Chakundri kebab

Share Button

image(28)

Preparation Time : 3 hours

Cooking Time : 20 minutes

Serving : 4-5 members

Description

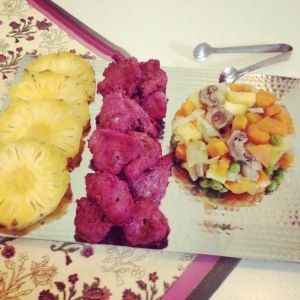
The first book that hubby dear brought for me was the great Indian cook book by chefs Vincent Joseph and Mohamed Ahmed qureshi . A treasure trove to North Indian dishes but seldom did I refer to this book as hubby dear being a true blue South Indian just didn’t appreciate any other cuisine . my experiments in the kitchen with food and kids being in boarding school  , hubby dear had no option other than being my laboratory rat for trial and error . Slowly he did start liking other cuisines and I some how pulled out the true blue South Indian in him .( Uff , what a relief it is ) once in a while , he dose mention asking me to take care of the rat ( himself ) with care . Oops coming back to the dish . This kebab recipe is from the book the great Indian cook book . I never knew that raw ground veggies were used for marination purpose until I came across this recipe . My trial was an instant hit from taste , aroma to the inviting natural colour because of the ground beetroot used . Though this book has been with me for ages ( nearly 22 years now ) never have I gone through the write up about the chefs and this time when I did noticed that this book contains recipes of dishes served at the Baluchi Indian restaurant at the holiday inn crown plaza New Delhi . This information did widen my eyes as I was awe struck with the reality that I was able to pull off a high class restaurant dish at my home kitchen .

Ingredients

Ingredients
Quantity
Chicken boneless pieces 1/2 kg
Beetroot ground 3/4 cup
Cumin seeds1 teaspoon
Butter to bast4 teaspoon
Cream 5 1/3 tablespoon
Garam masala powder1 teaspoon
Garlic paste1 teaspoon
Garlic paste 1 teaspoon
Lemon juice 2 tablespoon
Salt to taste
Curd3/4 cup

Method

  1. Mix lemon juice , beetroot pulp and salt . Rub over chicken pieces and set aside in the fridge for one hour .Whisk curd and add remaining ingredients and mix well well .
  2. Marinate chicken pieces in this mixture and keep in a refrigerator for 2-3 hours .Preheat oven to 175 degree Celsius .
    Skewer the chicken pieces leaving a gap of 2 cm between each chicken piece . Keep a tray underneath to collect the drippings .
  3. Roast in hot tandoor or oven or charcoal grill for about 10 -15 minutes .Paste with melted butter every two minutes once to get soft , melt in the mouth kebabs .
  4. Serve hot with pineapple slices garnished with chilli powder and salt . Vegetable Salad or boiled vegetables ( I served with boiled vegetables ) .

Mushroom biriyani

Share Button

image(27)

Preparation Time : 20 minutes

Cooking Time : 25 minutes

Serving : 2 members

Description

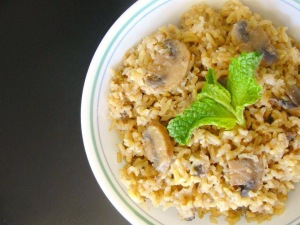
Mushroom biryani . At home biryani is always a MUTTON BIRYANI not even chicken as hubby dear just can’t accept another source of meat in biryani as a BIRYANI . So any experimenting with biryani is done on hubby’s absence at home . The first time I got to taste mushroom biryani was when my aunt Nazeem Akka made it on a holiday at grand moms place and it was devoured in minutes . I did take note of the recipe but never ever gave a try till date . This recipe is shimya janakiraman . that she had bought along with her for the recipe swap get together on the first anniversary celebration of saute , fry n bake . The recipe swap gave me an opportunity to  peek into home – style food cooked by families and expanded my culinary repertory .     This was the first dish on display in the vegetarian table and was wiped out clean with no left overs . This biryani can be very happily eaten on its own strait from the plate with no accomplishments as sides .  Shimya  is a great fan and a follower of sauté , fry n bake .  I got to see her for the first time that day and I embarrassed her and myself  by asking her which class she is studying in ???  Got an answer stating she has finished her MBA  !!!!  Every one present for the anniversary celebration were all praises about sauté , fry n bake and me . Shimya  was the only one who pointed out that with out uncles ( my hubby’s ) encouragement all this would have not been possible . Hubby dear was all flattered and keeps repeatedly bringing up what shimya  said .  What ever said and done , its a joy to see such young girls so very interested , enthusiastic and passionate about cooking  as food is a pivotal part of our culture .

Ingredients

Ingredients
Quantity
Basmati rice1 cup
Water 1 1/2 cup
Mushroom200 grams sliced
Onion3 medium sliced
Tomato 2 chopped
Lemon juice1/2 a lime
Mint leaves 1/2 cup
Curry leaves10
Coriander leaves1/2 cup chopped
Oil2 tablespoons
Ghee2 tablespoons
Saltto taste

Ingredients To grind

Ingredients
Quantity
Cinnamon + cloves + cardamon1 each
Pepper corns1/4 teaspoon
Cumin seeds1 teaspoon
Garlic4 flakes
Ginger 1/2 inch piece
Red dry chillies3
Cashew nuts7

Method

  1. Heat oil and ghee in a pressure cooker . Top with onions and sauté to translucent .
  2. Add tomatoes and sauté to soft . Top with mushrooms and sauté until the mushrooms lets out its moister and drys out with oil separating .
  3. Top with the ground paste and sauté for two minutes . Add washed rice and toss well .
  4. Pour water adding mint leaves , curry leaves , coriander leaves , lime juice and salt .
  5. Taste and adjust . Bring  to boil and pressure cook for 2 whistles .
  6. Wait for the pressure to subside and enjoy the delicious hot mushroom briyani , garnished with mint and coriander leaves .

Chicken kofta biriyani

Share Button

image(26)

Preparation Time : 35 minutes

Cooking Time : 40 minutes

Serving : 6 members

Description

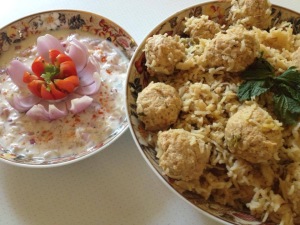
Chicken kofta biriyani . A recipe I came across in a cook book but can’t remember exactly where and when . At home hubby is very fussy about new styles or recipes of biriyani experimented . He sticks on to the old school cooking recipe of biriyani and pulao’s is a big no from his side . But my daughter ANISHA and my son – in – law Riyaz like a variety of biriyani’s ,pulao’s and not so regular dishes . Only in the recent have I started my kitchen experimenting with different types of biriyani’s and pulao’s . My first kofta biriyani i had was in tanjore . the koftas were made with mutton and were a bit firm . this recipe demands For chicken koftas And to be cooked in mutton stock . the chicken koftas are soft , Moist and burst with flavours . This kofta biriyani is absolutely rich , best had once in a year . ( or else you will be killed due to the fat content in the dish ) .the mild succulent flavours of the spices that is infused along with the Mutton  stock and is high lighted  with ghee and saffron . The rice is cooked in subtle clever flavoured combo of stock which elevate’s dum cooking . this is enough for us to abandon our doubts about taste . This dish lends a deep understanding of flavours as well as techniques and presentation . After all … One cannot think well , love well , sleep well , if one has not dined well … Isn’t it .

 Ingredients

Ingredients
Quantity
boneless chicken1/2 kg , ( blitz in a food processor with out adding water to a smooth paste )
green chilli chopped2 teaspoons
onions chopped3 big
ginger chopped1 inch piece
coriander chopped2 tablespoons
egg2
Bread crumbs2 tablespoons
Nutmeg powdera pinch
mace powdera pinch
mutton fat100 grams chopped
Chilli flakesto taste
Salt to taste
mutton stock1/2 litter ( made with pressure cooking mutton bones and fat with water and strained )
green cardamom8
black cardamom4
bay leaves5
cinnamon sticks3
cumin seeds1 teaspoon
deep fried brown onion1 cup
mint, chopped1 1/2 tablespoons
green chilliesas needed
slit / julienne10 or to taste
yogurt 2 cups
saffron1/2 teaspoon
fennel seeds (saunf)1 teaspoon
basmati rice, soaked400 grams
ghee1 cup
Fresh cream1 cup
milk 1/4 cup

Method

  1. Add boneless chicken ,  chopped green chilli, onion, ginger, coriander, egg, bread crumbs , nutmeg powder, chilli flakes , mace powder, mutton fat , salt and mix well.
  2. In another pan, take the mutton stock. Add whole spices, ( cinnamon , cloves , green and brown cardamom , cumin seeds , fennel seeds and  bay leaf ) half of brown onion, mint, slit/ julienne green chillies and salt. Simmer till all the flavours infuse together .
  3. Make small balls with the chicken mince and blanch in the stock for half an hour In medium heat .Strain the chicken balls and  Keep aside.
  4. In the remaining stock, add yogurt, half the saffron, and salt.
  5. Simmer it nicely and add the soaked basmati rice. Cook for 10 -12 minutes .
  6. Add ghee, cream, milk, mint, remaining brown onion , blanched chicken balls and remaining saffron.
  7. Cook rice in dum . Serve hot with the onion raitha .

Tandoori fish

Share Button

Tandoori fish

Preparation Time : 4 hours

Cooking Time :10 to 12 minutes

Serving : 6 members

Description

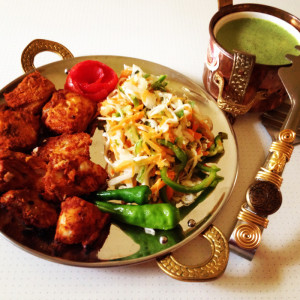
With the healthy bug on a high at home , the kitchen is on full swing experimenting healthy recipes to bring about smiles in the dining table as usual . A hard task to crack with majority of the trials resulting in the bin and by fluke at times it gets on to the dining table . To add upon this I had to cook some thing with fish that has to be healthy , tasty and looks appealing to the eyes as well . Broke my head and then suddenly the bulb moment happened in mind that grilling is healthy . What a relief it was but to be on the safer side just stuck to a known recipe . So my age old tandoori chicken recipe that is succulent , mildly spiced , grilled and the best known dish in the entire Indian cuisine came handy but with a twist of using fish instead of chicken . Cut down all the ingredients to 1/2 the amount that I usually use for chicken and added a little bit of onion seeds to take away the fishy smell . Went ahead and the out come was lip smacking good with a seasoning help of onion seeds to bring out the unique flavours of this dish which when served was empty in seconds . This can be served as a starter as part of a large festive meal or as part of a tandoori platter mixed with other grilled meats like in leading restaurants . Was so very happy about this dish and thrilled about the fact that these sort of sumptuous dishes can easily be made in a modern home kitchen that I shared the picture with my friends and cousins . My best buddy Gazeena sulu kunahmed liked the crockery used and called me immediately to ask from where I got it . I have promised her to get her a similar serving platter set on my next visit to her place . Surprised about how much can two souls share in common :-)) as even I get weak in the knees seeing such lovely crockery and traditional kitchen wear .

Ingredients

Ingredients
Quantity
Boneless fish1/2 kg ( sheer with out skin and bones )
Butter for basting2 tablespoons
Chaat masala powder1/2 teaspoon
Cream1 teaspoon
Garlic paste1/4 teaspoon
Ginger paste1/4 teaspoon
Lemon juice 1 teaspoon
Red chilli powder1 teaspoon or to taste
Saltto taste

Ingredients for First marination

Ingredients
Quantity
Cumin powder 1 teaspoon
Garam masala powder1/2 teaspoon
Ginger paste1/4 teaspoon
Garlic paste1/4 teaspoon
Lemon juice1 tablespoon
Oil1/ 4 teaspoon
Red chilli powder1/2 teaspoon or to taste
Saffrona pinch
Hung curd1/2 cup
Kalongi ( onion seeds or omam in Tamil )1/4 teaspoon

Method

  1. Mix salt , red chilli powder , ginger garlic paste and lemon juice . Rub this paste over the cleaned fish and set aside for 30 minutes .
  2. Whisk hung curd in a large bowl , add all the ingredients for marinade together .
  3. Add this marinade to the fish and mix well . Set aside to marinade for 3-4 hours in the refrigerator .
  4. Preheat oven to 175 degree Celsius .
  5. Skewer each piece of marinated fish leaving a gap of 1/4 inch between each piece . Keep a tray underneath to collect the excess drippings .
  6. Roast for approximately for 6 -8 minutes or until cooked in the pre heated oven . Baste with butter and roast for another 3 minutes .

To serve

  1. Remove the fish from the skewers , arrange on a platter . Sprinkle chat masala powder and cream ( I avoided the cream ) .
  2. Garnish with onion rings and lemon wedges . Compliment with raitha or a fresh salad .

Multigrain healthy mix iddiappam’s

Share Button

hm

Preparation Time : 20 minutes

Cooking Time : 10 minutes

Serving : 3 members

Description

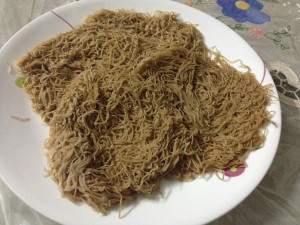
Last month there was a food fare at my home town in tirunelveli about cooking with multigrain’s in a healthy way . A small step taken by the local women to bring awareness of the health benefits of using multigrain’s instead of rice to avoid the intake of carbohydrates . I made sure to take my cook also along with me and we both patiently went through each and every stall in the food fare . We were given samples of the displayed food and the recipes were shared by request . There were three dishes that really kept me interested and I made sure to get all the recipes as well . This multigrain healthy powder iddiappam was one among the three dishes . I was surprised about the iddiappams being soft after so many hours as the food fare timing was from evening 3 to 7 . Tried the recipe and it was as good as the normal rice flour iddiappams expect for the change in colour with vitality , texture and spot on flavour when paired with a home made savoury curry . Hubby dear didn’t complain as well so these iddiappams are a sure addition to my regular menu at home that’s healthy goodness on the table for the pleasure of it .

Ingredients

Ingredients
Quantity
Multigrain health mix powder ( satthu maavu )1 cup
Rice flour1/4 cup
Saltto taste
Oil1 teaspoon
Wateras required

Method

  1. Roast the multigrain health mix powder in a hot kadai for five minutes . Remove , add rice flour and salt . Mix well .
  2. Boil water and pour over the flour mix and mix well . Once it starts to come together , cover with a lid and set aside for 15 minutes .
  3. Add one teaspoon of oil and knead to a soft dough . Grease the iddiappam press with oil and fill with the dough . Press in a circular motion on to a greased idli plate dent or greased iddiapam plate to get multigrain healthy mix iddiappams .
  4. Heat water in an idli steamer or pressure cooker . Steam for ten minutes or until the iddiapam’s are cooked .
  5. Serve hot with any gravy of your choice or coconut milk with sugar and sliced bananas .

Note

  1. When using pressure cooker to steam , do not use the weight . Steam for ten minutes with out the weight.

Malabar mutton biriyani

Share Button

image (29)

Preparation Time : 40 minutes

Cooking Time : 40 to 45 minutes

Serving : 8 to 10 members

Description

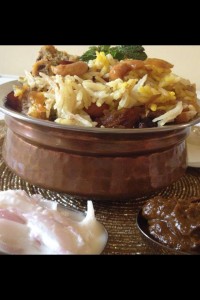
Malabar biriyani . This recipe is from one of my moms cook book which was given to her by her friends daughter henna from Calicut . That cook book is a treasure trove with home recipes from all the districts and communities of Kerala . Been wanting to flick it but mom is so very organised that she sure will get to know if its missing . So finally took note of all the recipes from that book . I really don’t know which district in Kerala follows this recipe but its aromatic , lightly flavoured , visually appealing , magical with a very balanced straight forward recipe that elevates dum cooking . I remember my friend sulu mentioning ( while we were in school ) about a wedding that she had attended in Palghat and the biriyani was horrible . I didn’t get her point then as I had never ever tasted malabar biriyani before . In Palghat we grind cinnamon , cardamom and cloves to a paste and add it to the biriyani which gives a dark brown colour and a pungent over dose taste of the spices . Only after my co – sister who hails from nagarkovil came into our family , I got to taste a lot of malabar biriyani . As in her place they follow the malabar biriyani style of cooking but another version with slight changes from this biriyani recipe . I guess there are at least a million recipes of biriyani’s in India very own to every region and community and these classics can never ever go out of style . This has served as a reminder to me that the biriyani means different things in different parts of India .

Ingredients for mutton gravy

Ingredients
Quantity
Mutton or chicken 1 kg
Onion250 grams sliced
Green chillies100 grams or more to taste ground
Garlic50 grams ground
Ginger50 grams ground
Poppy seeds2 tablespoons ground
Mint1/4 bunch
Coriander leaves1 bunch chopped
Curd1 cup
Lime juice 1 lime
Ghee150 grams
Garam masala powder1/4 tablespoons
Salt to taste

Ingredients for Rice

Ingredients
Quantity
Basmati rice1 kg
Onion1 big sliced
Ghee100 grams
Cinnamon1 stick
Cloves 3
Cardamom3
Ginger paste1/4 teaspoon
Garlic paste1/4 teaspoon
Wateras needed
Saltto taste

Ingredients to Garnish

Ingredients
Quantity
Deep fried crisp golden coloured sliced onions250 grams
Fried raisins 20 grams
Fried cashew nuts20 grams
Oilto deep fry
Saffrona huge pinch
Rose water1 tablespoon
Garam masala powder1 1/2 tablespoon

Method to Garnish

  1. Heat oil and deep fry sliced onions to crisp and golden in colour , drain and set aside .
  2. Fry the raisins and cashew nuts in the same oil to golden in colour and set aside along with the fried onions to garnish . Soak the saffron in rosé water and set aside .

Method for mutton gravy

  1. Heat ghee and brown the onions adding ginger and garlic paste . Fry to crisp .
  2. Add green chilli paste and poppy seed paste and sauté for 3 minutes . top with mutton and salt , sauté till the colour of the mutton changes for about 5-8 minutes .
  3. Add 1 cup water and cook the till tender .Top with lime juice , chopped coriander leaves , garam masala powder and mint leaves and boil till it gets to a thick gravy . Taste and adjust seasoning . Set aside .

Method for rice

  1. Wash and soak the rice in water . Heat ghee in a pressure cooker , add cinnamon , cloves , cardamom , sliced onion .Fry to translucent .
  2. Top with ginger garlic paste and fry to crisp . Pour the water along with salt and bring to boil .
  3. Add washed rice and toss well and pressure cook for 1 whistle and simmer for 10 minutes . Switch of the flame and once the whistle settles down , set aside .

To proceed

Take a huge heavy bottomed vessel that is apt for dum cooking . Start layering with the

  1. First layer – cooked mutton gravy
  2. Second layer – cooked rice
  3. Third layer – sprinkle of garam masala powder , sprinkle of fried onions , sprinkle of fried cashew nuts and fried raisins and finally a sprinkle of saffron soaked in rose water .
  4. Pile up the huge vessel repeating the layers as mentioned above until all the mutton gravy , rice and garnish ingredients are over .
  5. Make sure that the final layer must be the garnishing layer . Close the lid of the huge vessel . Place it on top of a hot tawa in low flame for 15 minutes to cook and infuse the flavours by dum cooking .
  6. (Place a vessel with water filled in it on top of the lid of the malabar biriyani huge vessel , so that the flavours don’t escape out .This is what I do ) serve hot with onion Raitha , fried Kerala pappadam , malabar biriyani chutney , chicken roast and pineapple slices as side dishes .

Ingredients for Malabar biriyani chutney

Ingredients
Quantity
Coriander leaves, with part of stemA small handful
Mint leavesA small handful
Garlic4 cloves
Ginger1/4 inchsmall piece
JaggeryA small piece
Chilli powder1 teaspoon (dry roasted)
Tamarind paste1 tablespoon
Fried onions2 tablespoons
Dates6 deseeded
Saltto taste
  1. Grind all the ingredients to make a smooth paste. Chutney’s ready.

Malpua

Share Button

image (28)

Preparation Time : 30 minutes

Cooking Time : 30 -35 minutes

Serving : 8 members

Description

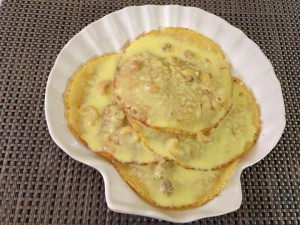
Malpuas are rich , soft deep fried pancakes which are soaked in saffron flavoured sugar syrup and eaten warm , topped with rabdi or almonds and pistachios . This recipe is an instant version to the authentic recipe . This sweet doesn’t take much skill or any special equipment to pull off . Sure this sweet will high lighten your Diwali table with a succession of celebration and a great meal. Much of the prep for the dessert can be done in advance , leaving you more time with your loved ones as festive time is together time . The pillowy malpuas soaked in the sugar syrup and topped with rabdi are gooey , chewy and delicious that are outstanding when served warm . Top with a scoop of vanilla ice cream which serves as a timeless combination . This dessert is packed in with quite a lot of calories , but all of us can do with an occasional treat , cant we ??? And get a taste of happiness.

Main Ingredients

Ingredients
Quantity
Flour / maida3 cups
Semolina1/4 cup
Milk2 litres
Sugar1/2 cup + 2 cups for sugar syrup
Ghee / oilto deep fry
Saffrona pinch soaked in 1/4 cup warm milk
Baking soda1 teaspoon
Cardamom powder2 teaspoons
Fennel seeds2 tablespoons
Crushed cashew nuts1/4 cup
Raisinssoaked in water 1/4 cup
Salta pinch
Yellow food colora few drops ( optional )

Method for sugar syrup

  1. In a heavy bottomed pan , add 2 cups of sugar and 1 1/4 cup of water . Bring to boil adding a pinch of cardamom powder .
  2. Boil for about 15 minutes in medium heat . Remove from heat and set aside .
  3. The syrup should be warm and not too hot when you put the fried malpuas in it .

Method for the malpua

  1. Boil milk with 1/2 cup sugar . Reduce it to 3/4 the amount . Cool down to room temperature .
  2. Take semolina in a big vessel . Pour the milk and let it soak for 15 minutes.
  3. Now add the flour , baking powder , cardamom powder , yellow food colour and salt . Mix well with a whisk or an electric egg beater making sure no lumps are in the batter .
  4. Add fennel seeds , saffron soaked in warm milk , cashew nuts and raisins . Mix well with your hands .
  5. The batter consistency must be like of dosa batter consistency . Set aside for three hours . ( You can start of with making the rabdi now , step -3 ) Heat ghee in a small non – stick pan with edges .
  6. Once hot , lower the flame for a minute . Pour a ladle full of batter . It will take a round shape . Let one side cook for a minute , flip over to cook on the other side .
  7. When done , remove and put it into the warm sugar syrup . Leave for 30 seconds , remove and set aside . Do the same with the remaining batter . Serve warm with rabdi .

Ingredients for Rabdi

Ingredients
Quantity
Milk4 cups
Sugar2 tablespoons
Rose water1 teaspoon
Green cardamom powder1 teaspoon
Almondsa few
Pistachiosa few
Yellow food colorfew drops ( optional )
Cream1/4 cup
Saffrona pinch

Method for Rabdi

  1. Blanch the almonds and pistachios, peel and slice them thinly. Bring the milk to the boil then cook slowly on low heat for at least half an hour.
  2. Stir frequently and let the cream thicken at the edge of the pan. Add all the other ingredients and mix well . Remove from heat and cool down.

Note

  1. Make sure not to soak the malpuas in sugar syrup for too long.

Green peas pulao

Share Button

image (27)

Preparation time : 15 minutes

Cooking time : 25 to 30 minutes

Serving : 3 members

Description

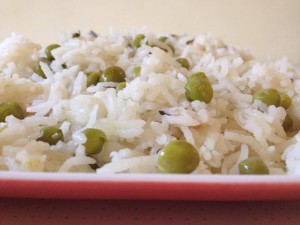
Peas pulao . A pulao that is so easy to make and is highly tasty with delicate flavours . Made with few simple ingredients transforming into a well executed main course . Love the greens peas popping up between the white long grained rice . It’s a treat to the eyes . Green peas is one among my favourite vegetables along with potatoes and cabbage . But my hubby hates potatoes and green peas . So very rarely do I get to eat my favourite veggies . To add to this he hates pulaos being a true blue South Indian , so very loyal to his boiled white rice . Me being experimental when it comes to food , find it difficult managing with fussy hubby most of the time . Ending up cooking two ways incorporating my hubbys interpretation to satisfy his and kids taste buds . This has served to be a bonus to me as it has helped me to learn cooking both ways with a deep understanding of flavours as well as techniques and presentation , time management in cooking too many dishes in a short span of time and multi tasking in the kitchen . So no complaints as this has raised the food bar at home .

Ingredients

Ingredients
Quantity
Green Peas1 1/2 cups ,( boiled )
Basmati Rice1 1/2 cup , ( washed and soaked in water for 1/2 an hour )
Onion (sliced)1
Green chillies2 slit
Mint leaves1 teaspoon
Cumin seeds1 teaspoon
Cloves2
Garlic flakes (crushed)3
piece of Ginger1 inch piece crushed
Cardamoms3
Cinnamon1 inch piece
Ghee 2 tablespoons
Coriander Leaves (chopped)2 teaspoons
Cashew nuts (chopped1 tablespoon,
Salt to taste

Method

  1. Take a non-stick pan with ghee and heat it.
  2. Add ginger-garlic crushed and stir.When it turns brownish, add onions, cloves, cardamoms, cinnamon and cumin seeds.Fry the mixture till the onions turn translucent.Mix well adding cashew nuts and washed soaked rice . Cook on medium flame till the rice get to a pink colour for about 3 minutes . Add 3 cups of hot water and salt , mix well.top with green peas , green chillies , mint and coriander leaves . Cook till most of the liquid  is absorbed.Lower the flame as much as possible, cover the pan and cook till the rice is almost done.Cook for some more time till the rice is done.
  3. Serve hot with vegetarian or non vegetarian gravy of your choice .


Kashayam for digestion

Share Button

image (26)

Preparation time : 10 minutes

Cooking time : 20 to 25 minutes

Serving : 2 members

Description

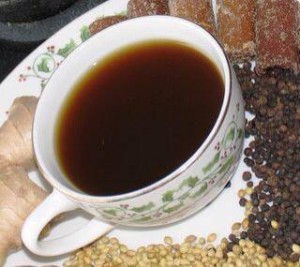
Kashayam is a term used to represent a drink made with spices that have medicinal qualities in them to heal cold , digestion , body pain so on and so forth in south India . Especially in Tamil Nadu and Kerala . They are excellent digestive aids and often the best expectorants. The word kashayam takes me back to my childhood days when my grandmother sabiya perima ( moms mom ) insisted we drank those home-brewed kashayam at least once a week , mainly being the jeeraga kashayam which was the one and only kashayam we were given mostly . At hubby’s place they have so many different kashayams for every possible thing . You name it and they have a kashayam for it . These home remedies are a treasure trove that I have learnt from my mother – in – law and she learnt from hers . I confidently hope to pass it on to my daughter , daughter – in – law and each one of you . Sundays were always a body cleansing day , from cutting your nails to oiling your hair and having a bath with a final kashayam drank after bath. All those years later, I religiously followed the same thing for my two children. Frankly, they hate it, but drink it only because they trust me enough not to poison them :-)) . Well now for you peeps , sure after lining your tummy’s with all the possible sweets for Diwali . This kashayam will sure cleanse and relive your system . Give it a try and watch what wonders this does to you !!!

Ingredients

Ingredients
Quantity
Cumin Seeds3 tablespoons
Black Pepper Corns2 tablespoons
Dry Ginger powder2 tablespoons
Liquorice / costus root1 inch piece ( sarana veru in Tamil , mulethi in Hindi , adimathuram in Malayalam )
Garlic4 flakes crushed
Water2 glasses
Palm jaggery1 cup

Method

  1. Dry roast cumin seeds and peppercorns separately for a 1-1½ minutes on a low flame till the heady aroma of roasted spices fills your home! Make sure that you don’t over do it and burn the spices.
  2. Spread the roasted spices on a wide plate and let them cool down completely to room temperature.
  3. Take water in a sauce pan , add roasted cumin seeds , pepper corns , dry ginger powder , liquorice crushed , garlic and palm jaggery and bring it to boil.
  4. Once the water comes to boil, mix well . Lower the flame and let the water reduce to one glass of liquid .
  5. Takes about 15 to 20 minutes . Switch off the flame and let it rest for 1 minute for the flavours to infuse.
  6. Strain the Kashaya through fine sieve and drink it while hot. Enjoy this cup of goodness at any time of the day .

Note

  1. Make sure to dry roast cumin seeds and black pepper corns in low flame separately until a good aroma arises . Be sure not to burn the spices as it results in a bitter kashayam instead .
  2. This kashayam works best with palm jaggery / karupatti .
  3. The kashayam is authentically done in a man chatti / clay pot .
  4. Do not drink water immediately after you have had your kashayam as it tends to up set your tummy .

Chemeen adukku pathiri

Share Button

image (18)

Preparation Time : 30 minutes

Cooking Time : 40 minutes

Serving : 10 members

Description

Chemeen adukku patheri . An authentic malabar meal in itself  dish that I tasted at my hubby’s niece alfinas home  in Cochin . Just loved it and did ask her for the recipe . She explained about how it is done but the exact measurement for the rice batter was not told . So just had to think and drool about the dish in my mind for nearly 3 long years . As I mentioned before  I am a real die – hard fan and a religious follower of a food blog ” notes from a Mallu kitchen ” run by Reshma Nooh of Cochin . I was super excited to see her post the recipe of this unpredictable dish with artistic combinations of staple ingredients put together using a new technique . with no delay tried it then and there . Guess what ??? It tasted so yum .. Actually much better than what I had at alfinas place . The rice batter layer was so soft and moist with the prawn roast in between was to die for .thank you Reshma Nooh for sharing this easy to follow yummy recipe .  I made this during Iftar time . It looked plain on the outside but take a bite and the prawn stuffing oozes out a delicious surprise  . A perfect make – ahead dish when entertaining  at home to dazzle your guests .

Ingredients for filling

Ingredients
Quantity

Button onions chopped
1 cup
Ginger garlic paste1 teaspoon
Green chillies(chopped finely)8
Tomato (chopped fine)1/2
Turmeric powder 1/2 teaspoon
Chilli powder1 to 2 teaspoon
Fennel seeds powdered1 teaspoon
Soya sauce 1/4 teaspoon (secret ingredient!!)
Salt taste
Curry leaves(chopped)a stalk
Coconut oilas needed to saute

Method for filling

  1. Cook 250 gm shelled and deveined prawns in 1 cup water, a pinch of turmeric and a pinch of salt. Drain.
  2. Saute the above items without it turning dry . Add prawns last. Stirfy till u get a nice thick roast. Keep aside.
  3. Soak 1 cup raw rice ( pachari) in water for 1-2 hours.drain and use to make batter.

Ingredients to Grind together

Ingredients
Quantity
Raw rice (pacharisi)1 cup (Soaked in water for one hour , drain and use to grind )
Coconut milk3 cups
Egg 1
Salt1 teaspoon
Cooked rice 1 tablespoon (optional,makes pathiri softer)
Soda bicarb 1/2 teaspoon
Method to grind
  1. Grind all the ingredients together except for soda bicarbonate for approximately 15 minutes . Strain and add soda bicarbonate and set aside.

How to proceed

  1. Take a steamer, fill with water and keep to boil. Take a deep dish which will fit inside the steamer, accomodate the pathiri and filling too..
  2. Grease well with some ghee/ coconut oil, pour 1/2 of the batter, and steam.After 5 minutes , turn heat to low, and open steamer. Do not take the dish out of the steamer.
  3. Put the prawn filling and spread out as a thin layer. Pour one more tbsp of the batter on top of this and steam on high again.
  4. Open again after 5 minutes of steaming. Pour the remaining batter onto this, Steam again till it is well set (10 mins).
  5. Remove from steamer and leave to cool. Invert this dish onto a plate,Cut into pieces and serve while warm.

Tips

  1. This pathiri can also be made without prawn filling. Just pour 1tsp ghee in between layers each tie, steam and invert onto a plate.
  2. Cut into diamond shapes, serve hot with mutton or beef or chicken gravy. This is what I make for dinner on some days. Adukkupathiri + beef curry.
  3. If you have any chicken curry left over,take the chicken pieces, de bone them, put them back in the curry and stirfry till all the water has dried up, and voila! you get a lovely chicken filling for making chicken adukkupathiri.