Daily Archives: October 6, 2014


Chicken stuffed pleated doughnuts

Share Button

image (54)

image (55)

image (56)

image (57)

image (58)

image (59)

image (60)

image (61)

image (7)

Preparation Time : 45 minutes

Cooking Time : 20 minutes

Serving : 6 – 8 members

Description

Chicken stuffed pleated doughnuts . A picture tutorial that I came across in the world wide net that caught my attention immediately as this snack looked so innovative and new with an inspiring idea . Saved the image and googled the water marked name in the saved picture for the recipe . Got the recipe , saved it and gave a try one fine day following the recipe religiously . I had too many obstacles to cross with the original recipe on my first try so my second try tweaked the recipe of the dough , stuffing and method a little  to my comfort zone but with stealing the idea of this innovative snack  as before in an elegant way . The previous had a bread texture as the recipe demanded for yeast in the dough but my version has no yeast so it tastes more like a pie crust pastry . This tweak gave a whole new dimension to the snack that was worth the try and totally justified the effort put in . I enjoy playing around with recipes and ingredients . Served it , surprisingly was an instant hit   and a family favourite now . While on the table , there was an argument going on about naming this dish from chicken vada to pleated vada to chicken stuffed doughnuts . I just jumbled up all the names suggested together to get this name finally .  This did remind me about choosing names for my children when they were new born :-)) . I was just particular about one thing was my kids should have their names starting with the alphabet “A” . No particular reason but it just happened that way . A few months back I did receive a picture from my friend Sindhu Krishna that was about an interview in a Malayalam magazine on her elder daughter  aahana  ( who is a Malayalam movie star ) with some thing written in Malayalam . Me not knowing what was written was dead curious and later found out that. It was about our trio friends ( Sindhu , sulu and myself ) making a promise as kids in boarding school that we name each of our eldest child with the alphabet “A” . Sindhus eldest daughter is aahana , sulus eldest son is abid and my eldest one Anisha  :-)) . Well I don’t remember this incident or promise but it did happen that way :-)) . The liberty of naming is a joy for sure .

Ingredients for the cover

Ingredients
Quantity
Flour / maida 250 grams
Saltto taste
Oil 1/2 cup
Waterenough to get a smooth dough

Method

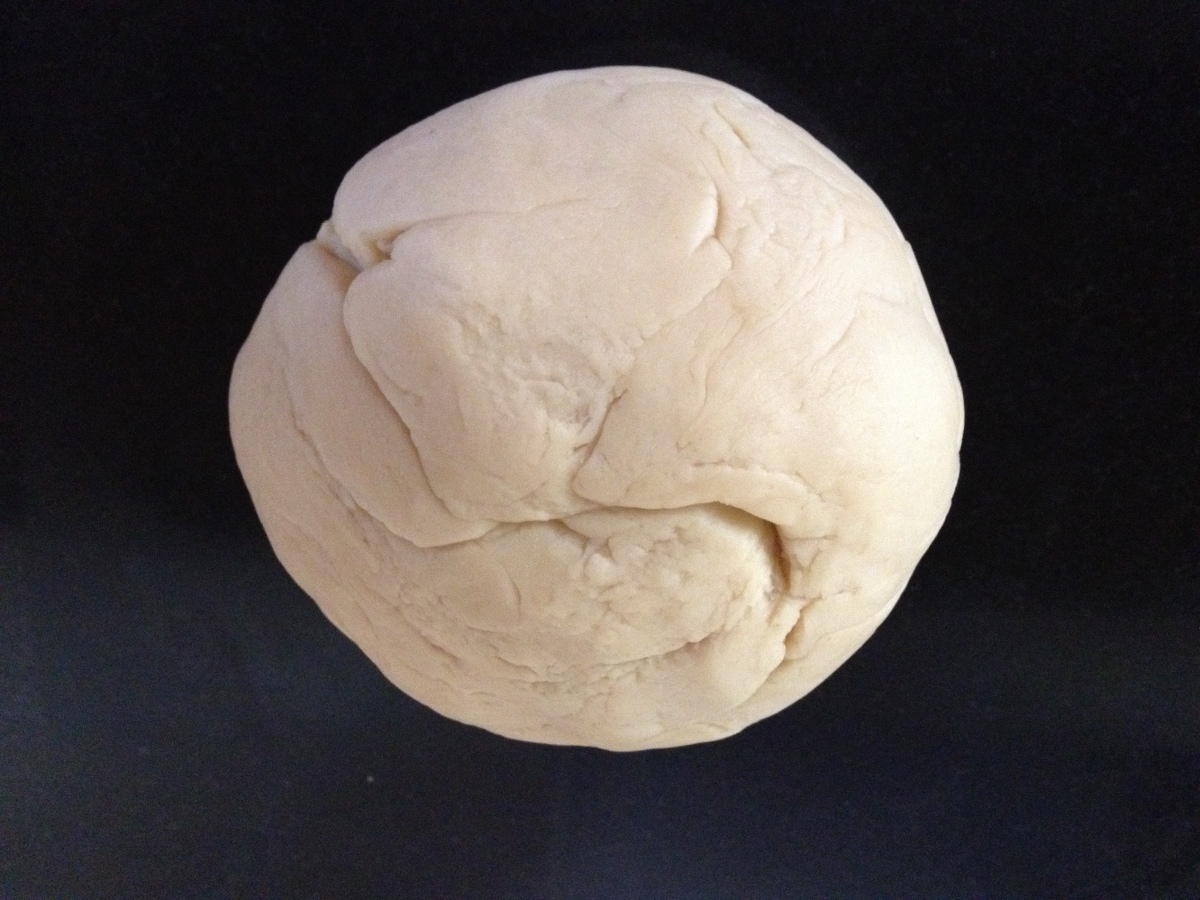
  1. Combine flour and salt together . Add oil and mix well .
  2. Sprinkle water little by little and knead to get a smooth dough and Set aside.

Ingredients for chicken filling

Ingredients
Quantity
Boneless chicken 1/4 kg
Ginger garlic paste 1/4 teaspoon each
Saltto taste
Turmeric powder1/4 teaspoon
Onions5 big chopped
Green chillies 4 chopped
Mixed vegetables - carrots , beans , cabbage , green peas chopped and boiled in water with salt 1 cup
Mint leaves few
Coriander leaves one hand chopped
Pepper powder to taste
Oil 2 tablespoons

Method for chicken filling

  1. Pressure cook cleaned chicken , salt , turmeric powder , ginger garlic paste and little water for one whistle .
  2. Bring to boil and Reduce the water . Cool completely and shred the chicken to treads ( I run it in the food processor for a second ) .
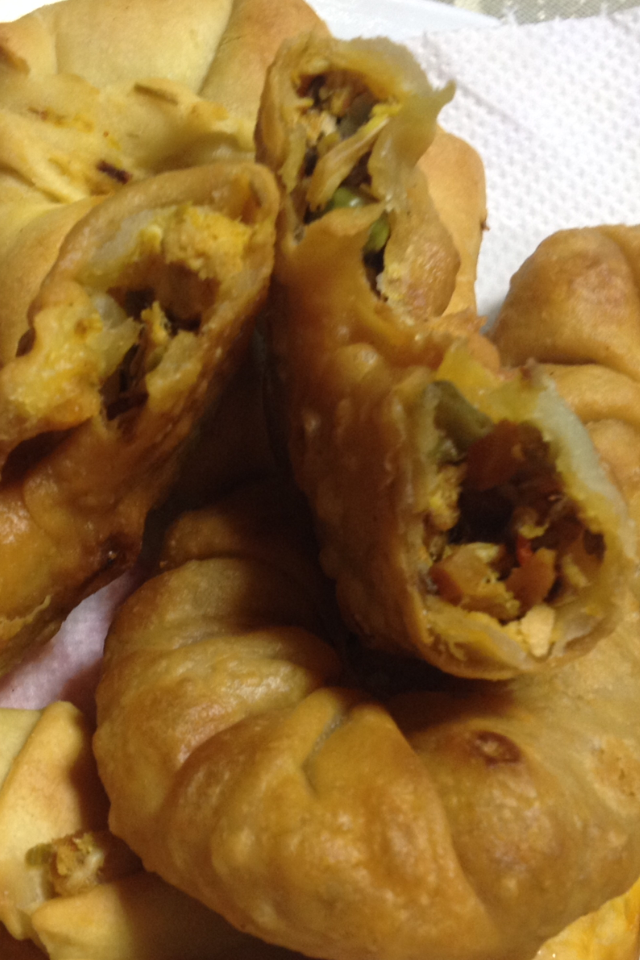
    Heat oil in a non stick board pan . Add onions and fry to translucent .
  3. Add green chilies , boiled chopped mixed vegetables , shredded chicken , mint leaves , coriander leaves , salt and pepper to taste .
    Mix well and lower the flame and keep stirring for 3 minutes letting all the flavours infuse together .
  4. Remove from heat , cool and set aside .

How to proceed

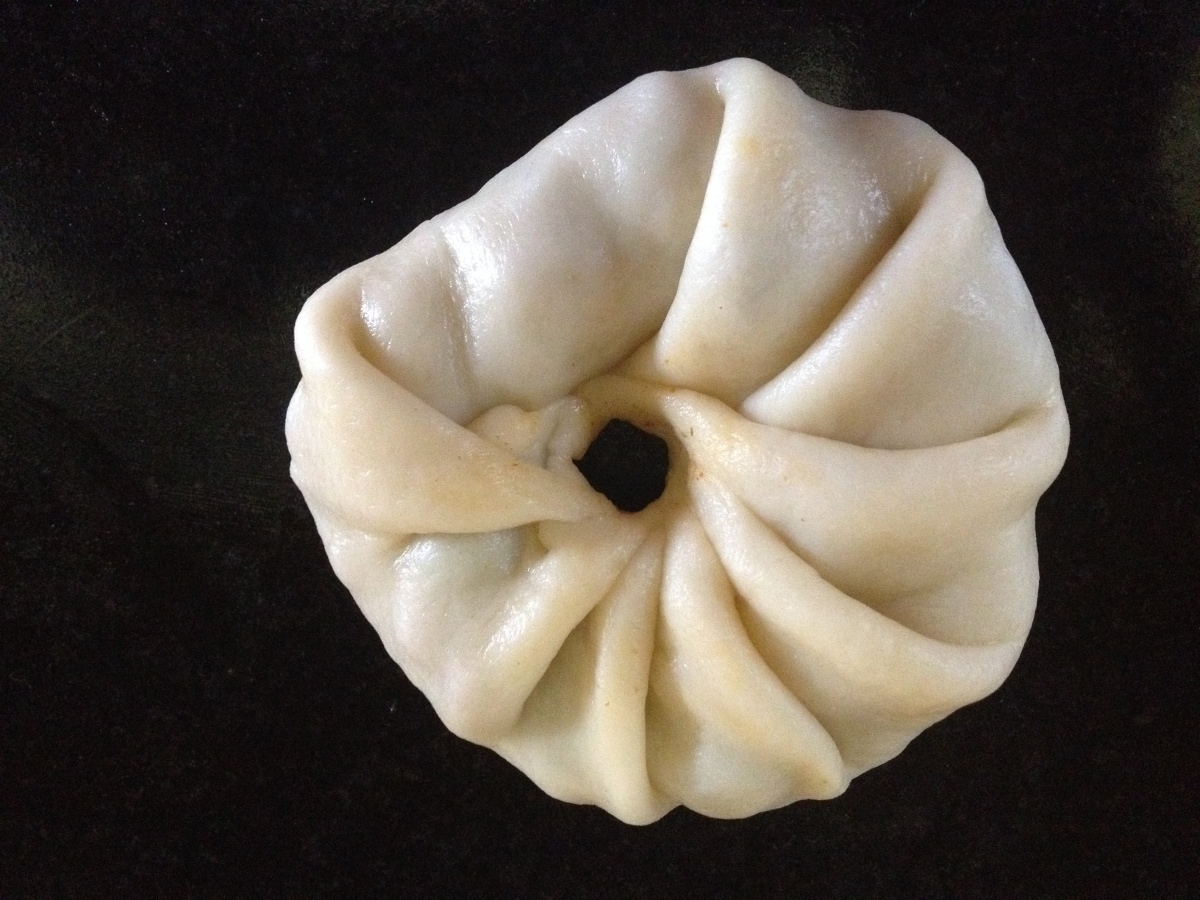
  1. Roll lemon sized balls out of the dough. Roll each dough ball into slightly thick discs .
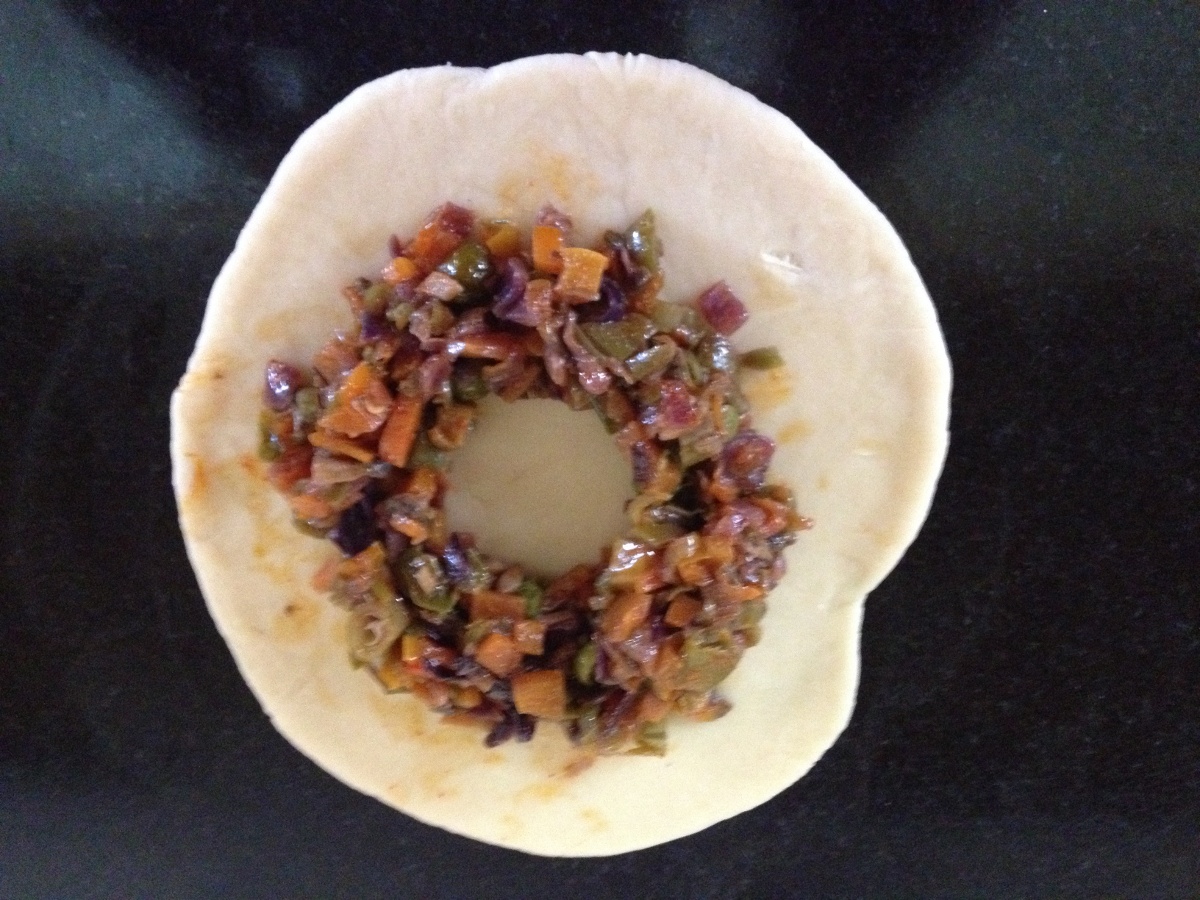
  2. place the cooled chicken stuffing about one tablespoon full over each rolled disc to a ring pattern in the middle leaving a small circle empty in the centre of each disc . ( refer to picture tutorial ) .
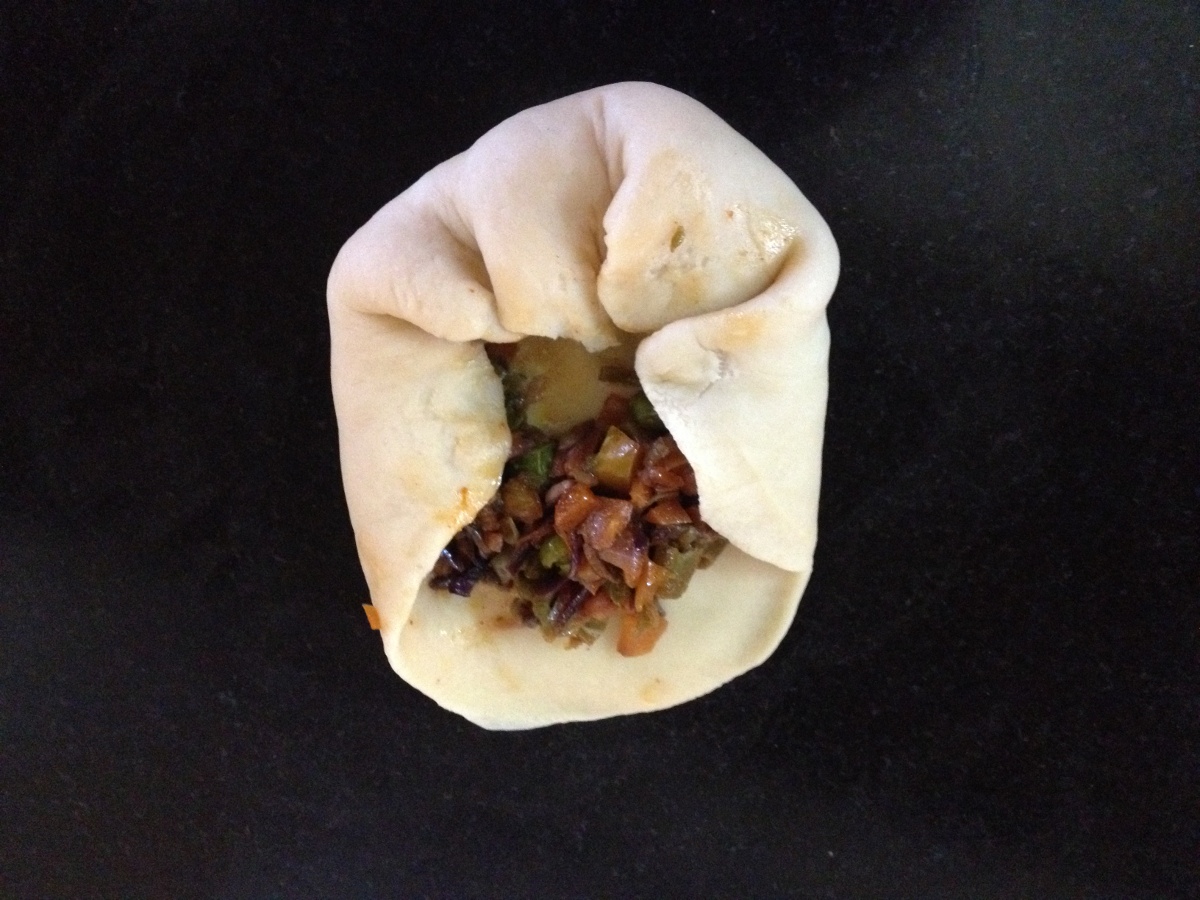
  3. Take the edge part of the disc and bring it towards the empty centre and press firmly making sure it’s stuck to the centre.
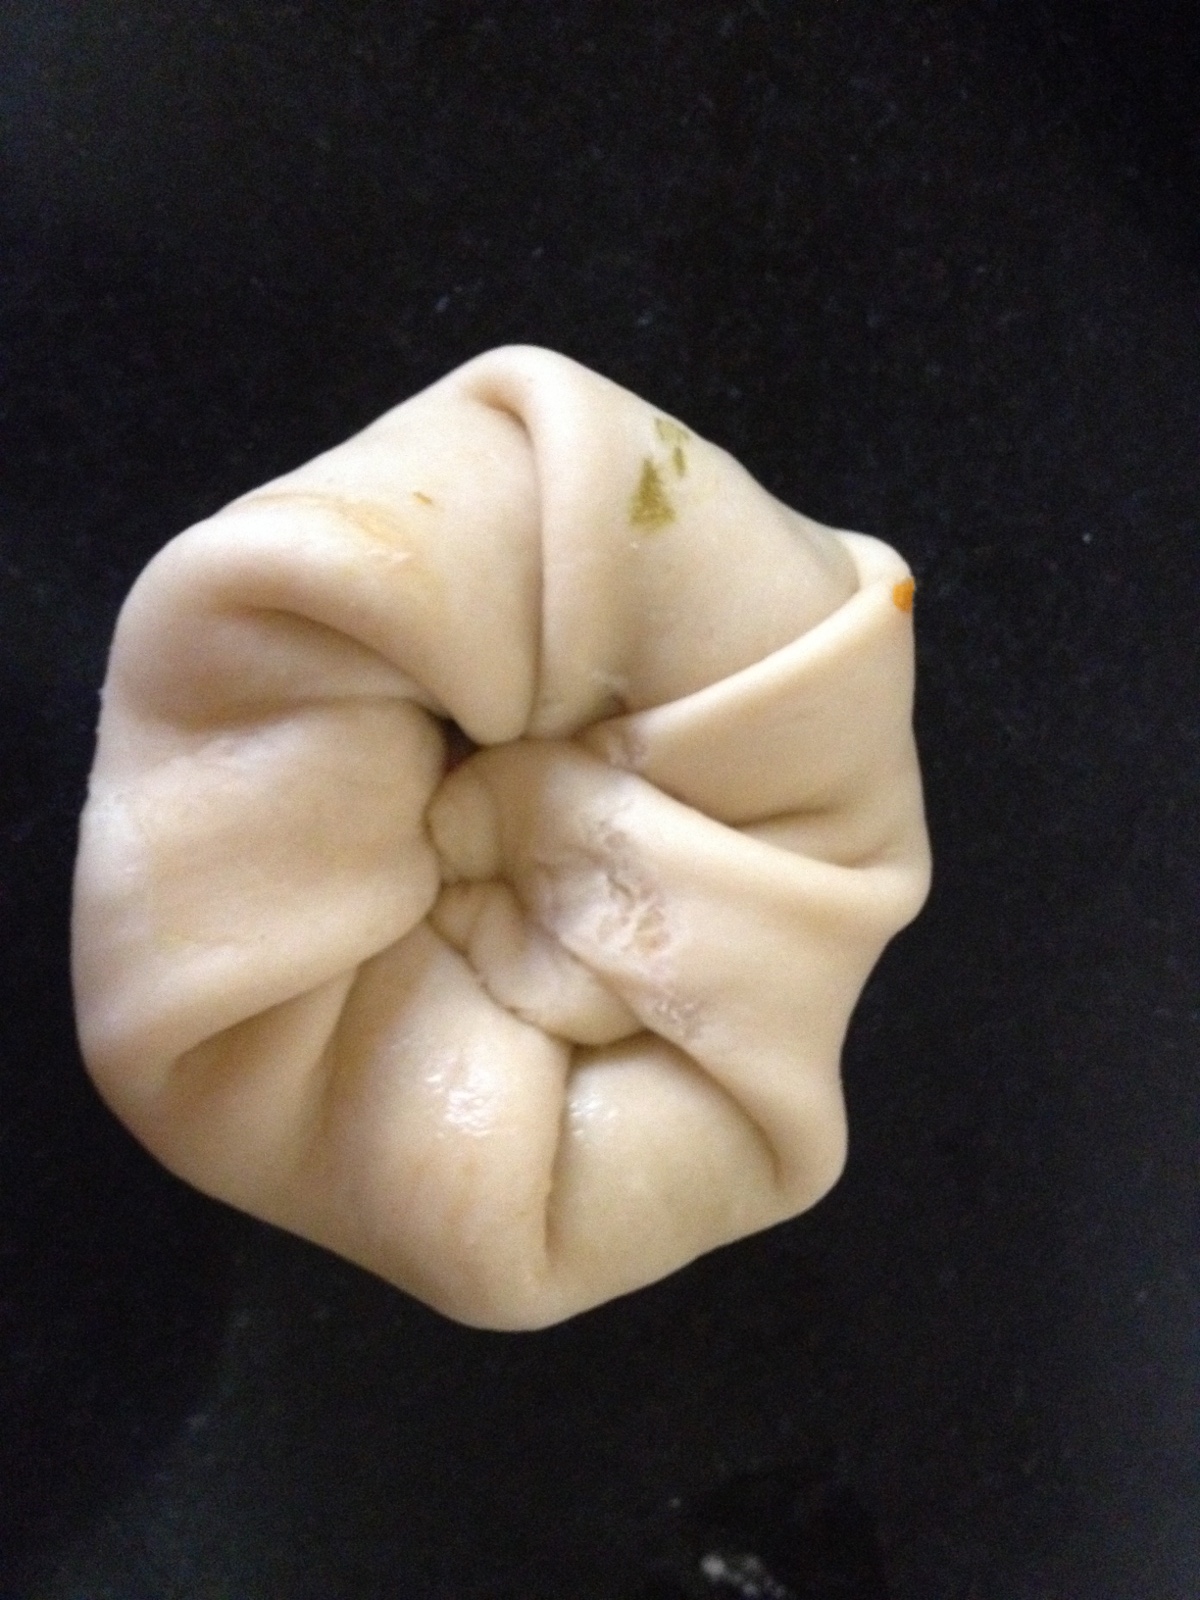
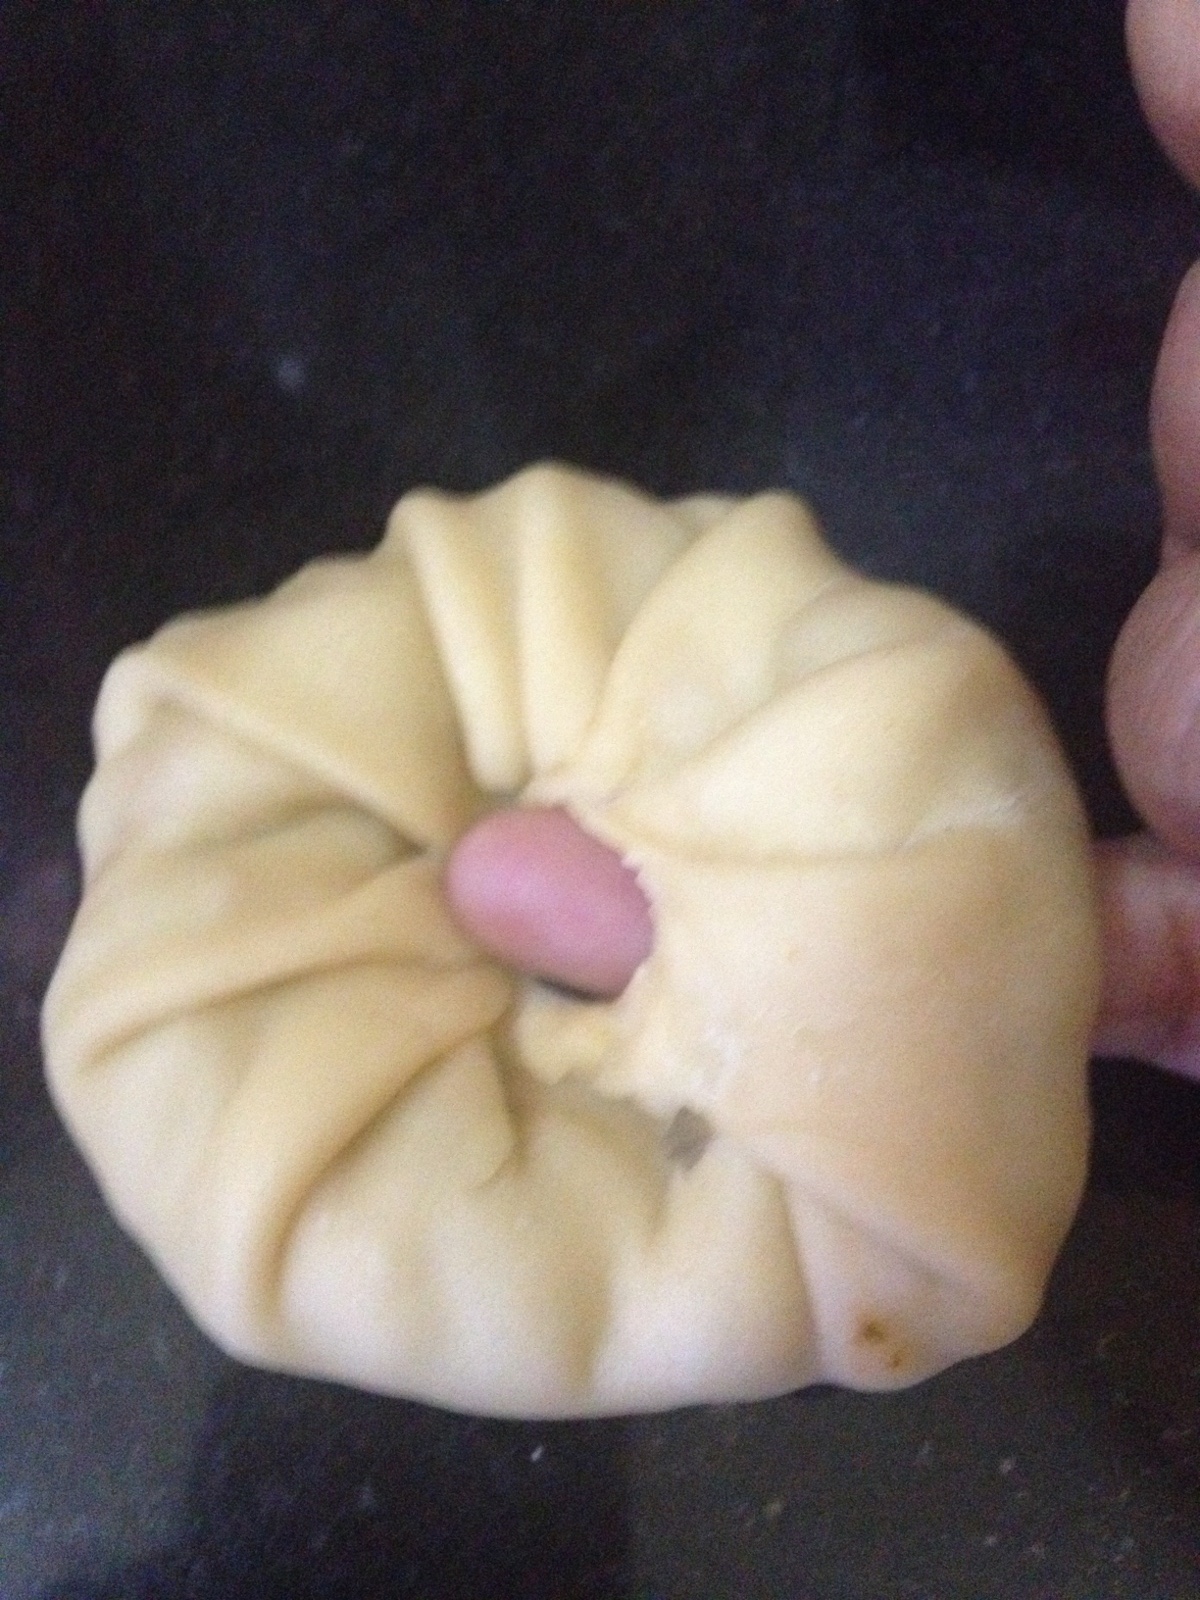
  4. Do the same through out the edge of the disc to get a pleated effect doughnut . Insert your last tiny finger from underneath of the empty centre to make a round hole to get a doughnut shape .
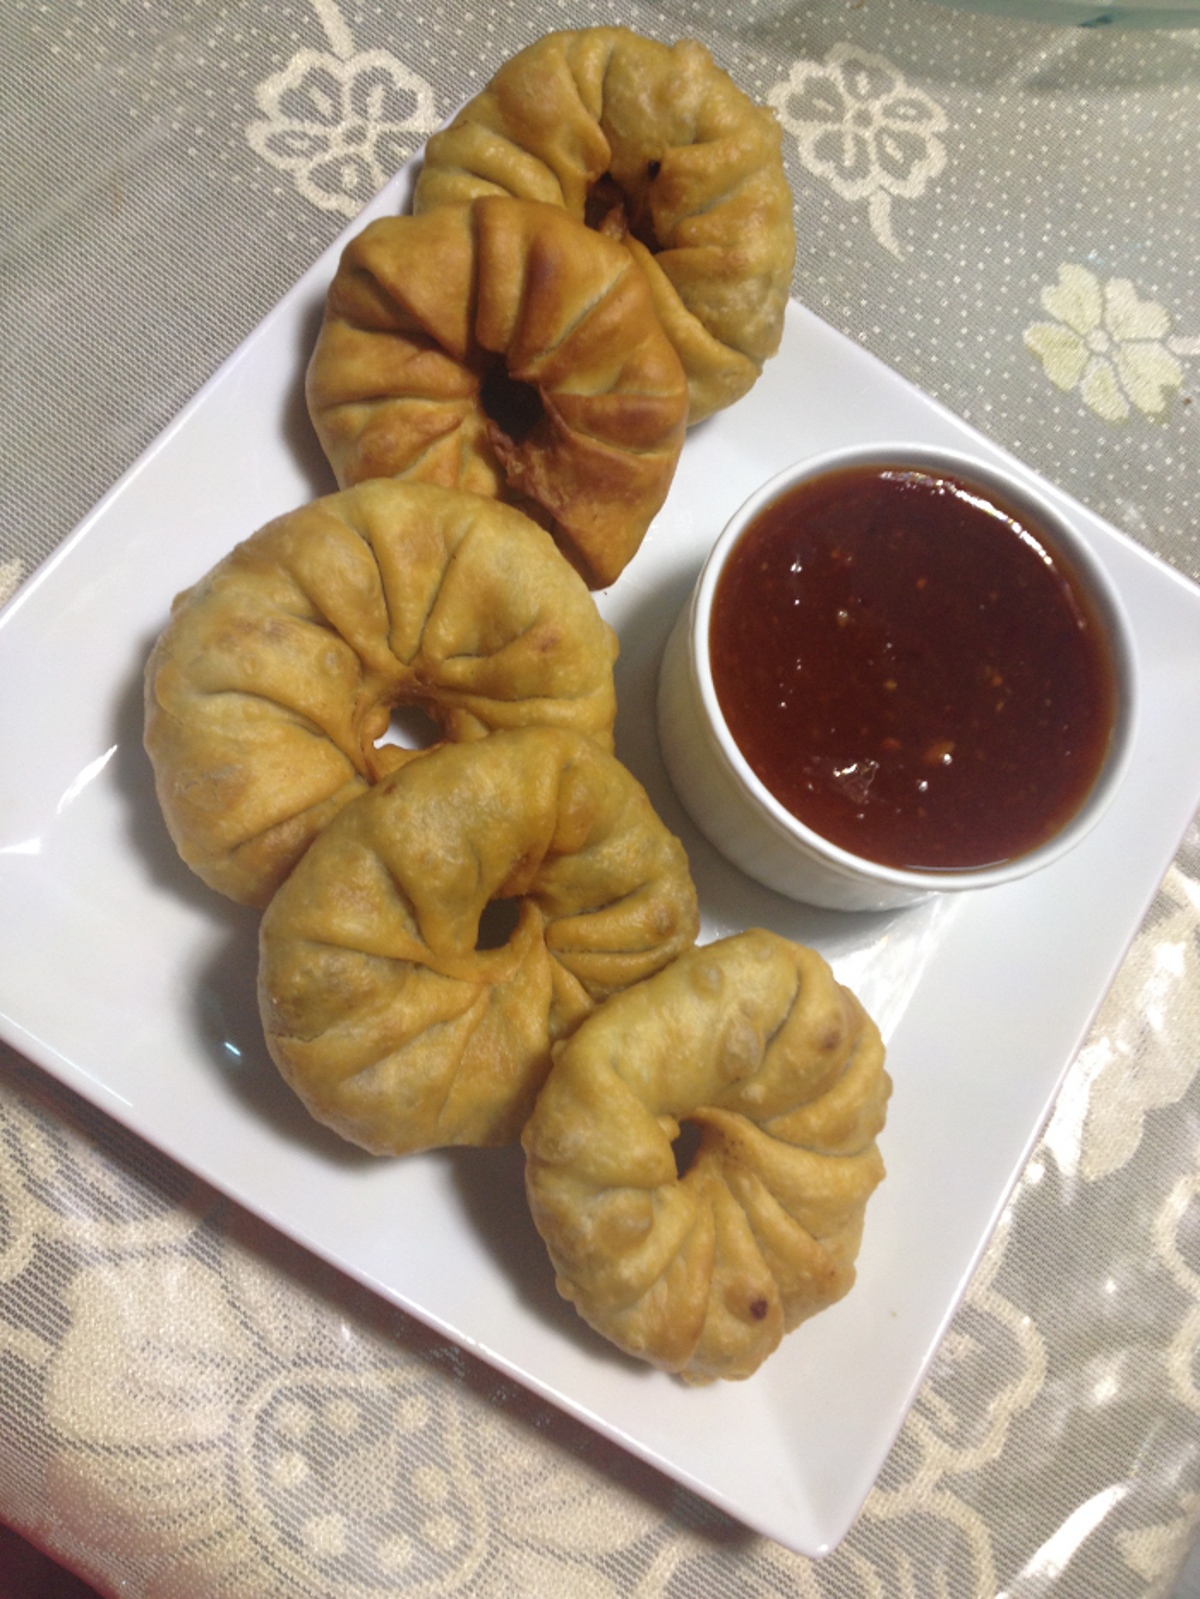
  5. Do the same with all the round discs and chicken stuffing . Now carefully deep fry the chicken pleated droughts in batches in medium hot oil to a golden brown colour . Drain and serve hot with tomato ketchup .

Irani samosa

Share Button

image (51)

Preparation Time : 20 minutes

Cooking Time : 8 minutes

Serving : 5 – 6 members

Description

Irani samosa . A dish which lalitha Varatharajan had got along with her self for the recipe swap get together for the first anniversary of sauté , fry n bake celebration . A vegetarian delight , so simple to make and high in taste . I had to allow plenty of stomach room for experimentation that day and just had a bite of each dish to taste but could not stop with a bite on these Irani samosas … Ended up gobbling one . At times savoury treats are a refreshing alternative to sweet ones.the samosas got the sweetness of the poha , the crunchiness of the onions and a subtle citrus tang from the lime juice . This dish won the second prize in the recipe swap event .more than it being remembered for its taste … And second prize .. it sure will be remembered for the enthusiasm and high sprits  lalitha had that day . We ladies just freaked out and were our true own selves that day . Well .. Lalitha and myself are gym mates , that’s where I got to meet her first . Now we are very close friends for another main reason being , her elder two sons are studying in good shepherd international school , Ooty were I did my schooling :-)) . She did get me a glass pie dish as a surprise gift for crossing the 2000 likes in  sauté , fry n bake and our bonding is getting stronger and stronger day by day :-))

 Ingredients Name

Ingredients
Quantity
spring roll sheetsas need
onlions chopped1 cup
pressed rice or poha1 cup
chat masala1/2 ( half teaspoon)
chilli powder1/2 teaspoon
coriander leaves1 banch chopped
cumin powder1/2 teaspoon
lemon juice1 teaspoon
green chilly3 number chopped
oilto deep fry
saltas need

Method

  1. Take a bowl add chopped onions and the same quantity of poha along with chilli powder,cumin powder,chat masala,coriander leaves,green chilly and mix well.
  2. In a small bowl add 1tsp of Maida mix with some water and make a paste, keep a side.
  3. Now take one springroll sheet and make a cone,put onion and poha mixture inside this cone,
  4. Apply littlebit Maida mixture and paste it.In a pan add oil to deep fryFirst half fry the samosas,and remove , then after 5 minutes fry again till golden colour.
  5. Fry it in medium flame not hot oil. Do not fry in hot oil.

Note

  1. We add same amount of poha equal to onions .This helps to absorb the moister in the chopped onions .This is very famous in HYDERABAD.


Masala potatoes stuffed mirchi wada bajji

Share Button

image (50)

Preparation Time : 30 minutes

Cooking Time : 10 minutes

Serving : 5- 6 members

Description

Masala potatoes stuffed mirchi wada bajji . One afternoon , woke up from a deep sleep hearing a loud thunder and was surprised to see it was raining .seeing the rains didn’t have the heart to go to bed again . After a long , cruel summer you just cant wait to welcome the monsoons . Admiring the first showers  of that season , my tongue craved for some milagai / mirchhi bajji ,potato bonda and ulunthu wada which are a match made in monsoon heaven .  But my laziness was not letting me get into the kitchen . Finally just pushed the lazy bugger out of me and walked straight into the kitchen . Started of prepping  for all the mentioned snakes but my pantry didn’t have chick pea flour , could not sent some one to buy it because it was raining heavily . Having no other option ( as i wanted to eat these feel good favourites with the magic of rain) I just made up my mind to stuff the mirchi’s with the potato filling and dip them with the ulunthu wada batter . I had my doubts if the batter would stick to the glossy mirchi skin so I steamed the potato stuffed mirchi’s for 5 minutes and then dipped in the ulunthu wada batter and deep fried them .As these treats were getting deep fried in hot oil , the rains were slowing down and I was like uff  , my laziness took away so much time … Or else I should have enjoyed these fried treats seeing the rains .   The mirchi wada bajji were perfect in shape , colour , crispness and taste . The beauty of these classics is that they never fail to please and tweaking the tired and true is exciting too .  Took it out to my foyer , sitting on the floor with these hot treats and a cup of hot masala ginger tea , admiring the wet floor and the plants in my garden all washed and fresh after the showers with the smell of mud  sinking into me but incomplete with out the rains .after a few bites of these wickedly cleaver treat that hits the right spot  and gulps of tea … It started raining again … A very happy me as whats more reassuring than these comfort fare ,  fried treats and a hot cup of masala chai when it’s  pouring .

Stuffing ingredients

ingredients
Quantity
boiled , peeled and mashed potatoes 2 cups
fresh coriander leaves2 tablespoons chopped
onion 1 chopped
salt to taste
grated ginger 1/4 teaspoon
Chilli powder1 teaspoon
Turmeric powder1/4 teaspoon
Lime juice a squeeze

To prepare the Stuffing

  1. Pressure cook the potatoes, till soft. Peel the skin & mash the potatoes finely in a bowl.
  2. Add fresh coriander leaves, red chilly powder , turmeric powder , grated ginger , salt and lime juice .
  3. Mix it well & keep aside.Spicy stuffing is ready..!

Ingredients for Wada batter

Ingredients
Quantity
Urad Dal / Ulunthu paruppu1 cup
Rice flour1 tablespoon
Saltto taste

Method for vadais

  1. Wash and soak urad dal for 1.5 hours. Strain the water.
  2. Grind urad dal to a smooth paste in a grinder by sprinkling water little by little. It took 15 minutes to grind 1 cup of urad dal.
  3. Use very very little water. Grind it till urad dal turns soft and fluffy.
  4. Add salt and rice flour to the urad dal mixture and mix well to a  thick bajji batter consistency and keep aside .

Other ingredients

ingredients
Quantity
Mirchi /bajji milagai5 to 6
Oilto deep fry

How to proceed

  1. Wash and dry the green mirchi / bajji milagai. Take a mirchi , make a slit lengthwise in the middle, keeping the ends intact.
  2. Scoop out the seeds with a knife or spoon leaving the insides clean for the stuffing.Now stuff the mirchi ‘s with the potato mixture.
  3. Fill in the gap of each mirchi with the potato stuffing and keep them on a greased steaming plate and steam for 5 minutes for the mirchi skin to soften . ( I used my idli steamer ) cool completely .
  4. Heat oil to deep fry . Dip the stuffed mirchi’s one by one into the wada batter coating them well on all sides and drop them gently into hot oil.
  5. Deep fry until golden, turning constantly.Deep fry 2-3 wadas at a time.
  6. Drain and remove them on absorbent paper. Serve hot with coconut green chilly chutney or tomato sauce and a cup of hot masala ginger tea .

Cater pillar roll

Share Button

image (49)

Preparation Time : 1 hour + 20 minutes

Cooking Time : 18-20 minutes

Serving : 6 members

Description

Carter pillar roll . I have noticed that most  of my recent posts usually start off with ramblings about my family, memories, events and sometimes even about nutritional values of certain  ingredients. But today I am going to deviate a tad from the beaten path and instead I am just going to focus on the story of how i got to bake this stuffed bread and over came my fear about breads and baking .  The first time ever I got to see and taste these sort of stuffed rolls were in Coimbatore as a kid in J. M ENGLISH BAKERY . Those days it was the happening place in and around Coimbatore . Whenever I saw  these cater pillar rolls on the display counter , juicy and warm , I got this hunger pang attack my tummy simply and start rumbling non stop . I used to wonder how they got the filling inside and the striped effect over the roll . Never ever in my dreams did I think I would end up baking these myself !!! With such a drool-worthy presentation, this dish is apt for any special occasion . Sounds delicious already right? – slurp! I know – lets continue…was dead nervous about baking bread .. But to my surprise the bread was moist , soft , light and better than any bread I have tasted till date and helped me over come my fear of baking breads and gain more confidence .    Now a’int that something delectable and mouth-watering? …So why wait – get cooking!!! Good luck peeps :-))
Oops , sorry to have bugged you all once again with my memories ….

Ingredients For the filling

Ingredients
Quantity
Minced lamb / chicken ¼ kg
medium sized onion2 chopped
Chilly powder 1 teaspoon
Pepper powder1/4 teaspoon
Cumin powder1/4 teaspoon
Turmeric powder1/4 teaspoon
Ginger and garlic paste1/ 4 teaspoon each
Coriander leaveschopped few
Salt to taste

 Method for filling

  1. In a pressure cooker put the minced meat and the rest of the spices .let it cook up to two whistles . heat oil ,
  2. Sauté the chopped onions to translucent . Add the cooked minced meat and cook to dry .
  3. Taste and adjust seasoning . Garnish with coriander leaves . Cool completely and set aside .

Ingredients

Ingredients
Quantity
All-purpose flour2 cups
Warm milk3/4 cup
Instant yeast1 teaspoon
Baking powdera pinch
Sugar1/2 teaspoon
Salt1 teaspoon
Egg1 - lightly beaten and divided in half
Melted butter1 tablespoon
Oil2 tablespoon
Milk powder1 tablespoon

Instructions

  1. Sieve the flour, then add milk powder, baking powder, sugar, yeast and salt.  Then add the oil, butter and half the egg (reserve the other half for brushing the bread later) and mix together.  Now add the milk gradually whilst kneading.
  2. You might not need it all, so add it sparingly until your dough is nice and soft.  If more milk is needed to get a soft dough consistency, warm a little more and use.  Knead for a good 8-10 minutes.  The more you knead the softer the bread results will be.
  3. Touch a bit of oil with your fingertips and apply all over the ball of dough. Cover in a bowl and set aside for 40 mins to an hour for it to double in size.
  4.  Divide the dough into 5 sections. Start rolling each one into an oval/rectangular shape, about quarter inch or less thickness.
  5. Brush with butter, then cut strips about a third of the way into the oval on one of the longer sides of the rolled out dough.
  6. Add your filling on the opposite side of where the strips have been cut. Fold the dough over the filling to enclose it, then roll gently all the way to the end.
  7. The strips will cover the top of the bun and give a pretty finish. Try and pinch the ends of the strips under the dough so they do not unfurl or open up during baking.
  8. Place on a greased tray and repeat with the rest of the balls of dough. Cover with a light kitchen towel and allow the buns to rest for about 30 minutes to allow them to expand again slightly.
  9. When ready to bake, preheat the oven at 180 C. Brush the remaining half egg over the bread and sprinkle sesame seeds. Bake for about 18-20 minutes or until the buns are done and golden.
  10. Remove and brush them with some butter, keep them covered with a kitchen towel to retain their softness until time for serving.

Notes

  1. The filling can be made with veggies , cheese , paneer , fish , prawn or anything to your taste .
    Sweet fillings can also be used for the sweet version .
  2. Store the cater pillar roll in the refrigerator in an air tight container and steam – microwave before serving for a minute . Best served and had on the day made and can be stored for the next day not more than that .
  3. This is the best ever bread recipe I have come across and I follow it for any recipe that demands to bake bread … So peeps don’t forget to book mark the bread recipe .