Daily Archives: September 19, 2014


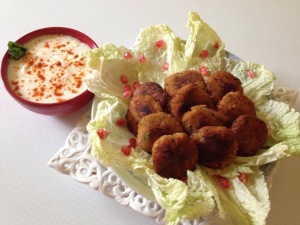
Chick peas kebab

Share Button

image (40)

Preparation Time : over night soaking + 30 -40 minutes to boil the chick peas

Cooking Time : 1-1/2 minute for each batch cooked

Serving : 3-4 members

Description

Chick peas Kabaab . A dish I came up with when wanting to make a salad with millet grains, chick peas and pomegranate . Washed and pressure cooked the millet grains but then came to know that the husks were not removed from the millet grains . It had a grainy , muddy taste and could not use it and went strait into the bin . The remaining boiled chick peas and pomegranate kernels had to be used in some way and I came up with a Kabaab . Used all the ingredients I would for shammi kabaabs but spiked it up with pomegranate kernels For an extra dash of flavour . Fried and served it with a simple cooling sour cream dip and it was delicate , warm and lightly spiced  . The sweetness of the pomegranate and light spice of the chillies elevate this humble kabaab to a delicious side dish . Started with one dish in mind and ended with inventing and turning basic ingredients to a fun , power packed side dish , starter , snack or a packed lunch item instead , with an experience of an extraordinary culinary contrast .

Ingredients

Ingredients
Quantity
White dried chickpeas2 cups
Cumin powder 1/2 teaspoon
Ginger garlic paste1/4 teaspoon
Onion1 chopped
Garam masala powder1/4 teaspoon
Green chilli 1 chopped
Oil to shallow fry
Mint leaves few chopped
Coriander leavesfew chopped
Chilli powder 1 teaspoon
Lime juice 1/4 teaspoon
Salt to taste
Pomegranate kernels3 tablespoons

 Method

  1. Soak chickpeas overnight.
  2. Pressure cook until soft. Will require at least 4-5 whistles on medium flame.
  3. Drain out excess water. Heat oil. Add slit green chilly, chopped onion and ginger garlic paste.
  4. Once onions appear soft add chick peas, chilli powder , garam masala powder , cumin powder and salt. Mix well.
  5. Turn off the heat. Add coriander leave and mint leaves . cool the mixture completely .
  6. Grind this mixture in a mixie jar without adding water.
  7. Now mix lime juice and pomegranate kernels and Knead for a minute to form a smooth dough.
  8. Now take the chickpea dough and make round small tikki’s. heat oil to shallow fry in a non stick pan and fry to golden colour on both sides .
  9. Serve hot with sour cream dip .

Ingredients Sour cream

Ingredients
Quantity
Sour cream 1 cup ,( can use hung curd also )
Saltto taste
Cumin powder 1/4 teaspoon
Coriander leaves chopped few
Chilli powder3 pinches

Note

  1. Mix all the above mentioned ingredients together except for chilli powder .
  2. Garnish with chilli powder . Chill in the refrigerator and serve .

Vendakai paal curry

Share Button

image (39)

Preparation Time : 15 minutes

Cooking Time : 20-25 minutes

Serving : 3-4 members

Description

Vendakai paal Kari . A side dish very own to my hubby’s place which is simple , yet an inventive approach to cooking with focus on using local ingredients .  Usually this side dish is served in most Muslim house holds through out the Nellai district with each house having their own twist and version to it . The basic of this dish is same by adding thin and thick extracts of the coconut  but the other ingredients may vary and most households garnish with maasi ( Maldives dried fish powder ) here at hubby’s place they don’t add maasi . This dish is one among my favourite side dishes . Once my grand ma balkees perima ( dads mom ) had come to my hubby’s place to visit me on a two days trip . My grand mom being a fussy person about food and every thing around , I had to take extra care to satisfy her needs . She loves fish and fish is one among the best local produce that Nellai is best known for . Made fish curry with other side dishes for lunch , one being vendakai paal Kari . My fussy grand mom liked the vendakai paal Kari so much that she just could not stop raving about it in a hilarious way though !!!Well,  who would have expected this simple lesser known but much more flavourful and interesting side  dish would impress her taste buds to this extent . Till date this dish fills my mind with soaked wealthy emotions of memories about my grand mom balkees perima . Miss her tons and loads as she is no more :-((

 Ingredients

Ingredients
Quantity
Tender small ladies finger 1/4 kg cut into finger size
First coconut milk thick extract1 /2 cup
Second coconut milk thin extract 1/2 cup
Small onionsone hand full chopped
Tomato 1 big chopped
Green chillies 2 slit
Coconut oil1 tablespoon
Cumin seeds1/2 teaspoon
Curry leaves few
Chilli powder1/4 teaspoon
Turmeric powdera pinch
Saltto taste

Method

  1. Heat coconut oil in a non – stick pan . Add cumin seeds and curry leaves . Once they crackle add small onions , green chillies and ladies finger .
  2. Saute until the ladies finger changes colour and gets dry without being sticky .
  3. Add the tomato and saute until it lets out all its juices and gets to a mushy pulp .
  4. Add salt , chilli powder and turmeric powder . Mix well adding thin second extract of the coconut .
  5. Cover and cook the ladies finger . Once cooked and the thin extract has evaporated , add the thick first extract of the coconut .
  6. Simmer and let the coconut milk infuse into the ladies finger for a few minutes and when oil separates , remove from heat and serve hot as a side dish with white rice or chapatis .

Notes

  1. Wash the ladies finger whole . Pat dry with a napkin .
  2. Then cut and use . In case the ladies finger are wet , it tends to get sticky and mushy .
  3. You can do the same with French beans , drum sticks and potato fingers . ( use fennel seeds instead of cumin seeds with drum stick and potatoes .)

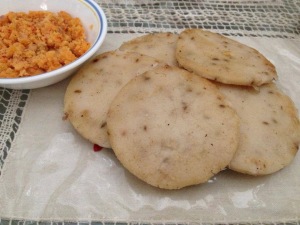
Kai pathiri

Share Button

image (38)

Preparation Time : 15-20 minutes

Cooking Time : 1 -1/2 minute for each Kai pathiri

Serving : 4-5 members

Description

Kai pathiri . An authentic malabar recipe that was introduced to our home by our then cook shakeela who had worked in Kerala before . On our every visit to my moms place after my marriage , a grand spread of food on the table was a must mainly to impress my hubby with warmth , a sense of well being and satisfying cravings .  this continuous till date . Shakeela would add her known new recipes to the menu and that is how we got to know about this dish and now its a regular at home . She paired it with a coconut chutney that is my grand mom ( dads mom ) balkees perimas recipe and the match felt like made in heaven .you will for sure get to taste the skill that goes into making a home style chutney .  My daughter ANISHA loves this Kai pathiri and chutney and who ever I have served it to there are no complains at all . My cousin sister Ashibha’s hubby hassan a very fussy eater who just sticks on to the authentic minimal dishes just loved it and out of all the dishes he had on his visit to my place , this one dish managed to tickle his taste buds that made me smile with utter pleasure …

Ingredients

Ingredients
Quantity
Rice Flour ( iddiappam flour ) 2 cups
Water2 cups
Coconut grated1 cup
Cumin Seeds1/2 teaspoon
Small onions1 hand coarsely chopped ( the traditional way is to just smash it over a ammi / sil patta coarsely )
Salt to taste
Coconut oil 1/4 cup

Method

  1. Boil water and salt in a board vessel.When boils, add the grated coconut,cumin seeds , coarse onions and rice powder .(At this stage the flame should be low)
  2. Stir well to combine all the ingredients together for 2-3 minutes to get a mass of dough together and switch off the flame.transfer the mix into another tray and start kneading by dipping your hands into a bowl of water , every now and then , so that you don’t feel the heat .
  3. Knead to make a soft dough.Make lemon size rolls from it.Take a banana leaf or foil and keep the roll in it.
  4. Flatten it using our palm.( I flatten in between greased plastic sheets using a rolling pin to 1/2 inch thickness and cut with a big size cookie cutter ( a round lid will do ) .
  5. Heat a iron griddle .place the kai pathiri and cook for a minute on medium heat on one side , turn oven and cook for another one minute .
  6. pour 1/4 teaspoon coconut oil all around and cook for 1/2 a minute on each side until the edges crisp and a good aroma arises .
  7. Remove and serve hot with coconut chutney ,beef ularthiyathu , chicken / mutton roast or gravy .

Ingredients Red coconut chutney

Ingredients
Quantity
Coconut1/2 grated
Dry red chillies6 to 8
Salt to taste
Small onions1/2 hand
Coconut oil 2 tablespoons

Method

  1. Grind coconut , red dry chillies and salt together to a coarse dry paste .
  2. Add very little water and grind further to a semi smooth paste .
  3. Top with small onions and blitz for 5 seconds just to crush the onions .
  4. Make sure not to grind the onions as the chutney gets onion dominating smell if gridded .
  5. Taste and adjust , remove to a serving bowl and add the coconut oil . Mix well and serve .

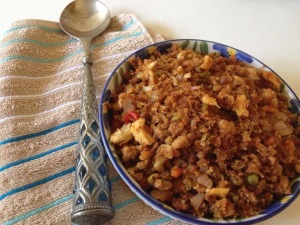
Savoury bread mixture

Share Button

image (37)

Preparation Time : 15 minutes

Cooking Time : 10 – 12 minutes

Serving : 3 – 4 members

Description

Savoury bread mixture is a dish I came up with when I was newly married . Having to travel to and fro from tirunelveli ( hubby’s place ) to Coimbatore ( mom’s place ) very frequently , a road trip of nearly 8 to 9 hours then in a narrow one lane sort of road , with no good eateries or restaurants on the way . Had no other option other than to pack breakfast as we would start by 4 o clock early morning so that we reach our desired destination by 1 o clock for lunch . At hubby’s place we always used to get idlis packed with a thick chutney called kuthala thovayal ( kuthala meaning coutralam –  a small tourist post where there are a number of water falls in and around the place , thovayal meaning a thicker version of chutney which is addressed as such . Please back to the savoury bread mixture … Oops …ok .. Ok .  Getting monotonous with idli and kuthala thovayal … One early morning by 3  o clock just opened the fridge and took out what ever was in and came with this dish . Was dead nervous as i made this dish half asleep and hubby dear does not eat bread even when he is sick .with my fingers crossed fed him as he was driving and he just loved it . From then on this dish has become a staple at home but now a days I miss those long road trips to mom’s place as the roads are perfect 4 way tracked and its a journey of just 5 hours with restaurants and eateries on both sides of the road every 10 kilo meters once :-)) .

 Ingredients

Ingredients
Quantity
Bread slices14 chopped into tiny bits
onion3 big chopped
green chillies3 minced
curry leavesfew minced
coriander leaves2 table spoons chopped
ginger1/4 inch piece grated
tomato1 small chopped
chilli powder1/4tea spoon
salt to taste
garam masala powder1/4 tea spoon
pepper powder1/4 Tea spoon
oil4 table spoons
egg2 ( seasoned with salt n pepper and scrambled )
bone less chicken4 table spoon (cooked and shredded )
Chopped and Boiled
mixed veggiescarrots green peas cabbage cauliflower beans
capsicum1 cup
lime 1/2 a squeez

Method

  1. Heat oil in a non stick kadai . Add onion and saute till translucent .
  2. Top with green chillies , tomato, curry leaves , half of coriander leaves and ginger . Stir for a minute .
  3. Add chilli powder , salt to taste , pepper powder , garam masala powder , chicken And chopped boiled veggies .Mix well .
  4. Add the chopped bread and toss well on medium heat for five minutes until all the flavours infuse together .
  5. Finally add a squeez of lime , coriander leaves and scrambled eggs . Mix well . Taste and adjust .
  6. Serve hot wit onion raitha or tomato sauce .

Notes

  1. Vegetarians avoid the chicken and egg . Add one more cup of mixed veggies instead .
  2. This dish is apt for packed lunches to office , school and picnics ..
  3. Can do the same with minced mutton , left over chicken curry , prawn masala , mutton gravy .

Parotta

Share Button

image (36)

Preparation Time : 30 minutes

Cooking Time : 1-1/2 minutes for each parotta

Serving : 3-4 members

Description

Parotta . An  authentic flakey  bread very own to Tamil Nadu and Kerala With a lot of emotion attached to it . Mostly found in the small eateries in all places .  At home it’s usually pronounced as barotta . Every alternative day barotta is made for dinner at moms place and is served with non – veg korma , white korma or a mutton chops curry . When in boarding school we were served parottas once in a week For dinner . three small ones on your plate , finish that and want more . You get piping hot white rice with rasam . The parota day in school is full of cribbing all around  …. i was like hey its barotta and why on earth are these people so annoyed about it . the first bite into my parota in school … the rubbery small circle which we had a never ending chewing experience made me realise the cribbing and annoying part around . I did join in with the rest but they stopped serving us parotas after a few months and we were saved finally . Married   of to Nellai , at hubby’s place the barotta is called rotti and served with non veg salna but very rarely made at home . ( once in two months or so ) one among the first dishes I learnt to do was barotta at home and I was surprised about this bread being made very rarely . My hubby has his share of stories about rotti salna . Here at Nellai its very famous to ask for the rotti to be shredded and mixed with the salna , then served . This is known as pichu potta rotti salna . There was a restaurant in the name of niyas hotel in Nellai where my father – in – law used to get rotti and salna for my hubby and sister – in – law when they were kids . The entire house used to be in an excited mood about having rotti salna for dinner . Hubby used to exchange mutton pieces with his sister for more rotti . Nostalgia …. Well how can I forget to mention about the famous vaira maligai rotti salna here in Nellai and the border kadai of shenkottai near coutralam  . In total this bread is a cheap and cheerful part and parcel of every house hold through out south India and at my home its always on the menu first when I have guests and on regular basis I substitute flour / maida with wheat flour and make gothumai rotti   to be on the safer side because of health benefits .

Ingredients

Ingredients
Quantity
Flour / maida 4 cups heaped
Sugar 1 /4 teaspoon
Egg1
Milk 1/4 cup
Water just enough to get a dough out of the flour mixture
Saltto taste
Oil1/2 cup (or 1/2 ghee + 1/2 coconut oil )

Method

  1. Mix salt , sugar and flour together . Make a well in between and add the egg and milk . Mix well and knead to a smooth elastic dough adding just enough water .
  2. Pat and knead well for 8- 10 minutes till the dough becomes pliable without breaking in the middle . Pour 2 teaspoons of oil on top of the dough , cover and keep aside for one to half an hour .
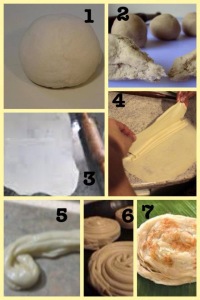
  3. Apply oil on the work surface . Divide the dough equally into small orange sized balls . Place a ball on oiled surface , flatten it with hands and stretch all around so that it forms a thin circular diaphragm .
  4. Apply little oil on top , fold like saree pleats by gathering the top on both sides and pleat them till the bottom.holding one end of the pleated dough, roll like a spiral and press the last edge on to the Center.
  5. Make all the balls in the same manner and apply little oil over the top ( just wipe it with the oil in your palms ) keep covered until needed to be served . Just as you want to serve , Heat a tawa .
  6. Pat each ball gently on top , flatten with hands like thick parathas or roll gently with a rolling pin . Fry on the hot tawa using little oil for both sides till golden brown in medium flame .
  7. After removing from fire , pat the sides with a help of a towel to loosen the layers . Serve hot with veg or non – veg curry of your choice .

Pulkas

Share Button

image (35)

Preparation Time : 15 minutes + 4-5 hours

Cooking Time : 1 minute for each pulka

Serving : 3-4 members

Description

Pulkas .As a kid I used to hate chappathi’s served at home . Mainly because of the South Indian food habits that makes us want more and more dishes made with rice . Secondly the chappathi’s are never up to the mark at home . I got a recipe book 100 TIFFIN VARIETIES ( vegetarian ) by mallika badrinath quite some time back . This book has nearly 40 different types of roti’s from basic to exotic . I did try all the basic roti’s and have adapted the tried roti’s as a staple at home . My previous post on soft chappathi’s is also from this recipe book . At home no one can differentiate chappathi’s from pulkas . Either of the two served are counted as chappathi’s at home :-)) these pulkas bring another memory leading a whiff  of nostalgia . At school ( good shepherd , ooty ) we had to eat our meals with spoon and fork . I had a hard time to learn the skill of handling the spoon and fork . Even after I mastered the art , I just could not accept the fact of eating chappathi’s with a spoon and fork ??? I always give extra points for eating chappathis  ( in fact every thing ) with  hands as it gives a soul full connection , touch  and feel of the food .

 Ingredients

Ingredients
Quantity
Wheat flour 2 cups heaped
Waterenough to mix the dough ( I usually use very thin butter milk strained or whey water ( the liquid which separates while making paneer from milk ) instead of water . Adds more taste and is nutritious .
Salt to taste
Oil or ghee2 teaspoons

Method

  1. Mix flour and salt together . Sprinkle water / buttermilk / whey water gradually and knead to a smooth paste .
  2. Pat and knead the dough several times at least for 10 to 15 minutes . ( a good way to burn some calories ) keep closed for 4 -5 hours .
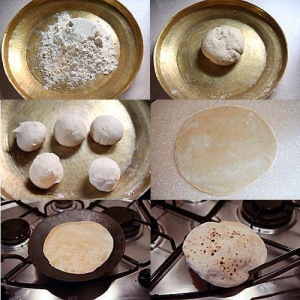
  3. Make even sized balls . Flatten and roll out into medium sized chappathi’s . Heat a tawa and place the chappathi on top .
  4. When small bubbles appear on top , turn over immediately . Roast till light brown underneath .
  5. Turn over to direct flame or over a wire mesh on top of the stove . When it puffs up like puris , remove from fire .
  6. Crumble the chappathi with hands once .apply ghee or oil on one side of the chappathi ( optional ) .
  7. Fold like a triangle and keep in a chappathi box which is lined with a thin muslin cloth . Serve hot with any gravy of your choice .

Masala chappathi

Share Button

IMG_5848

image (34)

Preparation Time : 15 minutes  + 4-5 hours

Cooking Time : 1 minute for each chappathi

Serving : 3 members

Description

Masala chappathi . These chappathi’s are soft and moist with masala added to them . Can be had as it is without any accomplishment . Best served hot or at room temperature . Very handy to be taken along while travelling . My first masala chappathi I had was at a shop in Coimbatore called confectionary ( D.B road , R.S Puram ) . They have packets of these home made masala chappathi’s in the front counter of their shop . On my every visit to the shop , I never miss out to pick up masala chappathi’s . By the time I reach home the chappathi’s would have settled down in all our ( kids and myself ) tummy’s . My hubby’s new love towards chappathi’s has made me experiment to make more varieties . This recipe is just an assumption of the masala chappathi’s I had in confectionary . To my surprise it did work out well . I mean , I have come close to 80 % of confectionary masala chappathi’s .  Worth giving a try recipe which might add to your daily menu as a staple at home .

 Ingredients

Ingredients
Quantity
Wheat flour 2 cups
Curd 1/2 cup
Milk1/2 cup
Roasted cumin powder 3/4 teaspoon
Saltto taste
Red chilli powder1 teaspoon
Turmeric powder1/4 teaspoon
Dry mango powder(amchur powder )1/2 teaspoon
Garam masala powder1/4 teaspoon
Onion1chopped finely
Coriander leaveschopped finely few
Kasoori methi ( dried fenugreek leaves 1/4 teaspoon ( optional )
Oil5 teaspoons for the dough + more oil for frying

Method

  1. Mix all the dry ingredients together in a large mixing bowl . Add curd , oil and milk . Knead to a smooth dough .
  2. Keep aside closed with a wet moist cloth for 3- 4 hours . Make even sized balls .
  3. Roll out each ball into thin chappathi’s , using little wheat flour for dusting .
  4. Heat a chappathi tawa/iron griddle . Place one rolled chappathi on the hot tawa .
  5. Roast on one side for a minute . Turn over and apply oil . When it puffs up , turn over and roast till light brown on both sides .
  6. Do the same to all the remaining chappathi’s . Serve hot with Any Subji , raitha , pickle or curd .

Ven pongal

Share Button

image (33)

Preparation Time : 15 minutes

Cooking Time : 15 minutes

Serving : 3 members

Description

Pongal is one dish that all at home relish but are hesitant because of the calorie content in it . Though we all complain when it’s on the table , the mighty ven pongal is devoured in no time with utter silence seeking to line our stomachs full . This dish was a must when I had to pack lunch for my school going kids once a week . But it did change to once a month as my kids and hubby started complaining about becoming a python ( all they wanted to do was lay down and sleep :-)) at school and work . After my brother shifted to London with his family . My mom learnt a genius  trick to pack ready made ven pongal mixes which she found so easy to cook when at my brothers home in London . She used to mix raw rice , moong dal , salt , cumin seeds , pepper corns , curry leaves and cashew nuts together and dry it in the sun for a day And Pack it . At my brothers place she would just take enough of the mix required and cook it with water in the rice cooker and when cooked , garnish with ghee and its ready to serve . I realised the hunger for comfort , the  expression of deep cravings and love for the brilliant flavours of home cooked food when in London  .  What ever said and done my love for the old school laid back,  life style in India with brilliantly intense filling  relatives around , fresh home cooked food three times a day , our street food , cows at home , plenty of milk , curd to butter milk and the bonus of having maids at home is ultimate . What more would you want in life  ????

Ingredients

Ingredients
Quantity
Raw rice ( pacha arisi ) 1 cup
Lightly dry roasted Split yellow moong dal (pasi paruppu) 1/2 cup
Saltto taste
Ginger finely chopped1 teaspoon
Cumin/ Jeera seeds1 teaspoon
Whole black pepper1 teaspoon

Ingredients For the seasoning

Ingredients
Quantity
Ghee 1/ 2 cup
Cashew nuts6 to 7
Curry leavesfew

Method

  1. Mix rice , dry roasted moong dal, ginger , pepper corns , cumin seeds and pressure cook adding salt with 3 cups of water for 4 to 5 whistles.
  2. The rice has to be cooked in such a way that it should be mushy.
  3. Open the cooker once the pressure subsides and mash the contents well.
  4. Heat ghee , add curry leaves and cashew nuts . fry until the cashew nuts are golden brown in colour .
  5. pour the seasoning over the rice + dal mixture and mix everything well.
  6. Switch off and serve hot with sambar , coconut chutney and a kara chutney .

Notes

  1. The same can be done in a rice cooker . It’s more hassle free .
  2. Make sure you use only raw rice ( pacha arisi ) to make pongal .In case you want to use lesser ghee .
  3. Cook the pongal with jeerasala ( jeeraga samba ) broken rice and season with 1/2 the amount of ghee .
  4. Can use 1/2 oil and 1/2 ghee but the authentic way only ghee is used