Tree of life

Share Button

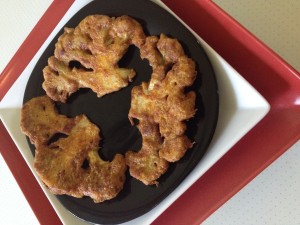
image(1)

Preparation Time : 40 minutes

Cooking Time : 3 minutes

Serving: 4 members

Description

This is a recipe I learnt from my mother – in – law which is a regular in the lunch table every week once at least . Cauliflower being one of my favourite vegetables , I was head over heels when I first tasted this dish . Thinking it might be a pains taking job to execute this dish as a new bride , when asked what I wanted would never mention this dish ( nor any other as I was dead nervous as a new bride , guess all of us were the same ).  As days passed by and I was getting more comfortable with the place , food , language and people around , I would take note of what ever was being cooked in the kitchen as I was just let to chop vegetables like a sue chef in a restaurant kitchen . I was awe struck with this simple sensational recipe bursting with mouth watering flavours .  Then slowly as I got more confident in the kitchen , even before my mother – in – law would suggest what’s to be done for lunch , I would have chopped , cooked and placed it on the dining table . This was one among the very few dishes that I used to make very often as a new bride as I was ( and am ) a keen cook who can’t resist trying out a recipe I particularly love as soon I discover it . At home we usually make this dish with cauliflower flower lets but I have showcased the same in a modern feature . The idea of life of tree was adapted from chef vikkas Kanna . I was mad at myself as from eleven years my heart , soul , thought  and every bit in me is all about food , food and food . Then how come my mind didn’t get the idea to cut a cauliflower in such a lovely pattern . Umm well that’s the difference between a chef and a home cook isn’t it :-)) .

Ingredients

Ingredients
Quantity
Cauliflower1 medium sized whole or 2 cups flower lets
Chilli powder 1/2 teaspoon
Turmeric powder1/4 teaspoon
Salt to taste
Eggs2
Pepper powderto taste
Oilto fry

Method

  1. Boil water with little salt . Immerse a whole cauliflower into the boiling water for 5 minutes to get worms out . Remove and cool .
  2. Cut the whole cauliflower from the middle to 1/4 inch thick slice to get a tree patterned slice . Keep doing the same to get more slices .  ( be careful as the blanched whole cauliflower tends to break up in between )
  3. Marinate the cauliflower tree slices with chilli powder , turmeric powder and salt to taste for 30 minutes .
  4. Beat eggs with salt and pepper powder to taste . Place in a flat shallow plate so it’s easy to dip the cauliflower tree in it .
  5. Beat oil to shallow fry . Dip the cauliflower tree in to the beaten egg mixture and gently drop into the medium hot oil . Fry to a golden brown color on both sides . Drain and serve hot as it is with out any dips or sauce .
  6. Do the same with the other cauliflower trees .

Notes

  1. I usually use cauliflower flower lets and do the same but deep fry instead of swallow frying .
  2. Can do until the marination part ahead and fry in hot oil just before serving to avoid the eggy smell .
  3. Beat more eggs in case you need more for dipping .
  4. Best served as a starter .
Patra

Share Button

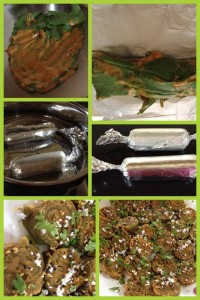
image (9)

Preparation Time : 35 minutes

Cooking Time : 15 -20 minutes

Serving: 5 members

Description 

Patra . An authentic Gujarati  snack that I first ate in chennai at residency towers 3 years back on celebrating our wedding anniversary . ( I have mentioned the word “OUR ” wedding anniversary as my hubby’s brother nawaz and first cousin Yousuf also got married on the same date as  our’s – me and hubby ) un – expected we all happened to be in chennai together and all cousins in chennai had a grand buffet feast for lunch in residency towers . Patra was served in the chat counter and i just could not stop eating it . I didn’t know the name but guessed , it is a Gujarati dish as it was sweet , sour ,  hot and made with chick pea flour . ( Who else would tickle your taste buds with all these flavours in one dish ) I had taken note of this recipe from a blog , only then did I know this dish is called patra . Originally they use collaslavia leaves but I have substituted it with huge spinach leaves . Was at moms place last week and my grand finale of finishing my holiday always has to end with a shopping at nilgiri’s store in r.s Puram  in Coimbatore .  Every time I am there , I am surprised with new ingredients , fruits and veggies there . This time I went more than mad actually while shopping as I ended up picking every thing in the store ( think as I was fasting …. Wanted every thing there ) my daughter was like what is wrong with you mom ???? I just could not resist my surprise seeing really huge spinach leaves there . I just grabbed 3 bunches and immediately patra sparked in my mind . Made it today and feel so revealed that hubby liked it and another snack added to my know lists of not deep fried goodies .

Ingredients

Ingredients
Quantity
Spinach large Leaves6
Besan / Gram flour 2 cups
Asafoetida1/4 teaspoon
Ginger green chilli paste 1 teaspoon or to taste
Red chilli powder1/2 teaspoon
Coriander powder1/2 teaspoon
Cumin powder1/2 teaspoon
Grated jaggery 2 tablespoon
Tamarind pulp3 tablespoon
Baking powder 1/4 teaspoon
Oil 1 tablespoon+ little to grease the foil paper
Salt to taste
Waterrequired to make a thick batter

For Tempering

Ingredints
Quantity
White sesame seeds1 tablespoons
Mustard seeds1 Teaspoon
Asafoetida a pinch
Oil1 teaspoon
Water3 tablespoons

To Garnish

Ingredients
Quantity
Grated coconut little
Coriander leaveschopped

Method

  1. Wash the spinach leaves and wipe them with a kitchen towel.remove the thick stems.
  2. In a large bowl mix the ingredients mentioned in the ingredients list on top, to make a smooth and thick batter of spreading consistency except for the spinach leaves .
  3. Place the leaf reverse side up and spread the batter evenly. Place another spinach leaf on top of this and repeat the procedure. Usually 3 leaves are perfect for one roll.
  4. Now roll the leaves carefully to make a thick roll.
  5. Place it in a greased foil wrap and close the edges.
  6. Put water in a steamer and place the roll to steam for 10 minutes, turning the side after 5 minutes. ( your iddli steamer will work perfect for steaming )
  7. Remove the steamed roll and let it cool.remove the foil paper and Cut it into slices with the help of a wet knife .
  8. In a flat-bottomed pan fry the tempering ingredients . add 3 tablespoons water and bring to boil . toss the slices carefully and wait for the moister to get into the patras .
  9. Place them on the serving platter and garnish with grated coconut and finely chopped coriander leaves.serve as it is ( i served it with out a dip , tasted yum ) or with green chutney and sweet chutney

Note

  1. You could add 1/4 teaspoon of turmeric powder as I found my rolls a bit dark coloured . Turmeric powder added will result in a brighter looking patra .
  2. You can use blanched large cabbage leaves also instead of spinach leaves .
  3. Non – vegetarians can add cooked chicken or meat to the batter and follow the same recipe .

Pav bhaji

Share Button

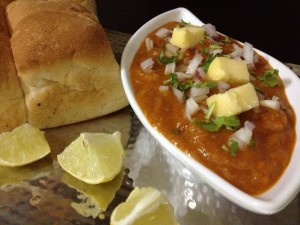
pavbhaji

Preparation Time : 35 minutes

Cooking Time : 40 minutes

Serving : 4 members

Description

Pav bhaji . A street food favourite to all . A mouth watering dish that has the goodness of all the vegetables together . The best part , children don’t get to know that the bhaji is made with veggies . The butter high lights the dish even more . Umm .. If there’s one thing we can say with utmost confidence , its that every thing tastes better with a smear of melted butter . The butter is more generous that a smear :-) pav bhaji brings back memories of my brother darvesh a lot . He used to take me and my kids nearly every day to a chat shop in Coimbatore out side the old nilgiris in R.S puram . The joy of being with your sibling around is beyond value . Good old days ….. Miss you bro ….. Love you tons and tons . Oops got carried away !!! This recipe is trala Dallas , I have tried loads of recipes to make pav bhaji and finally stuck to hers as it was the best . Simple to follow and high in taste .

Ingredients for the pav

Ingredients
Quantity
pavs8
butter4 tablespoons ,
pav bhaji masala1 teaspoon ( optional but adds a lot of taste )

Ingredients for the bhaji

Ingredients
Quantity
potatoes, boiled and mashed
1 1/2 cups
cauliflower1 cup (finely chopped)
green peas1/2 cup
carrots1/2 cup (finely chopped)
onion1 cup (finely chopped)
capsicum1/2 cup (finely chopped)
chopped tomatoes2 1/2 cups
turmeric powder1/2 teaspoon
chilli powder1/2 teaspoon
pav bhaji masala1 1/2 tablespoon
black salt1/2 teaspoon
butter4 tablespoons

Method for the bhaji

  1. Boil the cauliflower, peas and carrots till they are soft. Drain out the excess water.
  2. Heat the butter in a large pan, add the onion and capsicum and sauté for 2 minutes. Then, add the prepared chilli-garlic paste and sauté till the onion softens.
  3. Add the tomatoes and simmer till the oil separates.
  4. Add the turmeric powder, chilli powder, pav bhaji masala, black salt and salt and cook for 2 to 3 minutes.
  5. Add the boiled vegetables and potatoes and mash thoroughly using a potato masher, adding ½ cup of water if required.

Method for the pav

  1. Slice each pav into 2 horizontally. Apply a little butter to each side and sprinkle with a little pav bhaji masala, if desired.
  2. Heat a large tava and cook the pav on both sides till the pieces are lightly browned.

How to proceed

  1. Serve the hot bhaji on 4 individual plates and top with the onion and coriander.
  2. Serve with the hot pav and lemon wedges.

Ingredients for Pavbhaji masala powder

Ingredients
Quantity
Coriander seeds2 tablespoon
Cumin seeds1 tablespoon
Dry red chillies4
Turmeric powder1/2 tablespoon
Dry raw mango powder1 tablespoon
Cardamom 2 pods (seeds removed)
Cloves6
Cinnamon1 inch piece
Star anise2
Fennel seeds1 teaspoon
Dry ginger2 inch piece
Garam masala powder1 tablespoon
Asafoetida1/4 teaspoon

Method

  1. Heat a flat pan on medium heat. Gently roast the cumin, coriander, fennel seeds, the dry red chillies, cloves and cinnamon till they turn slightly darker and begin to release their aroma. Remove from fire immediately and cool.
  2. Grind all the ingredients – including the garam masala powder – together in a dry coffee grinder, till a fine powder is formed. Store in an air-tight container for upto 4 weeks.

Note : This home made pav bhaji masala powder adds more taste but no harm in trying the ready made one’s also .


Thayir Vadai

Share Button

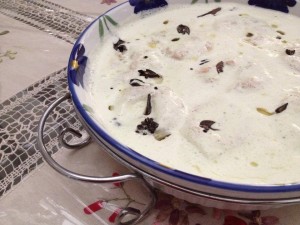
tv

Preparation Time : 1 1/2 hour soaking time + 30 minutes

Cooking Time : 5-6 minutes for each batch of vadais deep fried

Serving : 6 to 8 members

Description

Thayir vadai . This is a typical South Indian style thayir vadai recipe . Initially when ever I made thayir vadais at home it never used to taste like the ones we get in hotels ( especially the ones we get in annapoorna hotel and Krishna sweets in Coimbatore . ) the curd used to always be a bit curdled like texture after some time . Once my hubby’s niece sabeena shared a secret about how to get the curd like in hotels . Gave it a try and it was pitch perfect . From then on I am religiously following this recipe . A few weeks back I was fortunate enough to attend a cooking work shop conducted by master chef 3 winner ripu dhaman handa . He was making a chat dish and suddenly he asked if any one knew what BALLA was ?? All of us in the class including the North Indians were like *#€¥!?#%*^>€$* ??? He showed us an ulunthu vadai and we all shouted out loud in a chorus VADAIS . In punjabi vadais are called BALLA . That was news to me as I thought ulunthu vadais are known as wada through out north India . In spite of the diversity in culture and language each indian state has the similarity in food with different names proves the unity we share as Indians .

Ingredients for ulunthu vadai

Ingredients
Quantity
Urad Dal / Ulunthu paruppu1 cup
Oilfor deep frying
Onions finely chopped
1/4 Cup
Ginger finely grated1 teaspoon
Curry leaves finely chopped
6-8
Green chillies finely chopped2
Saltto taste

Method for vadai

  1. Wash and soak urad dal for 1.5 hours. Strain the water. Grind urad dal to a smooth paste in a grinder by sprinkling water little by little.
  2. It took 15 minutes to grind 1 cup of urad dal. Use very very little water. Grind it till urad dal turns soft and fluffy.
  3. Add salt, finely chopped onions, ginger, curry leaves and green chillies to the dough and mix well.Heat oil in a Kadai to deep fry.
  4. Take a plastic cover or banana leaf. Moisten your hand with water. Take a lemon size dough and place it in the plastic cover. ( At times when i have guests at home , i use my doughnut cutter and make perfect same shaped and sized vadais )
  5. Flatten the dough and pierce a big hole in the centre of dough using your finger.Slide the dough carefully into oil.
  6. Fry till vada turns golden brown on both sides , takes about 2-3 minutes .
  7. Drain and Remove excess oil by placing the vadai in paper towels and set aside .

Ingredients for the curd mixture 

Ingredients
Quantity
Thick curd3 cups
Cashew nuts8
Coconut grated1/4 cup
Poppy seeds1 teaspoon
Green chilly 1
Saltto taste

Method for the curd mixture

  1. Grind coconut , green chilly , cashew nuts and poppy seeds together to a smooth paste .
  2. Blend this paste with the curd adding salt to taste . Taste and adjust and set aside .

How to proceed

  1. Soak the fried vadais in warm salted water for 5-8 seconds .
  2. Drain and drop them into the curd mixture And set aside .

Ingredients to temper

Ingredients
Quantity
Oil1 teaspoon
Mustard seeds1/2 teaspoon
Curry laces6

Method to temper

  1. Heat oil . Add mustard seeds . Once they crackle add the curry leaves .
  2. Remove from heat . Cool completely and pour over the soaking thayir vadais .

Ingredients to garnish

Ingredients
Quantity
Carrot grated1 small
Coriander leaves choppedfew
Kara boondhi1/4 cup

Method to garnish

  1. Garnish with chopped coriander leaves , grated carrots and kara boondhi .
  2. Serve at room temperature or chill and enjoy .


Savoury envelope appam

Share Button

savoury

Preparation Time : 40 minutes

Cooking Time : 10 minutes for filling and 5 minutes for each envelope appam

Serving : 8-10 members

Description

Savoury stuffed appam. The recipe for this dish was borrowed from my mothers cook book panorama home recipes of Kerala which was gifted to her by her friend. A treasure trove of home -style recipes. To me, recipes have always been more than instructions about how to make a great dish. Having this recipe in hand for quite sometime and being in my to try list as well, Every time something or the other just kept me away from the dish.My quest to make non-deep fried dishes for Iftar this year made me do this dish but with a little changes of using lesser oil than what the original recipe demanded. Once you have the pancakes and filling ready, you just have to assemble them together, shallow fry and cut and serve the pillow Drool worthy treat. Tadaa it’s ready.The layers and the crisp outer cover sure does tempt you a lot.It’s the same old thin pancakes and filling we make at home just like how our mothers would make but with a wicked clever, knock out spin of twist in assembling that gives this dish a oomph factor. This dish is a must try for all the home ministers.

Ingredients for pancakes / appam

Ingredients
Quantity
Flour / Maida1 1/2 cups
Milk1/2 cup
Eggs2
Saltv
Waterenough to get a loose batter

Method for pancakes / appam

  1. Mix maida , eggs , salt and milk together .
  2. Add water little by little according to the required amount to get a nice smooth thin batter . Keep aside .

Ingredients for filling

Ingredients
Quantity
Mutton / chicken keema250 gram
Green chillies4
Onions2 chopped
Ginger garlic paste 1 teaspoon each
Garam masala powder1/2 teaspoon
Coriander powder1 teaspoon
Turmeric powder1/4 teaspoon ,
Oil2 teaspoons
Coriander leaves1/2 bunch chopped

Method for filling

  1. Cook washed and cleaned keema with coriander powder , turmeric powder and salt to taste .
  2. Heat oil in a non – stick kadai . Fry the chopped onions to brown adding ginger garlic paste . Sauté to crisp .
  3. Top with green chillies , garam masala powder , cooked keema and chopped coriander leaves .
  4. Fry for two minutes or until dry and set aside .

Ingredients for Maida paste

Ingredients
Quantity
Flour / Maida1/2 cup
Salt to taste
Waterjust enough to make a thick paste of maida

Method for Maida paste

  1. Mix all the above mentioned ingredients together to get a thick consistency paste with out lumps . Set aside .

How to proceed

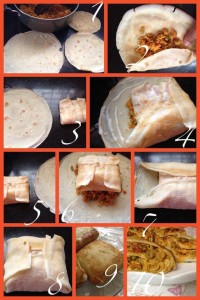
  1. Make pancakes with the loose batter of 3 sizes ( small , big and bigger ) in a non stick pan . ( i used 3 different sized non – stick pans for the 3 sized pancakes ) you get 3 pancakes in each size for the amount of batter mentioned in the recipe . Cook the pancakes on both the sides and set aside .
  2. Place the small pancake . Spread 1 1/2 tablespoon of filling in the Center in the shape of a square . Apply maida paste all around the filling till the edge of the pancakes . Fold the maida paste applied four sides in wards to form a small envelope .
  3. Take the big pancake . ( the middle sized pancake ) place 2 tablespoon of filling in the Center and spread evenly into a square shape leaving the edges of the pancake . Apply maida paste apart from the filled portion up to edges on all four sides . Place the 1st small envelope on top of the square filling and fold like the first envelop from all four sides inwards .
  4. Do the same with the 3rd ( bigger ) pancake . Each time placing the previous folded envelope on top of the square filling and folding the sides of the maida paste applied four sides in wards to get a bigger envelope .
  5. Heat a tawa with 1 tablespoon of oil and place the sealed side down and press to make it firm and crisp . Turn over and press the other side as well to get a golden colour crisp cover . With a help of a tong , carefully turn it over on all sides and fry to golden colour and crisp .
  6. Remove from tawa . Cut into four triangles and serve hot with tomato sauce . You get a crisp outer layer with soft inner layer of pancakes filled in between with the filling .

Notes

  1. Vegetarians can omit the eggs in the batter . Substitute with vegetable filling . Follow the same recipe and go ahead for the vegetarian version .
  2. I have added mixed vegetables ( carrots , beans , green peas , capsicum and cabbage ) along with the chicken keema for the filling . Just to add more vegetables in our diet as its ramadan and no other way than to cheat every one at home to get some veggies into their tummy .
  3. You could dot the pancakes with ghee while cooking on both sides .( I skipped using ghee , so my pancakes were oil free pancakes made in non – stick pans .)
  4. You could pan fry each envelope in oil for every envelope making sure each envelope has a good sealed sides and golden crisp cover . Start with small pancake and make sure each pancake gets bigger than the other , resulting in crisp golden layers outside as well as inside . ( I just pan fried the outer last layer alone wanting to avoid the extra oil content in the dish )
  5. I made just 3 different sizes of pancakes , resulting in 3 envelopes to be folded . Maximum you could do with 4 envelopes . ( I tried with 4 but it was too massive and huge )
  6. In total other than the oil used for the filling , I have just used 1 tablespoon of oil to fry each 3 layered envelopes . You could oil spray and fry and reduce the 1 tablespoon of oil that I used as well .


Baked stuffed cabbage rolls

Share Button

baked

Preparation Time : 30 minutes

Cooking Time : 20 -25 minutes

Serving : 10 -12 members

Description

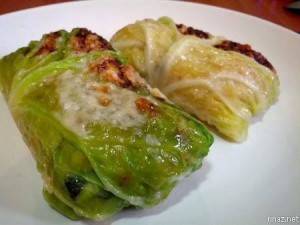
I have been getting requests pouring in asking for healthy recipes that are not deep fried to be had while breaking the fact for the on going month of Ramadan. Here is one try of mine. Please bear with the picture, as it was taken in a hurry. Happy healthy cooking folks.

Ingredients

Ingredients
Quantity
cabbage leaves12 large
olive oil6 tablespoons
vegetable broth or maggi cube stock
1 litre
Grated cheeseyour preferred type
Balsamic vinegar to taste
Riceyour preferred choice for making risotto
celery1 stalk
carrot1
red onion1 small
Salt and pepper to taste

Method

  1. Carefully peel off 12 layers of leaves. Rinse and clean them and remove the hard stem.
  2. Fill a large saucepan with water and salt and bring it to a boil. Then dip each cabbage leaf into the boiling water for about 1 – 2 minutes to soften them.
  3. Chop some celery, carrot and onion finely.
  4. Heat olive oil into a pan and fry the onions , carrots and celery .Add in about 300g of rice (any preferred brand for making risotto).
  5. Add in 1 litre of vegetable broth or stock from cubes and a dash of balsamic vinegar. When the rice is almost cooked, add in some chopped cheese (you can use any preferred cheese or omit this ingredient). Season with salt and pepper .
  6. Place 2 spoonful of risotto rice mixture and wrap it snugly. Fold the sides and roll tightly .
  7. Place 12 cabbage rolls in a baking tray, lined with a ladle-full of vegetable broth. Brush some melted butter or oil on top of each cabbage roll
  8. Sprinkle some grated cheese and bake them in preheated oven at 200 degrees for about 15 minutes. Serve hot .

Note

  1. Can substitute with any vegetarian or non vegetarian filling of your choice .
  2. Cheese can be substituted with paneer ( cottage cheese )

Fresh fenugreek greens gota

Share Button

photo (1)

Preparation Time : 50 minutes

Cooking Time : 6 – 8 minutes for each batch deep fried

Serving : 6 members

Description

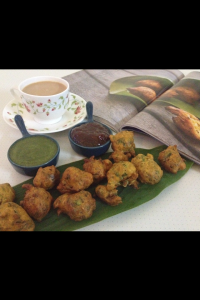
I know just two dishes that I use fresh fenugreek greens for . One is for methi chapathi and the other I use the fenugreek greens along with chicken or mutton gravy . I came across this recipe in good food magazine and was delighted about the easy approach and uncomplicated home style recipe to use fresh fenugreek greens . Followed the original recipe religiously but found the fenugreek leaves bitterness over powering the gotas so on my next try used a simple trick I always do to remove the bitterness of the fenugreek greens to a certain amount by soaking them in water along with sugar for a few minutes , drain and use as required . This worked wonders with the light , airy , crunchy , local , rugged flavoured gotas . These gotas are a Gujarati variation of the methi pakoras found across India which is usually made in winter as a street food  . Some of the greatest Indian tastes in food are with the street food sellers in our country . I made these for ifthar which was an apt opportunity to add some greens into my menu injecting a dose of freshness .

Ingredients 

Ingredients
Quantity
Gram flour 1 1/2 cup
Whole wheat flour 1/2 cup
Salt to taste
Sugar 1 teaspoon + 1 tablespoon
Red chilli powder1/2 teaspoon
Turmeric powder 1/2 teaspoon
Asafoetida 1/4 teaspoon
Garam masala powder 1 teaspoon
White sesame seeds 2 teaspoons
Coriander seeds 2 teaspoon coarsely crushed
Black peppercorns 10 coarsely crushed
Green chillies 4 crushed
Garlic cloves 4 crushed
Curd 4 tablespoons
Fresh fenugreek leaves 2 cups cleaned
Fresh coriander leaves 1/2 cup chopped
Oil to deep fry

Method 

  1. Marinate cleaned fresh fenugreek leaves in 1 cup water with 1 tablespoon of sugar for 15 minutes .
  2. Mix gram flour , salt , sugar , chilli powder , turmeric powder ,asafoetida , garam masala powder , sesame seeds ,coriander seeds , green chillies , garlic and pepper corns together .Add curd and mix well .
  3. Top with fresh methi leaves drained and coriander leaves along with 1/2 cup water to make a thick paste consistency batter similar  to condensed milk .Let the mixture stand for 15 minutes .
  4. Add baking soda and mix well . Heat oil until extremely hot .Add 4 teaspoons of hot oil to the gota mix ,this helps the gotas get crunchy and light .
  5. Gently add a tablespoon of the mix to the heated oil and fry until golden brown in colour .Drain and repeat with the rest of the batter .
  6. Serve hot with green chutney and sweet tamarind chutney.

Bread pita pockets with lamb filling

Share Button

Bread

Preparation Time : 30 minutes

Cooking Time : 20 – 25 minutes

Serving : 10 member

Description

Pita bread pockets with lamb filling . I got to see a picture of this dish in a foodie group which was posted by my fellow home chef mubeen Sulthana . The dish looked so different and wondered how the pita bread pockets were made as they looked perfect . As usual recipe requests were poured and the recipe was posted but only of the filling , not the pita bread pockets . After a while the pita bread pocket recipe was also posted . Saved the recipe and gave it a try one fine morning . Time consuming but good things come to those who wait isn’t it ? The way the  bread just popped up and puffed  floating over the hot oil , I felt like a child in a candy store filled with so much joy and excitement . The genius tricks and twists  that we home chef’s posses in our own ways is amazing and any day far better than a cook book recipe or a recipe googled . We inspire and share the little we know with one another helping each of us improve and widen our culinary horizon . With all credits to mubeen for this recipe , I have elaborated the original recipe a lot more so it’s easy for you people to follow .   Happy cooking and snacking to all .

Ingredients

Ingedients
Quantity
Sandwich bread16 slices
Flour 1/2 cup
Oil to deep fry
Egg 2 beaten
Salt + pepperto taste
Bread crumbs
2 cups

Method

  1. Steam bread slices over a stove top or in a microwave oven for 10 seconds .
  2. Remove and dust with flour and roll the bread slices with the help of a rolling pin to flatten the bread slices .
  3. Cut each flattened bread slice into circles with the help of a round mould cutter .Take two cut round bread slices ,
  4. place one over the other and brush the edges of the bread slices with water .Press the wet edges together and seal the edges firmly .
  5. Do the same to all the bread slices .Beat eggs with salt and pepper to taste .
  6. Dip each sealed round into the beaten egg , remove immediately and toss over the bread crumbs making sure the bread crumbs are coated well all over on both sides .
  7. Do the same with all the sealed bread rounds .Heat oil to deep fry and fry the bread rounds to a golden brown colour .
  8. The rounds puff up like poorie’s . Drain and cool completely .Cut each fried round into half to get a semi circle pocket with the help of a sharp knife .
  9. The pita bread pockets are ready .

Ingredients For the filling

Ingredients
Quantity
Minced lamb¼ kg
2 medium sized onion2 chopped
Chilly powder 1 teaspoon
Pepper powder1/4 teaspoon
Cumin powder 1/4 teaspoon
Turmeric powder 1/4 teaspoon
Ginger and garlic paste 1/ 4 teaspoon each
Coriander leaveschopped few

Method for filling

  1. In a pressure cooker put the minced meat and the rest of the spices .let it cook up to two whistles .heat oil , sauté  the chopped onions to translucent .
  2. Add the cooked minced meat and cook to dry .Taste and adjust seasoning .
  3. Garnish  with coriander leaves .Cool completely and set aside .

How to proceed 

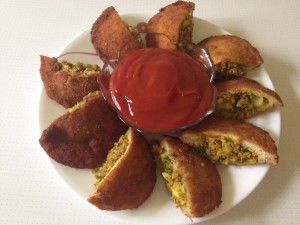
  1. Fill each bread pita pocket with  generous amount of filling and serve with tomato ketchup ,mayonnaise or any dip of your choice .

Note

  1. Make the filling and pita  bread circle until dipping into beaten egg and coating in bread crumbs all around ahead for ultimate convenience .
  2. Deep fry the Pita   bread circles just before serving , cut into 1/2 , fill and serve .
  3. You can use any filling of your choice . Vegetarians can substitute with a vegetable filling , panner filling or soya chunks filling .

sweet pepper pesto pinwheel

Share Button

pesato

Preparation Time : 40-50 minutes

Cooking Time : nil

Serving : 6 members

Description

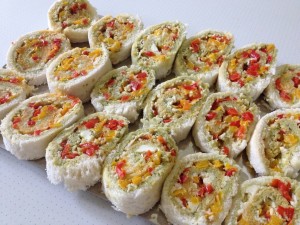
Pinwheels always excite me as the circular shape with colours popping out here and there is a visual treat . My first pinwheel experience was not a good one though which was sent over by a Neighbour made with colourful vegetables . Looked nice but the taste was awful . I have tried pinwheels with rotis and dosas but never with bread . I came across a recipe in one cook book that was given to me by my hubby’s friend that made me want to try the recipe then and there . There were two recipes side by side both of pinwheels , I have combined both together and created this recipe as one pinwheel showcasing the delightful dimensions of flavours to combine as one . Made it when I had my daughter and son – in- law visit me at home for breakfast . These circular colourful beauties with minimalist use of spices did enhance the dinning table with raised eye brows and was devoured in seconds vanishing away that brought a board smile on me to end a wonderful family breakfast of togetherness .

Ingredients Main

Ingredients
Quantity
White bread1 loaf unsliced
Red bell pepper1/4 cup chopped
Yellow bell pepper1/4 cup chopped
Parmesan cheese1/4 cup grated
Pesto sauce3/4 cup

Ingredients for pesto sauce

Ingredients
Quantity
Garlic1 tablespoon chopped
Fresh basil leaves ( can use tulsi leaves )
1 1/2 cup
Salt1 teaspoon
Black pepper2 teaspoons
Toasted pine nuts or walnuts5 teaspoons chopped
Olive oil3/4 cup
Parmesan cheese50 grams grated

Method for pesto sauce

  1. In a blender , combine basil , salt , pepper , garlic , walnuts and oil .
  2. Blend them at high speed until the ingredients are smooth . The sauce should be thin enough to run off the spatula easily .
  3. Transfer the sauce to a bowl . Stir in the grated cheese . Pesto sauce is ready .

Notes

  1. The pesto can be thinned further by adding 1-2 tablespoons of hot pasta water that is used to cook pasta .

Method for pinwheels

  1. Cut bread loaf into 4 horizontal slices , discard the edges . Place one slice on a board , spread 1/5 cup of pesto sauce evenly on it .
  2. Sprinkle 1 1/2 tablespoon each of red , yellow pepper and grated cheese on it and roll the bread tightly .
  3. Place over plastic wrap and roll tightly , secure both the edges by twisting the plastic wrap like eclairs sweet paper tightly .
  4. Repeat the same with all the bread slices . Place all the rolled bread slices on a tray , cover with a wet cloth .
  5. Place in the refrigerator for 30 minutes or until to be served . When chilled , remove plastic wrap , slice the rolls into 1/2 inch circles with a sharp knife .
  6. Arrange over serving plate , sprinkle grated Parmesan cheese and serve . ( I didn’t sprinkle cheese over ) .

Notes

  1. If you find the bread difficult to roll , place over a wet towel and roll them .


Noodles cutlet

Share Button

IMG_5830

noocut

Preparation Time : 25 minutes

Cooking Time : 10 to 12 minutes

Serving : 6 members

Description

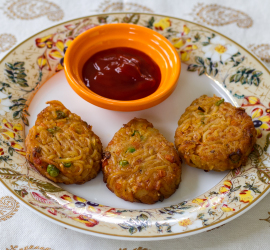
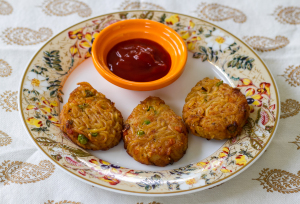
Noodles cutlet. A recipe i came across in one of the food blogs. Not sure which one. Loved the idea of this haute make over as every one at home likes noodles (except my hubby).Gave it a try and worked pitch perfect with excellent mixes of simple but tasteful ingredients. Noodles always brings memories of my school days. Instant maggi noodles was newly introduced in India then for the global craze that noodles had. My friends (sulu, sindhu)and myself would bring loads of maggi noodles packets from home. In the evenings mostly, we would catch a mug (with the same mug that we use for our bath)of hot boiling water from the tap and break the maggi noodles into it along with the taste maker. Spin it around and wait for the noodles to get cooked. those few minutes of waiting were the longest few minutes of my life till date.All of us used to just dig into it and at times we would mix in prawn or fish pickle to add more taste to it. At times the water we used would be a lot and we used to drink it like soup and when there is no hot water available. Just crush the noodles as it is mixed with the taste maker and eat the crisp noodles. (now i make a salad with raw crisp maggi noodles with the taste maker and veggies)i guess my experimenting of channeling creativity with food into an endless oppurtunity to reinvent started with the maggi noodles from school.

Ingredients

Ingredients
Quantity
Noodles200 grams
Mixed vegetables1/2 cup ( carrots , beans , green peas , cabbage , cauliflower , capsicum )
Green chillies2 finely chopped
Turmeric powder1/4 teaspoon
Boiled potatoes3 peeled and mashed
Onion2 finely chopped
Garlic2 teaspoon chopped
Coriander leaves 1 tablespoon chopped
Chilli powder1/2 teaspoon
Chicken or vegetable stock cubes1 1/2 ,( I used maggi chicken stock cubes )
Oilto shallow fry

Method

  1. Boil noodles with 1 tablespoon oil . Drain , rinse in water and set aside .
  2. Mix all the other ingredients together except for noodles and oil to shallow fry . Add boiled noodles and mix gently making sure not to mash the noodles and make it mushy . Taste and adjust .
  3. Add salt if needed as the stock cubes contain a lot of salt . Make cutlets with oiled hands and greased moulds to desired shape .
  4. Heat oil and shallow fry to golden brown in colour on both sides . Be careful not to break the cutlets as they are very delicate .
  5. Serve hot with tomato ketchup .
  6. Can add 1/2 cup cooked shredded chicken for non vegetarian version .