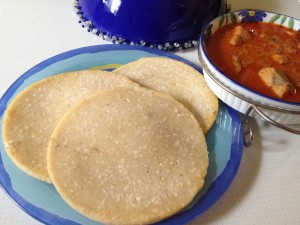
Maavu rotti

Share Button

image (4)

IMG_8513

IMG_8514

IMG_8515

IMG_8516

IMG_8517

IMG_8521

IMG_8522

IMG_8525

IMG_8527

IMG_8530

IMG_8531

IMG_8532

Preparation Time : 15 minutes

Cooking Time : 2 1/2 minutes for each roti

Serving : 4 members

Description

An authentic dish very own to my hubby s place . A roti made out of a coarse rice flour fried along with coconuts to dry and stored .The colour of this flour is a light cream colour . This flour is called as thengaatta maavu . I have seen this flour only in my hubby’s place not any where else . They use the flour for another dish called thakkadi which is rice flour balls cooked in mutton gravy . Any dish made with this rice flour makes you feel stuffed in the tummy and sure to put you off to sleep . Every muslim house in Nellai will surely have this rice flour stored in their homes . Initially when l was newly married , the rice flour was pound at home with a stone mortal and a long wooden pistol ( urulai and olakai in Tamil ) by women. (Nellai woman are physically strong ) . It would take an entire day for them to got the rice flour ready . The entire house would be a mess that one day . In fact my in-laws place has a separate room behind our ancestral home specially for this purpose (i followed the same and have a room for this purpose at my place to ) and the flour was fried only in a wood stove. Now a days we got the flour pounded in the near by rice mill but the frying part of the rice flour is still done the old school way of using a fire wood stove which I think gives the flour a nice smoky flavour . I have suggested puttu rice flour as substitute to this rice flour as its a difficult process to make this rice flour and not easily available any where other than the southern districts of Tamilnadu . So folks make sure to buy this thengaatta rice flour once you pass by Nellai along with our Tirunelveli special halwa :-)) .

Ingredients 

Ingredients
Quantity
Rice flour ( puttu rice flour ) 2 heaped cups
Boiling water 6 cups
Salt to taste
Coconut grated 1 cup
Coconut oil2 tablespoons

Method 

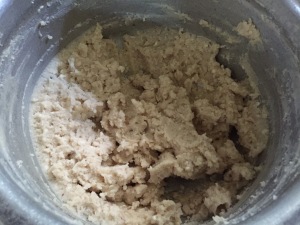
  1. Mix rice flour, coconut  and salt together .Pour the boiling water over the Rice flour mixture . ( Might seem a lot of water but the flour will take in all the water .  ) close with a lid and set aside undisturbed for 2 minutes .
  2. Knead into a smooth dough . In case you need more water add little more boiling water .
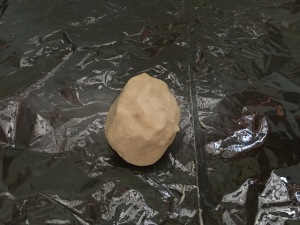
  3. Roll the kneaded dough into apple sized balls and keep covered in a vessel .
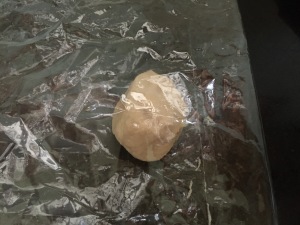
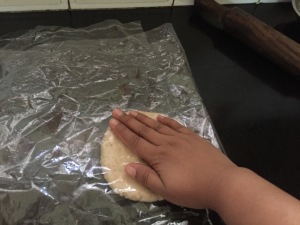
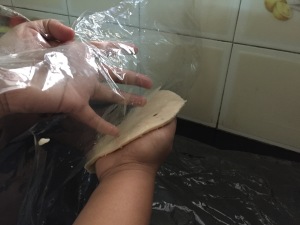
  4. Place a greased plastic sheet over a flat surface ( your kitchen counter will be apt ) I usually cut white plastic bags , grease and use as the coloured plastic bags tend to ooze out colour from the cover to the rotis .
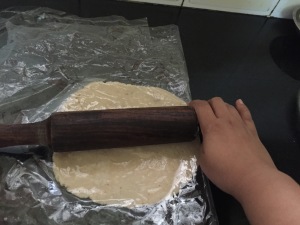
  5. Place one dough ball in between the greased plastic sheet .Roll with a rolling pin very gently as the level of the roti surface has to be of same level through out to about 1/4 inch thickness .
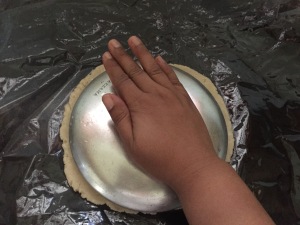
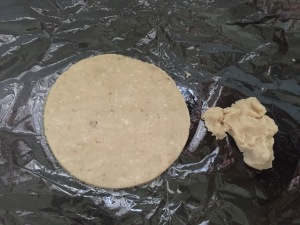
  6. Make a circle like for chapathis , with the help of a round shaped lid . press the lid well and remove excess dough sticking out .Heat a tawa .
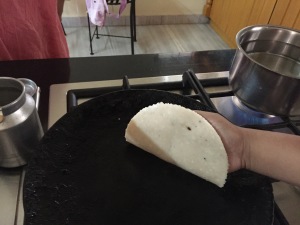
  7. Lift the roti with the cover in your left hand and place the roti side down on your right hand and place it over the hot tawa .
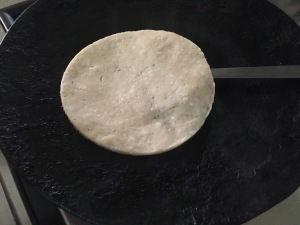
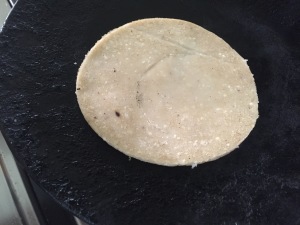
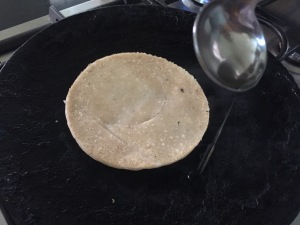
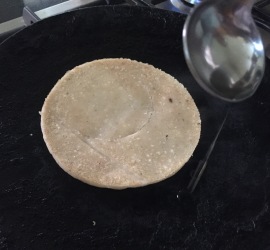
  8. Place it undisturbed for 3 minutes in medium heat . Flip over and pour 1/4 teaspoon coconut oil all around the roti and cook undisturbed for another 3 minutes in medium heat .
  9. Remove and serve hot with any non vegetarian or vegetarian gravy or curry .
  10. This roti is served with mutton salna or fish curry usually .In the picture above i have served the roti with fish curry .
  11. Follow and do the same with all the dough balls .

Tangy Prawn Gravy

Share Button

image (2)

Preparation Time : 20 minutes

Cooking Time : 35 minutes

Serving  : 4 members

Description 

A yummylicious mouth watering dish that bursts with a satisfying plop on your plate. The highlight of the dish is the balance between tanginess , spiciness and slight sweetness that results in a sublime art of cooking . Tanginess and me (actually my entire aadi clang (dads family is addressed so don’t know from where this word derived ) are made for each other anything that’s tangy tastes really good to all our (aadhi clang ) taste buds . From the youngest one to the eldest person in our family has the same liking towards tanginess. We cousins were fed with raw mangoes, big and small goose berries , ambhalankai (dont know the english version of this sour fruit ),elantha vadai and sour fruit marinated in salt water as a snack during our holiday . Memories of scrumptious food stick to the soul. My nephew dyab was a around 6 months old and just started eating semi solid food . A very fussy eater, it used to be so difficult to feed him . Every one mouth he is fed , the food comes out as if he wants to through up.Once my sister Fazeem just dipped her finger into the tangy salted water where we had marinated raw mangoes into and kept it into his mouth . Surprise he just sucked her finger out with a lip smacking sound.From then on she used to have a bowl of tangy water besides her when ever Dyab was to be fed. The aadhi clang is a tangy crazy lot .

Ingredients

Ingredients
Quantity
Prawns 1 kg
Tomato2 chopped
Onions 2 chopped
Green chillies 3 slit
Ginger garlic paste 1 teaspoon each
Red chillies5to 8 , ( or to taste )
Cloves2
Tamarind pulp1/4 teaspoon
Pepper powder1/4 teaspoon
Cumin powder 1/2 teaspoon
Curry leaves few
Coriander leaved few chopped
Vinegar1 tablespoon
Salt to taste
Coconut oil4 tablespoons
Sugar2 pinches

Method

  1. Grind ginger garlic paste,  red chillies , tamarind pulp , cumin powder , pepper powder and vinegar together to a smooth paste.
  2. Marinate the cleaned prawns with the ground masala and salt to taste .
  3. Heat oil , add curry leaves , cloves , onions and fry to brown .
  4. Top with tomato and green chillies .Fry till it gets to a gravy consistency .
  5. Add the marinated prawns and  Toss well. Pressure cook for one whistle adding 1/4 cup water . Simmer and let the oil separate .
  6. Add the sugar and toss well , This helps to balance the sourness of the dish .taste and adjust seasoning .
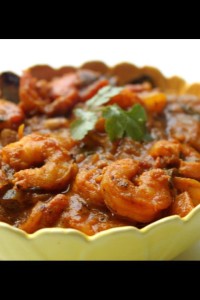
  7. Garnish with chopped coriander leaves and serve hot.

Mayonnaise

Share Button

image

Preparation Time : 10 minutes

Cooking Time : nil

Serving : 2 members

Description

Mayonnaise a silky smooth spread which tastes good with any thing and every thing. I First came to know about this spread on a trip to London . A friend of ours took us out for dinner to an middle eastern restaurant . We were served with different kinds of breads, kebabs and salads accompanied with mayonnaise. Just dipped into the mayonnaise and gave it a try. It took me strait to heaven . Next day morning for breakfast not wanting to disturb my friend fathima Aboo, went though her refrigerator and made sandwich’s before any one was awake (the time difference just didn’t let me get sleep ) with available ingredients at her place . The first time i got to use mayonnaise while making the sandwich. It was yum and a big block buster hit with every one. Once back home, wanting to use mayonnaise, went hunting but results ended in a big disappointment. In fact no one knew what mayonnaise was then. Got a recipe for mayonnaise from trala Dallas cook book after a few months . Gave it a try and it worked perfect . My quest for mayonnaise came to an end. Now a days as its easily available in the market , the lazy bug in me just does not let me make mayonnaise at home . But what ever said and done there is always a distinctness to home made stuff .

Ingredients

Ingredients
Quantity
Egg 1
Salad oil 150 ml
White vinegar 1 tablespoon
Sugar1/2 teaspoon
Mustard powder ( rai in hindi , kadugu in tamil ) 1/2 teaspoon
Salt 1/2 teaspoon
Black pepper a pinch

Method

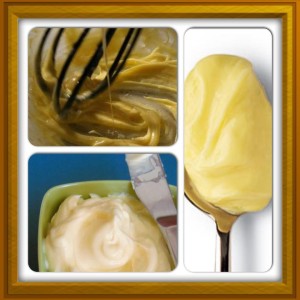
  1. Combine all ingredients ( which should be in room temperature ) except for oil in the liquidiser and blend for a minute .
  2. Remove lid and pour oil .
  3. Blend again for a minute .
  4. If the mixture is not as thick as desired , blend again at maximum speed .
  5. Store in the refrigerator .

Spring rolls

Share Button

photo (6)photo (7)

Preparation Time : 30  to 40 minutes

Cooking Time : 15 minutes

Serving : 6 members

Description

Favourite to all with its roit of texture , colour and flavour. The perfect appetiser for any occasion. I first got to taste spiring rolls in a restaurant called cloud nine, city tower hotel in Coimbatore as a kid . Latter i used to wonder and check what the cover was made up of. Tried and experimented a lot of methods to give it a crisp texture and form but failed every time . The crispness just didn’t work out . Finally tried this recipe which is my poshed – up version of spring rolls with all its delicious trimmings and wolla it worked perfect. When i have stock of spring roll ready made sheets (mostly from the Middle East or rarely from a department store in Coimbatore)  it s no hassle at all. Even left over said and romali rotis work’s and give’s a crisp cover. What ever said and done, i am always excited when it comes to spring rolls .

Ingredients for the pancake

Ingredients
Quantity
Flour 1/2 cup
Egg1
Salt to taste
Water1/4 cup
Milk 1/4 cup
Oil 3 tablespoons

Method for pancakes 

  1. Mix  flour and salt  together .
  2. Mix water , milk ,egg and oil together and beat lightly .
  3. Combine the egg milk mixture into the flour and salt and mix well to get a lump free batter .
  4. In case lumps are formed no problem just strain the batter .heat a non stick pan and  Make thin pancakes and set aside .

Ingredients for the filling

Ingredients
Quantity
Cooked shredded bone less chicken 1/4 cup
Cabbage 1 cup thinly shredded
Spring onions 1 cup chopped
Carrot 1 cup thinly shredded
Celery 2 tablespoons chopped
Onion 1 sliced
Garlic3 flakes crushed
Light Soya sauce 1 teaspoon
Salt to taste
Ajinomoto a pinch ( optional )
White pepper powder to taste
Oil 2 tablespoon + to deep fry ,
Flour 1 tablespoon diluted in little water to a thin paste

Method for the filling 

  1. Heat a wok with 2 tablespoon oil ,saute garlic and onion till translucent .
  2. Add rest of filling ingredients one after the other and toss well a few times over high heat .
  3. Taste and adjust seasoning . Remove from heat and set aside .( I have used left over noodles for the filling in the picture )

How to proceed 

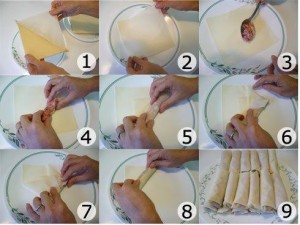
  1. Take a pancake and place a heaped tablespoon of filling towards the edge .
  2. Fold the edge over the filling , then fold the two sides thus formed over the fold and roll over till the end .
  3. Sealing that edge with flour paste . Do the same with all the pancakes and filling mixture .
  4. Heat oil and deep fry the rolled spring rolls to golden brown and crisp.
  5. Drain and cut diagonally and serve with tomato sauce or thai sweet chilli sauce .

vegetarians omit the chicken in the filling and the egg in the batter and follow the same recipe for the vegetarian version .


Jackfruit payasam

Share Button

photo (5)

Preparation Time  : 40 minutes

Cooking Time : 30 minutes

Serving  : 4 to 5 members

Description  

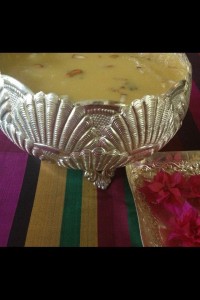
Jackfruit Payasam . A delicacy that l was fed and pampered with as a kid , At home it’s known as chakka payasam . This payasam is decadently rich with the distinct sweetness and tang of the jackfruit . Best served with a family style feast . The highlight of this dish is contrast of the tart alone side the sweet which l assure will satisfy the cravings of the dessert devil in anyone . Have to mention about another connection i have with the mighty jackfruit . Any holiday that my kids have , the first thing we do is pack our bags and run to my moms place . One holiday i had to stay back with my hubby so sent my girl anisha to my moms place . My brother had put up a sale in ooty that holiday and my girl accompanied him along with his family . After 2 week got to see my girl in ooty and i was shocked as she was plump and chubby (you can say fat actually ) in just 2 weeks . All her cloths didn’t fit her and I kept asking my brother what did you feed her with . He was so happy about it and started calling her chakka finoli (no idea till date why that finoli behind the chakka ) as she bloated like a chakka (jackfruit) though she is skinny now (girl’s their dieting and stuff now a day’s) she is still addressed as chakka finoli as always.

Ingredients

Ingredients
Quantity
Ripened Jackfruit Pieces (deseeded and inner cores removed ) 2 Cups
Thick Coconut extract(milk ) 1 cup
Thin coconut extract( milk )2 to 3 cups
Powdered Jaggery 1 and a 1/2 cups or to taste
Salt a pinch
Ghee25 grams
Cashewnuts 10
Raisins 5
Cinnamon 1 inch piece
Cloves2
Coconut bits1 tablespoon
Rice flour 1 heaped tablespoon full

Method

  1. Pressure cook the jackfruit with 2 cups of water for 2 whistles .
  2. Cool completely . Blend and add  the thin coconut extract ,salt and powdered jaggery  to the jackfruit solution and mix well. Bring to boil .
  3. Dilute the thick coconut extract with the rice flour and pour it into the boiling jack fruit payasam stirring continuously in medium heat making sure no lumps are formed ,until the payasam thickens . Taste and adjust .In case the payasam is too thick , dilute it by adding a cup of water .
  4. Heat ghee ,crackle cinnamon and cloves .
  5. Top with cashew nuts and raisins .
  6. Once the raisins expand and cashew nuts  are brown add the coconut bits .
  7. Remove from heat and pour over the payasam . Mix well and serve hot .

Fresh fenugreek greens gota

Share Button

photo (1)

Preparation Time : 50 minutes

Cooking Time : 6 – 8 minutes for each batch deep fried

Serving : 6 members

Description

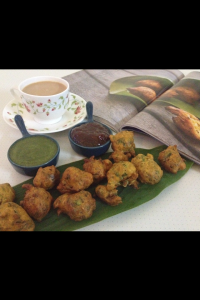
I know just two dishes that I use fresh fenugreek greens for . One is for methi chapathi and the other I use the fenugreek greens along with chicken or mutton gravy . I came across this recipe in good food magazine and was delighted about the easy approach and uncomplicated home style recipe to use fresh fenugreek greens . Followed the original recipe religiously but found the fenugreek leaves bitterness over powering the gotas so on my next try used a simple trick I always do to remove the bitterness of the fenugreek greens to a certain amount by soaking them in water along with sugar for a few minutes , drain and use as required . This worked wonders with the light , airy , crunchy , local , rugged flavoured gotas . These gotas are a Gujarati variation of the methi pakoras found across India which is usually made in winter as a street food  . Some of the greatest Indian tastes in food are with the street food sellers in our country . I made these for ifthar which was an apt opportunity to add some greens into my menu injecting a dose of freshness .

Ingredients 

Ingredients
Quantity
Gram flour 1 1/2 cup
Whole wheat flour 1/2 cup
Salt to taste
Sugar 1 teaspoon + 1 tablespoon
Red chilli powder1/2 teaspoon
Turmeric powder 1/2 teaspoon
Asafoetida 1/4 teaspoon
Garam masala powder 1 teaspoon
White sesame seeds 2 teaspoons
Coriander seeds 2 teaspoon coarsely crushed
Black peppercorns 10 coarsely crushed
Green chillies 4 crushed
Garlic cloves 4 crushed
Curd 4 tablespoons
Fresh fenugreek leaves 2 cups cleaned
Fresh coriander leaves 1/2 cup chopped
Oil to deep fry

Method 

  1. Marinate cleaned fresh fenugreek leaves in 1 cup water with 1 tablespoon of sugar for 15 minutes .
  2. Mix gram flour , salt , sugar , chilli powder , turmeric powder ,asafoetida , garam masala powder , sesame seeds ,coriander seeds , green chillies , garlic and pepper corns together .Add curd and mix well .
  3. Top with fresh methi leaves drained and coriander leaves along with 1/2 cup water to make a thick paste consistency batter similar  to condensed milk .Let the mixture stand for 15 minutes .
  4. Add baking soda and mix well . Heat oil until extremely hot .Add 4 teaspoons of hot oil to the gota mix ,this helps the gotas get crunchy and light .
  5. Gently add a tablespoon of the mix to the heated oil and fry until golden brown in colour .Drain and repeat with the rest of the batter .
  6. Serve hot with green chutney and sweet tamarind chutney.

Bread pita pockets with lamb filling

Share Button

Bread

Preparation Time : 30 minutes

Cooking Time : 20 – 25 minutes

Serving : 10 member

Description

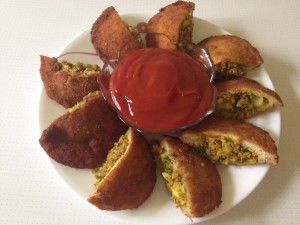
Pita bread pockets with lamb filling . I got to see a picture of this dish in a foodie group which was posted by my fellow home chef mubeen Sulthana . The dish looked so different and wondered how the pita bread pockets were made as they looked perfect . As usual recipe requests were poured and the recipe was posted but only of the filling , not the pita bread pockets . After a while the pita bread pocket recipe was also posted . Saved the recipe and gave it a try one fine morning . Time consuming but good things come to those who wait isn’t it ? The way the  bread just popped up and puffed  floating over the hot oil , I felt like a child in a candy store filled with so much joy and excitement . The genius tricks and twists  that we home chef’s posses in our own ways is amazing and any day far better than a cook book recipe or a recipe googled . We inspire and share the little we know with one another helping each of us improve and widen our culinary horizon . With all credits to mubeen for this recipe , I have elaborated the original recipe a lot more so it’s easy for you people to follow .   Happy cooking and snacking to all .

Ingredients

Ingedients
Quantity
Sandwich bread16 slices
Flour 1/2 cup
Oil to deep fry
Egg 2 beaten
Salt + pepperto taste
Bread crumbs
2 cups

Method

  1. Steam bread slices over a stove top or in a microwave oven for 10 seconds .
  2. Remove and dust with flour and roll the bread slices with the help of a rolling pin to flatten the bread slices .
  3. Cut each flattened bread slice into circles with the help of a round mould cutter .Take two cut round bread slices ,
  4. place one over the other and brush the edges of the bread slices with water .Press the wet edges together and seal the edges firmly .
  5. Do the same to all the bread slices .Beat eggs with salt and pepper to taste .
  6. Dip each sealed round into the beaten egg , remove immediately and toss over the bread crumbs making sure the bread crumbs are coated well all over on both sides .
  7. Do the same with all the sealed bread rounds .Heat oil to deep fry and fry the bread rounds to a golden brown colour .
  8. The rounds puff up like poorie’s . Drain and cool completely .Cut each fried round into half to get a semi circle pocket with the help of a sharp knife .
  9. The pita bread pockets are ready .

Ingredients For the filling

Ingredients
Quantity
Minced lamb¼ kg
2 medium sized onion2 chopped
Chilly powder 1 teaspoon
Pepper powder1/4 teaspoon
Cumin powder 1/4 teaspoon
Turmeric powder 1/4 teaspoon
Ginger and garlic paste 1/ 4 teaspoon each
Coriander leaveschopped few

Method for filling

  1. In a pressure cooker put the minced meat and the rest of the spices .let it cook up to two whistles .heat oil , sauté  the chopped onions to translucent .
  2. Add the cooked minced meat and cook to dry .Taste and adjust seasoning .
  3. Garnish  with coriander leaves .Cool completely and set aside .

How to proceed 

  1. Fill each bread pita pocket with  generous amount of filling and serve with tomato ketchup ,mayonnaise or any dip of your choice .

Note

  1. Make the filling and pita  bread circle until dipping into beaten egg and coating in bread crumbs all around ahead for ultimate convenience .
  2. Deep fry the Pita   bread circles just before serving , cut into 1/2 , fill and serve .
  3. You can use any filling of your choice . Vegetarians can substitute with a vegetable filling , panner filling or soya chunks filling .

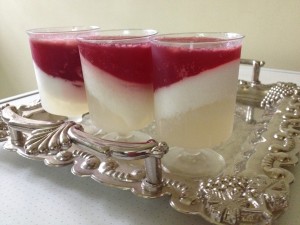
Layered tender coconut and pomegranate wave

Share Button

layered

Preparation Time : 30 minutes

Cooking Time : 25 minutes

Serving : 6 members

Description 

A budget day at home and had guests to entertain as well . I had to cater to a menu with available ingredients at home . Some how managed the starters and main course but was stuck with dessert as I didn’t know what to do . Checked out what was there in the pantry at home apt for a dessert . Had two tender coconuts , one pomegranate , coconut and sugar . Ok some thing that I had to come up with these few ingredients in hand . For dessert I have to have a setting agent and was lucky to find agar agar in hand . Now I was confident enough that I could pull of a decent dessert . Wanted to set the dessert in an alternative pattern to create a visual treat . Suddenly the bulb moment happened with in me and I thought why not set the the pudding by tilting the glasses so that I get a wave effect . Gave it a try and to my surprise , the coconut milk used along with the tender coconut gave me two layers instead of one which up lifted the look and taste of the dessert . I guess the tilting technique of setting the dessert got me connected to the leaning tower of Pisa where a blunder became a wonder :-)) . The flavours of the tender coconut , coconut milk and pomegranate married each other so well transforming into a never like before harmony combination of goodness and taste . The most talked about dish that day on the table . I realised that the fun part of hosting is trying some thing different to impress .

Ingredients 

Ingredients
Quantity
Tender coconut water2 tender coconuts
Sugarto taste
Agar agar ( china grass )10 grams + 10 grams
Thick coconut milk1 cup
Pomegranate juice3 pomegranates
Red food colorfew drops

Method 

  1. Soak 10 grams of agar agar in 1/2 cup water + tender coconut water for ten minutes .
  2. Heat agar agar soaked in water with tender coconut water .Once the agar agar has dissolved add sugar to taste and mix well .
  3. Remove from flame and add thick coconut milk .Mix well .
  4. Pour into tall glass and tilt the glasses and set in the freezer for 40 minutes or more to set .
  5. ( I placed it in a large bowl of ice cubes with the glasses tilted and kept in the freezer to set quicker ) soak the remaining 10 grams of agar agar in a cup of water for 10 minutes .
  6. Heat soaked agar agar in water until dissolved .Add sugar to taste and mix well .
  7. Remove from flame add pomogranite juice ( I added a few drops of red colour as I had only one pomogranite in hand as the colour was pale ) pour over the set tender coconut layer and replace in the freezer with the glasses straight for another one hour or more to set .
  8. Replace in the refrigerator and serve chill any time when desired .

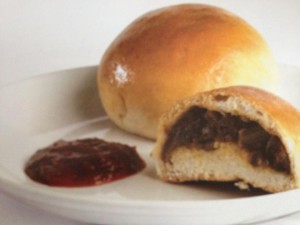
Stuffed curried buns

Share Button

photo(4)

preparation Time  : 1 hour 15 minutes

Cooking Time       :  20 – 30 minutes

Serving              : 6 members

Description

Curried stuffed buns . Anything that’s stuffed excites me and i get super thrilled . I am crazy about stuffed things from spring rolls , samosas , puffs so on and so forth . Stuffed buns . This is my first try . The results were not bad for a first try as the shape and look turned out pitch perfect but the texture was not as soft as i expected them to turn out . I guess it s my fault as i was so impatient to let the dough rise as demanded . I always has a big question in mind as to how does the filling get into the bun in my initial stages when i started to cook . Feels great to think about my culinary journey and non – stop foodie adventure from where i started to till date . But my hunger for knowledge in this field gets more and more and i have a never ending craving passion towards food . The preparation of good food is merely another expression of art . one of the joy’s of civilized living with inspiration drawn from all over the globe and the simplest things like colored candies at home .

Ingredients for the buns

Ingredients
Quantity
Yeast 1 tablespoons
Sugar30 grams
Salt 1/2 teaspoon
Maida2 cups
Warm water 1 tablespoon
Egg 1
Oil 1/4 cup
Milk 1/4 cup
Poppy seeds or sesame seeds to top the bun 1 teaspoon ( optional )

Ingredients for the filling

Ingredients
Quantity
Minced meat200 grams ( vegetarians can substitute with soya chunks or 2 cups of chopped mixed vegetables )
Ginger1 inch piece grated
Chilli powder1 teaspoon
Pepper 1/2 teaspoon
Small onions 5 chopped
Vinegar1/2 teaspoon
Onion 1 chopped
Garlic 6 flakes
Green chillies 2 chopped
Thick Coconut milk 1/2 cup
Turmeric powder1/4 teaspoon
Cumin powder 1/4 teaspoon
Egg 1 boiled and chopped ( optional )
Oil3 tablespoons
Coriander leaves few chopped

Method 

  1. Dissolve the yeast in warm water . Mix maida with salt and sugar .
  2. Mix in the dissolved yeast and oil to the maida . Knead into a very soft slightly sticky dough , adding egg and milk .
  3. Transfer to a wooden board , sprinkle maida and knead the dough very well till it is smooth and elastic .
  4. Cover with a wet damp cloth and set aside in an oiled bowl for 30 -40 minutes .

Method for filling

  1. Boil minced meat with salt and vinegar to dry and cooked .Grind turmeric powder , cumin powder , chilli powder ,pepper powder , small onions and garlic together .Heat oil and fry the chopped onions ,green chillies and grated ginger for a minute ,top with ground masala and fry well .
  2. Add cooked minced meat and toss well .Once the raw smell of the masala vanishes ,
  3. Add coconut milk and cook to dry .Finally add the chopped boiled egg and coriander leaves .Mix well and cool completely and set aside

How to proceed 

  1. Preheat an oven to 200 degree Celsius .Divide the dough into 12 equal
  2. Flatten each portion into a disc and in the Center put a heaped teaspoon of curried meat filling inside .
  3. Close carefully by pulling the edges of the disc towards the center to seal the filling into a ball and leave seam side down on an oiled baking tray for 10 -15 minutes till they rise and double in volume .
  4. Brush the buns with beaten egg .Sprinkle some poppy seeds or sesame seeds over on top .Bake for 15 – 20 minutes till golden brown on top .

Chicken ball manchurian

Share Button

chicken ball manchurian

Preparation Time : 35 minute

Cooking Time      : 30 minutes

Serving       : 6 members

Description

Chicken ball manchurian a fabulous stir fry gravy a dish that i had to try out because of my gal ANISHA . I regularly make caulifiower manchrian at home but this was new to me. How much every i cook and experiment . At time there are dishes that i learn and got to know because of my my kids . (maninly my daughter a bundle of fuss when it comes to food) this dish is a riot of textures colours and flavours on a plate . Any thing related to the word ball . My mind goes to cheese balls i was in the 2 nd standard then (1979) just joint boarding school . With every thing from language , friends , food , ambience to surroundings new to me . I was in a fix , Totally felt lost but coped up soon . We had a room called the tuck room where all our snacks from home were kept in a wardrobe locked . We were given our snacks only in the evening . The minute the wardrobe was open , i used to gaze at all the snacks that my friends from the Middle East have . From kitkat , snicker , mars , milky Way …. (the list is end less ) and mainly the mighty cheese balls . Back then we just has cadbury chocolates in india and there was no source of imported items as well . Having no idea about what is this heavenly ball made up of . I used to beg , plead and soap my middle east friends to give me some cheese balls . One outing with my parents searched through out ooty for cheese balls but resulted in disappointment . Now a days you got cheese balls any where and every where but can’t eat as you wish because of the calorie count in it . What a pity ????

Ingredients for making the balls

Ingredients
Quantity
Boneless chicken,
minced uncooked
250 grams
Refined flour½ cup
Ginger Paste 1/4 teaspoon
Garlic Paste 1/4 teaspoon
Cornflour ¼ cup
Carrot grated1 small
Beans3 chopped
Cabbage shredded 1/4 cup
Ajinomotoa pinch ( optional )
Soya Sauce 1 teaspoon
Red Chilli sauce ½ teaspoon
OilFor deep frying
Salt To taste

Ingredients for sauce

Ingredients
Quantity
Ginger,finely chopped 1 tablespoons
Garlic,finely chopped 1 tablespoon
Green chilies,finely chopped 2 tablespoons
Soya sauce 2 tablespoons
Red Chilli powder 1/2 teaspoon
Red Chilli sauce ½ teaspoon
White pepper ¾ teaspoon
Sugar 1 teaspoon
Ajinomoto A pinch ( optional )
Chicken stock 3 cups (I used maggi chicken stock cube 2 + 3 cups water
Cornflour 3 tablespoons mixed
with 1/4 cup water
Capsicum 1 cubed
Oil 4 tablespoons
SaltTo taste
Tinned pineapple 2 slices cut into chunks ( optional , adds a lot of flavour )
Spring onions
few chopped
garnish

Method for making the balls

  1.  Combine all the ingredients mentioned for making the balls with the exception of oil.Set aside for 15 minutes.
  2.  Heat the oil in a frying pan.Make 16 small lemon-sized balls of this mixture, squeezing out excess water to prevent breakage.
  3.  Deep fry the balls a few at a time.Drain when golden brown and cooked. Set aside.

Method For the sauce

  1. Heat 4 tablespoons of oil in a pan. Add the ginger, garlic , capsicum and green chilies.Fry over a medium flame for 1 minute.
  2. Add the Soya sauce, chili sauce, chilli powder , pepper, sugar, ajinomoto, stock and salt. Bring to a boil. Add the fried balls , pineapple chunks and cook covered on low heat for about 3 minutes.
  3. Add the cornflour mixed with water and stir continuously, so that the sauce become thick.Garnish with spring onion tops.