Stuffed jalar roti

Share Button

image(36)

Preparation Time : 30 minutes

Cooking Time : 35 -40 minutes

Serving : 5-6 members

Description

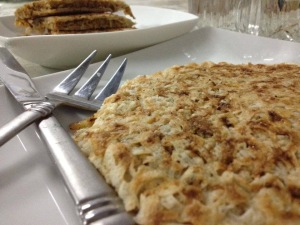
Stuffed Jalar rotis . A dish I learnt at my in- laws place . Jalar rotis are decadently lacy net crapes authentic to Malaysia And singapore muslims . I guess the working class Tamils living there bought this dish to India and now it’s a staple eaten in most tamil Muslim house holds . All these sort of dishes are known as palagaram .( meaning short eats ) .  my love for palagaram was the reason I started to learn to cook . Even as a kid any cook book or recipe I come across , i would  eagerly search for stuffed , coated , deep fried , boiled or sautéed  palagaram dishes . At moms place this dish is like Greek or French as we don’t know head  or tail of this dishes existence . At my in – laws place they make normal Jalar rotis and call them Jalar appam . I got to know about this stuffed Jalar rotis on a feast at my hubby’s cousins place . It was very filling , fragrant , visually appealing  with a rustic taste that was irresistible and delectable .  Tried it out the following week at in – laws place and it tasted magically perfect . I did make this special delicacy during my cousin sister  ( noorie meerans ) wedding in Coimbatore for the newly weds and it sparked conversations at the wedding .  Newly wedded is the only time you get the joy of being treated with royalty along with a delicious array of never ending variant dishes which lends an opportunity for others to eat well too .  ( Plus  to show off your kitchen skills and treat your family ) The groom ( rilwan ) named it Indian pizza and we all were giggles . Every time this dish is mentioned or made at home I am reminded about my cousin sister noorie and her hubby rilwan :-)) .

Ingredients For the jalar roti

Ingredients
Quantity
Eggs2
Water650 ml
Thick Coconut milk 100 ml
Salt to taste
Flour 350 grams
Oil100 ml

Method

  1. Mix all the ingredients together except for oil making sure no lumps are formed and the batter is a runny watery consistency .
  2. Heat a tawa greased with oil . Pour the batter using a jalar cup or a piping bag in a circular motion , making thin , lacy net pancakes With gaps in-between .
  3. Cook until set and crisp on one side . Remove and set aside .
  4. Do the same until all the batter is over , making sure you have at least  15 – 20 Jalar rotis in hand .

Ingredients For the filling

Ingredients
Quantity
Minced lamb ¼ kg
medium sized onion2 chopped
Chilly powder 1 teaspoon
Pepper powder1/4 teaspoon
Cumin powder1/4 teaspoon
Turmeric powder 1/4 teaspoon
Ginger and garlic paste1/ 4 teaspoon each
Coriander leaveschopped few
Salt to taste

 Method for filling

  1. In a pressure cooker put the minced meat and the rest of the spices .let it cook up to two whistles .
  2. Heat oil , sauté  the chopped onions to translucent . add the cooked minced meat and cook to dry .
  3. Taste and adjust seasoning . Garnish  with coriander leaves . Cool completely and set aside .

Other ingredients

ingredients
Quantity
Eggs 2 to 4
Salt and pepperto taste
Oil or ghee 4 tablespoons

How to proceed

  1. Beat eggs with salt and pepper to taste . Set aside .
  2. Heat a greased non stick  tawa ( dosa tawa ) in low heat  and place 2 Jalar rotis . Spread 3 to 4 tablespoons of the minced meat filling equally all around the Jalar rotis . Pour 3 tablespoons of beaten egg over the minced meat mixture .
  3. Top it with 2 more Jalar rotis and brush with the egg mixture . Once the base is cooked ( takes about 2  minutes ) turn over like a dosa and cook the other side to , in low flame to a golden colour .
  4. Brush egg mixture all around the edges and press together with the help of a spatula making sure the Jalar rotis stick together . ( About 1 to 1 1/2 minute ) Remove .
  5. Cut into triangles and serve hot with tomato ketchup or as it is . Do the same with all the Jalar rotis , minced meat filling and egg mixture .

Notes

  1. you can make the filling with chicken , beef or vegetables instead of minced mutton .
  2. Usually I make the filling and Jalar rotis in advance ( one day ahead ) and proceed just before serving .
  3. Best served hot as when cool tends to get an eggy smell.

Chicken sandwich pola

Share Button

photo(1)

Preparation Time : 30 minutes

Cooking Time : 15- 20 minutes

Serving : 10 members

Description

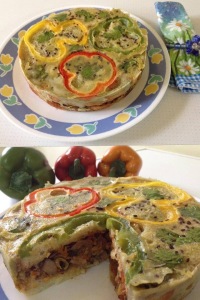
Chicken sandwich pola . The word Pola is used in malabar cuisine , referred to a dish sweet or savoury which is made with bread , eggs and milk as the main ingredient with a filling in between . I have heard about kaayapola which is made with ripe Kerala plantains . But the savoury pola was an eye opener to me as I didn’t know about it at all . I got know about this dish through UAE food guild where nawal althuaf had posted this recipe . Loved the look , recipe and easy procedure . Gave it a try and I was like ” I always use these ingredients in my kitchen but why didn’t my mind think of such an innovative concept  ” . The key to making this dish is slow cooking in very low heat to seal the sandwich together .  This particular recipe is a twist incorporated with modern interpretation to the authentic savoury malabar pola as in malabar cuisine they don’t use capsicum’s or bell peppers in their cooking . The dish had a lovely moist crisp outside with a hot juicy filling in between with a surprising array of aroma that is impeccable with  a delicate , alchemical infusion of flavours and textures . This made to impress dish will remain in your memory list of scrumptious food .

ingredients

ingredients
Quantity
Big Eggs5
flour/Maida5 tablespoons
Milk 1 cup , ( this is an additional ingredient I added to get a moist pola )
bread7 to 8slices ( depends upon the size of your pan , in case your pan is too small take less amount of total ingredients)
capsicum (red , yellow and green cut into round shaped slices ) 1 slice each
coriander leavesfew
seasame seedswhite
black1/2 tablespoons
green chillies2 crushed
salt to taste

Ingredients For Masala Filling

Ingredients
Quantity
Boneless Chicken300-400g( you can use mutton keema , fish , prawn , mixed vegetables , paneer or soya flakes instead )
Kashmiri Chilly pwd1 teaspoon heaped,
Turmeric powder1\2 teaspoon
Oil1 1/2 tablespoons
Onion finely chopped3
Green chilly finely chopped4 - 5 or more to taste
Ginger garlic paste1 teaspoon
Garam masala1\2 teaspoon
Curry leaveschopped few
Coriander leaveschopped few

Method for filling

  1. Marinate cleaned chicken  with chilly powder , turmeric powder and salt .Shallow fry Chicken pieces , cool and Mince by blitzing in the food processor .
  2. Heat oil in a board pan , sauté  onion and green chilly, till transparent.Add salt,  ginger garlic paste  and sauté to crisp .
  3. Add garam masala,  1/4 teaspoon of turmeric powder ,curry leaves, coriander leaves and Mix well.
  4. Add shredded Chicken . mix well and remove from flame and set aside .

How to proceed

  1. Beat the eggs using an egg beater till frothy along with one cup milk . finally fold in the maida , salt and crushed  green  chillies till well mixed.
  2. Grease some ghee in a non stick shallow pan and heat the pan in a very low flame . pour half of the egg mix place the bread slices tightly Making sure there is no gap or holes in between the bread slices .
  3. Press and level with your  hand . the bread must be soaked in the egg mixture .  now add the masala all over it.again spread the bread (place it carefully making sure there are no  hole ‘s in between the bread slice’s ) .
  4. Now top with the remaining egg mixture and fill the sides with egg mix . after 2 mins ,add the capsicum rings , coriander leaves and sprinkle  sesame  seeds .8 cover and cook on a very low flame for 10 minutes .then turn other side carefully.
  5. Its very diffcult to turn over the sandwich pola using a spatula so place a greased non – stick dosa tawa over the non – stick shallow pan and tilt over the sandwich pola carefully .   ( this is a hassle free method ) .
  6. Place the tilted sandwich pola in the dosa tawa , over a very low flame and cook further for 2-3 minutes . Making sure you do not burn or brown the upper crust too much .
  7. We want a pale or bright yellow colour on the crust .  Check if the sandwich pola is cooked by inserting a tooth pick in the Center of the sandwich  pola , if it comes out clean . The  sandwich pola is cooked .
  8. Place the serving plate over the cooked sandwich  pola in the dosa tawa and turn over  to get the capsicum decorated side on top . Cut into wedges and serve hot as it is

Mini muffin pizza

Share Button

image (48)

Preparation Time : 20 minutes

Cooking Time : 25 minutes

Serving : 5 members

Description

Mini muffin pizzas . A recipe I first came across in a foodie group in Facebook , home bakers guild . Rajashri Manoj had posted it and i just went head over heels seeing her haute make over post . Book marked the recipe but time didn’t permit me to give a try . Finally gave it a try with a home made pizza sauce from scratch . The beauty of this recipe is that it comes together very quickly . Thinking I had pizza sauce in stock went ahead giving this recipe a try , only after I baked my pizza muffins did I note I didn’t have it in my pantry . Immediately just made a sauce with what ever came to my mind with my trimmings and was surprised with the out come .this poshed  – up version of pizza sauce from scratch was delicious .  Hubby dear hates pizza  in spite of the global craze it has  so with fingers crossed served it to him on the Iftar table . ( Iftar table made me cross my fingers double the more ) . Thank fully he liked it as the muffins were soft , moist and packed with flavour , not chewy like normal pizza ‘S . The chewy part is what hubby hates about pizza’s . The pizza muffins bursted with a satisfying plop on hubby’s plate . So  Folks , sure can’t escape this must have casual bites .

Ingredients

Ingredients
Quantity
Flour/ maida 3/4 Cup
Baking powder3/4 teaspoon
milk3/4 cup
Egg1 lightly beaten
Mozzarella cheese shredded 4 ounces (about 1 cup)
Bell Pepper / capsicum (green , red and yellow 1/2cup very finely chopped
Boiled sweet corn kernels1/4 cup
Garlic 1 flack crushed
Saltto taste
Chilli flakesto taste
Onions 1/2 Cup finely chopped
finely chopped fresh basil/ dried basil 1 tablespoons

Method

  1. Preheat oven to 375. Grease a 24-cup mini muffin pan. In a large bowl, whisk together the flour and baking powder; whisk in the milk and egg.
  2. Stir in the mozzarella , bell peppers , onions ,sweet corn , salt , chilli flakes , garlic and let the mixture stand for 10 minutes.
  3. Stir the batter and divide among the greased mini-muffin cups. Bake until puffed and golden for 20 to 25 minutes.
  4. Sprinkle the mini pizza muffins with  basil. Serve them with the pizza sauce for dipping.

Ingredients Pizza sauce

Ingredients
Quantity
Ripe tomatoes1/2 kg blended
Flour2 tablespoons
Olive oil2 tablespoons
Garlic 2 cloves crushed
Stock cube 1 ( I used maggi chicken stock cube )
Dried Basil 1 teaspoon
Oregano1/4 teaspoon
Chilli powder 1 teaspoon
Sugar1 teaspoon
Saltto taste

Method

  1. Heat a non – stick saucepan with olive oil . Fry the garlic to light brown .
  2. Top with flour and sauté making sure no lumps are formed .Pour the blended tomatoes . And mix well .
  3. Add salt to taste , maggi stock cube and 3 -4 cups of water and boil until raw smell goes and sauce thickens .
  4. Season with basil , oregano , chilli powder and sugar . Taste and adjust and serve with the mini pizza muffins .

Notes

  1. You can add spinach , shredded chicken , sausages , pineapples , olives or any other ingredient of choice to the mini pizza muffins and bake .

Vermicelli croquettes

Share Button

IMG_4802-1

IMG_5940

photo (1)

Preparation Time : 30 minutes

Cooking Time : 20 minutes

Serving : 6-8 members

Description

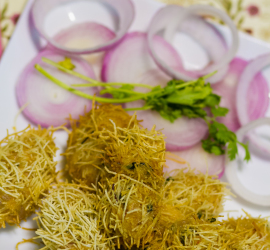
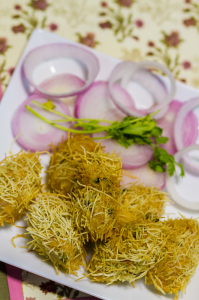
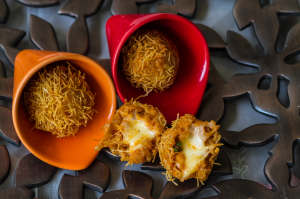
Vermicelli croquettes . It was during one summer holidays of my children  and the holy month of ramadan was going on then . Not sure why we planned a trip to Bangalore during the fasting time . on our journey towards Bangalore  on the out skirts , we dropped in to a hotel for a buffet lunch . A grand spread was displayed . As usual the curious me though fasting went through the entire spread seeing and reading the name boards of each dish displayed . There was this one dish that was rolled in vermicelli and deep fried to a deep sun shine yellow . It looked really tempting with pick me up written all over it and the aroma of this particular dish was over taking all the other dishes . My cousins , kids and hubby really liked the dish and lined their stomachs with this ubiquitous brunch . My mind was busy and a bit confused on this fatty culprit , weather they should have rolled the potato Patti in raw vermicelli or in boiled ones . As for American  chopsuey we boil the noodles and then deep fry to get crisp noodles . With this confusion in mind , this divine   dish was a forgotten story after that . Nearly after  6-7 years , I came across a recipe   in one of my friends cook books about a snack similar that had used vermicelli to coat the potato Patti .finally my doubt was cleared and the recipe demanded for raw vermicelli ( how dum I am !!! )  I took note of the recipe and tried it out for the first time when I had my newly wedded cousin sister Ashibha come over to my place for a holiday feast . Her hubby hassan loved this snack   and so many other things that I made for them . They were here for 2 days and both of them had gained two kg’s each :-)) . My job done and the best part being she got pregnant immediately after this trip to my place . Now she is blessed with a beautiful daughter adleena ( hope I have spelt her name right ) who has a dimple on her cheek that’s even more beautiful .

Ingredients for the covering

Ingredients
Quantity
Potatoes 6 boiled , peeled and mashed
Lime juice1/2 teaspoon
Green Chilli + ginger paste 1 tablespoon
Gram flour 4 tablespoons
Salt to taste

Method for the covering

  1. Mix all the above mentioned ingredients together .
  2. Taste and adjust . Divide into equal lemon size balls and set aside .

Ingredients for Stuffing

Ingredients
Quantity
Corn kernels1 1/4 cup boiled
Grated coconut1/4 cup
Chopped coriander leaves 1/4 cup
Lime juice 1/2 teaspoon
Green Chilli +ginger paste 1 1/2 teaspoon
Salt and sugarto taste

Method for stuffing

  1. Mix all the ingredients together .
  2. Taste and adjust .Set aside .

How to proceed

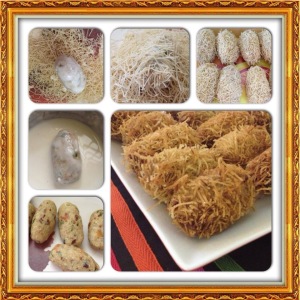
  1. In greased hands , make flat puris out of the potato balls .
  2. Place little corn mixture in the Center of each flattened ball and bind the open edges together and make an oval shape croquettes .

Other ingredients

ingredients
Quantity
Flour / Maida1/4 cup
Corn flour 1/4 cup
Saltto taste
Water enough to make a loose batter
Vermicelli 200 grams or more
Oilto deep fry

Method

  1. Mix flour , corn flour , salt and water to make a semi loose batter .
  2. Dip each oval shaped croquettes into the batter and roll in crushed vermicelli , making sure the vermicelli has coated all around the croquettes well .
  3. Do the same with all the croquettes and vermicelli . Heat oil to deep fry .
  4. Deep fry the vermicelli croquettes to a golden brown colour and crisp . Drain and serve hot with tomato sauce and mint chutney .

Notes

  1. any other veg or non – veg filling can be substituted to your choice .
  2. At times I do use cutlet mixture and roll them in vermicelli and deep fry . Works perfect .
  3. These croquettes can be made a day before , stored in the refrigerator and deep fried when required .

Healthy paneer filled dumplings

Share Button

photo (2)

Preparation Time : 35 minutes

Cooking Time : 30 minutes

Serving : 5-6 members

Description

Healthy paneer filled dumplings .mindful eating being clearly the buzz word for now , I am into swapping a few ingredients and making healthy choices that count .  But that doesn’t mean having to grudgingly pile on austere , flavour- less food on your plate . the magic is to accrue caloric karma with refreshing and nutritious way to tickle our taste buds . A recipe I came across in ndtv good times satellite telly channel . Took note of it but have made it with my twists and turns to the dish . As fasting is going on now , not being able to taste and cook is a big challenge . So , I was double nervous while making this dish  but it does help you to master the art of cooking with out tasting . This wonder ball is fluffy , light , healthy and succulent packed with so much flavour , character , taste and texture . In total it’s made to impress , so gear up to impress each one around you :-))

 Ingredients for paneer

Ingredients
Quantity
paneer / cottage cheese 200 grams
wheat flour 1 tablespoon
semolina1 tablespoon
couscous1 tablespoon (if you don't have couscous in hand substitute it with semolina)
egg1
oil1 teaspoon
Chilli flakes to taste
saltto taste

Method for paneer dough

  1. Mix all the above mentioned ingredients together and knead well to get a dough .
  2. Set aside in the refrigerator for one hour .

Ingredients For the filling

Ingredients
Quantity
Mixed vegetables1 1/2 cup chopped ( cabbage , carrots , capsicum , green peas , beans , cauliflower )
Chicken or mutton mince200 grams ( vegetarians can substitute with soya chunks )
Oil1 tablespoon
Onion1 big chopped
Green chillies2 chopped
Coriander leaveschopped few
Salt to taste
Ginger garlic paste 1/2 teaspoon each
Pepper to taste
Chilli flakes to taste
Turmeric powder a pinch
Lime a squeeze

Method for filling

  1. Mix chicken or mutton mince with turmeric powder , ginger garlic paste , salt to taste and very little water and pressure cook until cooked through .
  2. Boil till all the moisture has evaporated and the meat is dry . Heat oil and fry onions and green chillies to translucent .
  3. Top with chopped mixed vegetables and sauté till vegetables are half cooked , stirring constantly .
  4. Add the cooked minced meat , seasoning with pepper , chilli flakes , lime juice and salt to taste .
  5. Toss and mix well . Garnish with coriander leaves . Set aside and cool completely .

Ingredients For garnish

Ingredients
Quantity
Mixed vegetables1 1/2 cup chopped ( cabbage , carrots , capsicum , green peas , beans , cauliflower )
Chicken or mutton mince200 grams ( vegetarians can substitute with soya chunks )
Oil1 tablespoon
Onion1 big chopped
Green chillies2 chopped
Coriander leaveschopped few
Salt to taste
Ginger garlic paste 1/2 teaspoon each
Pepper to taste
Chilli flakes to taste
Turmeric powder a pinch
Lime a squeeze

Method for the garnish

  1. Blitz bread slices in a food processor to get fine crumbs .
  2. Remove and set aside . Blitz the sun dried tomato pieces along with the oil from the jar to a coarse paste .
  3. Mix bread crumbs ,sun dried tomatoes coarse paste and all the other ingredients together to get a well seasoned bread crumb mixture .
  4. Taste and adjust . Set aside .

How to proceed

  1. Take lemon size portions of the paneer dough and flatten them on your greased palm. Fill with the filling and shape to a round dumpling making sure the paneer dough has covered and sealed the filling inside .
  2. Do the same with all the filling and paneer dough .Boil in simmering one litter of salted boiling water till the dumplings rise to the surface.
  3. Remove the balls one by one out of the water .( be careful as the balls are very delicate and light , they tend to break soon .)
    roll them in breadcrumbs mixture immediately making sure the balls are coated well all around with the breadcrumb mixture .
  4. ( I placed 2 tablespoons of breadcrumb mixture on one palm .Then placed the paneer ball , topped it with another 2 tablespoons of breadcrumb mixture and pressed together with both hands to coat the breadcrumb mixture all around ) serve warm or at room temperature along with tomato ketchup or Thai sweet chilli sauce .

Notes

  1. In case you don’t have sun dried tomatoes in hand just omit the ingredient and follow the recipe .
  2. Don’t over load the dumplings while boiling them . 5 at a time is enough .

Dulce de leche

Share Button

image(34)

image(35)

Preparation Time : nil

Cooking Time : 40 minutes

Serving : as required

Description

Dulce de leche . Till date I really don’t know the real pronunciation of this South American word .  Well it’s nothing but an American confection prepared by slowly heating sweetened milk to create a substance that derives its taste from the Maillard reaction, changing flavor and colour . Literally translated and it means “candy of milk” or “candy [made] of milk”, “milk candy”, or “milk jam” . I first got to know about this deadly ingredient when I came across a recipe of a brownie that used dulce de leche in them . Loving the marble effect on top of these brownies did take note of the recipe . Wanting to give it a try had to make dulce de leche . Was so nervous and scared to pressure cook a tin of condensed milk . Went ahead and it worked perfect resulting in a caramel coloured mass of sweet . As it takes a while to cook and cool down before wanting to use it as an ingredient , after my first try I always make it in a batch of two or three tins together and make sure to get the dolce de leche done a day before so it’s handy and convenient . The left over dulce  de leche can be stored in the refrigerator until needed for next time . This magical ingredient is used in cheese cakes , cakes , puddings , Banoffe pies , tarts , ice creams and so many other desserts . You just have to be more creative to use this ingredient as it tastes good as it is .so gear up peeps to add a hell lot more of calories with this fatty Devine culprit .

Ingredients

Ingredients
Quantity
Condensed milk 1 tin
Water enough to cover the tins

Method

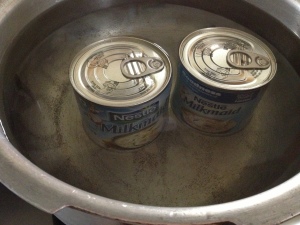
  1. Place a flat round pressure cooker with condensed milk tin in the Centre  . Pour water just up to the top of the condensed milk tin .
  2. Make sure the condensed milk tin is immersed in water well . Place over heat . Cover and pressure cook over medium heat for 40 minutes .
  3. Remove from flame and wait for the whistle heat to subside . Then open the pressure cooker lid and cool completely .
  4. Remove condensed milk tin from the cooled water . The condensed milk tin might be a bit hot still .
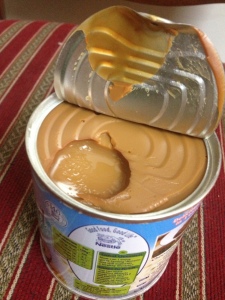
  5. So set aside to cool completely and then open the condensed milk tin . Your home made dulce de leche is ready to be devoured .

Notes

  1. Make sure the water is just above the condensed milk tin and the condensed milk tin is immersed in water well before pressure cooking .
  2. Cool cooked condensed milk tin well and then open .
  3. I usually made these a day ahead when required to save time .
  4. When making it’s better to make a set of two or three and store in the fridge so it’s handy to use when pressed for time .

Pistachio chicken curry

Share Button

image(33)

Preparation Time : 20 minutes

Cooking Time : 30 minutes

Serving : 5 members

Description

Pistachio chicken curry .pistachio being my favourite nut and it’s light pale green colour is also one among my favourite colours . What more do you need to love this curry that’s  a lightly flavoured rich curry that hits you on the right spot . Pistachios always bring me nostalgic memories of me eating these salty nuts in my boarding school as a kid . I would always eat the nuts inside first and save the shells to be had later to just suck the salt on each shell and a sour taste that follows after that . crazy little  me !!! I have such wired moments with food that always brings a board smile on my face . Coming back to the dish . This recipe was shared by my fellow home chef sherin Rizwan in a foodie group ” home chefs guild ” in face book . Her post was viral and for nearly a month we had at least two try’s by so many of us in the guild including me . Un – complicated strait forward recipe that requires less effort but with mind blowing results . A perfect cook ahead recipe to entertain guests . I served this lip snaking curry with garlic butter naan and it was devoured with no complains vanishing from the table in minutes . Make sure to have this dish once in six months or so , as it’s to rich and heavy to be had in regular basis . Umm fatty rich things are always
Yummy to the tummy but to be had with a portion control . Wonder why , why  , why ????

Ingredients

Ingredients
Quantity
Chicken1/2 kg
Onion 2 big sliced
Ginger garlic paste1/4 teaspoon each
Green chillies 8 or more
Pistachio 1/2 cup blanched and peeled + 1 tablespoon chopped to garnish
Oil 2 tablespoon
Coriander powder2 tablespoon
White pepper powder 1/2 teaspoon
Curd1/2 cup beaten
Salt to taste
Fresh Cream1/2 cup
Garam masala powder 2 pinches

Method

  1.  Cook sliced onions in little water . Cool completely and grind to a smooth paste and set aside .
  2. Grind blanched and peeled pistachio’s with green chillies to a smooth paste and set aside .
  3. Heat oil in a heavy bottomed pan . Add onion paste and sauté for a minute but not to brown .
  4. Top with ginger and garlic paste and sauté further for another minute . Add pistachio , green chilli paste , coriander powder , white pepper powder , salt and chicken . Sauté until the colour of the chicken changes .
  5. Lower the heat adding one cup of water and cook until chicken is tender .
  6. Once chicken is cooked and tender , add beaten curd . Mix well and simmer for a minute .
  7. Add fresh cream finally and keep over low heat for a minute  letting all the flavours infuse together .
  8. Garnish with chopped pistachio and a sprinkle of garam masala powder on top . Serve hot with naans , rotis or pulaos .

Oats biriyani kanji

Share Button

IMG_5858

image(32)

Preparation Time : 20 minutes

Cooking Time : 25 -30 minutes

Serving : 4-5 members

Description

Oats is one thing that every one at home hate’s as it’s slippery texture and no taste puts us all off away from it . But it’s so very healthy and I try my best to find a cheats way to some how line our tummies for breakfast  at least once in a week . My experiments works at times and when it does not , it’s had by me ( the bin tummy at home :-)) ) one morning , there was something new on the dining table for breakfast . Not knowing what it was or who sent it over . Opened the lid to see a semi thick soupy consistency , pale yellow coloured with bits of vegetables and chicken inside that had an inviting aroma . Found out it was sent over by my mother – in – law . I tasted a spoon first to see what it was and it was a savoury soup made with oats . Served to hubby dear not letting him know it was made with oats . He finished the entire bowl and asked for a second helping . Surprised me then let him know that it’s made with oats . With raised eye brows he was like it’s the magic of my mother’s hand’s that’s done justice here . Of course,  it is her magic as she is my mentor and first teacher in my culinary journey . Made sure to get the recipe from her and it was just the usual biriyani masala mixed with cooked oats and coconut milk . What a genius way to add more taste to the boring bland oats . Well , any thing that’s cooked like biriyani is a sure fire hit  and will be talked about always . Now this dish is added to my regular menu at home and during fasting ( rozza ) time I make this once in four days to be had while we break our fast as it’s healthy and better than having the rice kanji we make usually . Happy , healthy , tasty cooking to all .

Ingredients

Ingredients
Quantity
onion2 sliced
tomato1 chopped
green chillies2slit
Carrot1 big chopped
Green peas 1/4 cup
Beans 5 chopped
Cabbage shredded1/2 cup
Minced chicken / meat1/4 cup
coriander leaves 1 tablespoon chopped
mint leaves1 tablespoon , lime juice - a squeeze
ginger garlic paste1/8 tea spoon
curd 1 teaspoon
ghee10 gm
cinnamon1 inch pieces
cloves2
cardamom1
turmeric powder turmeric powder
chilli powder 1/8 teaspoon
salt to taste
coconut milk1 /2 cup
Instant Oats1 1/4 cup

Method

  1. Heat ghee in a pressure cooker , add cinnamon , cloves and cardamom . Top with sliced onions and fry till golden brown in colour .
  2. Add ginger garlic paste and fry to crisp . Top with chopped carrot , cabbage , beans , green peas , minced chicken , tomato , green chillies , mint leaves , coriander leaves , curd , turmeric powder , chilli powder and salt to taste .
  3. Mix well and sauté for another 10 minutes till all the juices are oozed out . Add 1 cup of water , mix well . Pressure cook for one whistle or until chicken and vegetables  are cooked and tender .
  4. Add coconut  milk , lime juice  add to the cooked chicken mince , vegetable mixture and set aside removing from heat .
  5. Bring 2 1/2 cups of water to boil . Add the instant oats and keep stirring until the oats are cooked through .
  6. Add the oats to the chicken mince and vegetable gravy . Mix well . Taste and adjust seasoning .
  7. Garnish with more fresh chopped coriander leaves and serve hot .

Notes

  1.  Vegetarians can omit the chicken used for a vegetarian version .
  2. At times when I make the vegetarian version , I add two beaten egg whites finally to the kanji .
  3. Pour the beaten egg whites slowly as stirring the kanji continuously to get thin treads of cooked egg whites like in sweet corn soup .
  4. It adds more taste and it’s filled with the goodness of proteins in the morning for breakfast .

Chicken wontons

Share Button

image(31)

Preparation Time : 30 minutes

Cooking Time :3-4 minutes for each batch deep fried + 20 minutes

Serving : 4-6 members

Description

Chicken wontons . The first time I got to read this dishes name on a menu card in a Chinese restaurant in Coimbatore , was not sure about how to pronounce the word wonton . I remember it was a chicken wanton soup . Wanting a clear soup , very hesitantly pronounced the word wonton and checked if it was a clear soup , then ordered the soup . Even till date I go through this difficulty of not being sure of a million words on how to be pronounced . But I never give up and make sure to learn the exact pronunciation of the word . Every passing day there is at least one new thing to be learnt isn’t it . The deep fried wanton also was introduced to me from the same restaurant Kowloon in Coimbatore . Ever since that  first mouthful bite , this in one of my favourite dishes .   Those days of no Internet and google left me in despair to experiment for a perfect recipe of home made wontons . But every try I failed with the texture of the wonton skin and the folding part .   Days of no google left us in plain experimenting of trial and error . Thanks to World Wide google network that anything and everything is just a finger touch away . My first try .. i was so very nervous but it was the talk of the table . From then on , it’s a staple at home . Only that no one ever gets enough of them .

Wanton wrapper ingredients

ingredients
Quantity
egg 1
salt3/4teaspoon
plain flour /maida2 cups + extra as needed
water1/4cup +extra as needed


Method for wanton wrappers

  1. Lightly beat the egg with the salt. Add the water
  2. Sift the flour into a large bowl. Make a well in the middle and add the egg and water mixture and combine.
  3. Add as much of the extra water as necessary to form a dough.
  4. Form the dough into a ball and knead for approximately 5 minutes, or until it forms a smooth, workable dough.
  5. Cover and allow to rest for 30 minutes.
  6. Turn the dough out onto a lightly floured surface. Roll out until very thin and cut into 9 cm squares.
  7. Pasta machines are brilliant for rolling this out, or just use a rolling pin.

Ingredients for the filling

Ingredients
Quantity
Spring Onions 5 tablespoons chopped
Carrot 1 thinly sliced
Beans5 thinly chopped
Cabbage1/4 cup shredded
garlic1 clove crushed
pepper powder to taste
Cooked shredded chicken 1 cup , ( cook boneless chicken cubes with salt to taste and enough water ,evaporate the water to dry . then blitz in a food processor )
light soy sauce1 tablespoon


MethodFor filling

  1. Add the carrots , beans and cabbage to hot boiling salted water .
  2. Cover and switch of the flame and set aside for 5 minutes .
  3. Drain and  Mix all ingredients together,taste and adjust and set aside .

How to assemble and deep fry

  1. Cut wanton wrappers into equal shaped squares. Place a tablespoon of chicken filling in the Center of the square .
  2. Spread egg white on the two adjacent  edges of the wanton wrappers . Fold the square into a triangle so that the  egg white helps the edges of the triangle to stick together .
  3. Dot with egg white on one side of the long side of the corners . Take the two sides of the long corners and bring them together with the edged corner underneath the other corner .
  4. The edge should curl up to form a boat – like shape . Do the same with all the filling and wonton wrappers .
  5. Heat up the oil in a frying pan or wok at medium heat.  Fry the wonton until golden brown. Watch the heat carefully.
  6. Keep turning them to cook them all the way through. Will take about 30 seconds not more . Drain and serve hot along with sweet and sour sauce .

Ingredients Sweet and Sour Sauce

Ingredients
Quantity
Red chilly powder1 1/2 tablespoon
salta pinch
sugar3 tablespoons
vinegar 1 tablespoon
water2 tablespoon

Method

  1. Put all ingredients together in a small bowl and microwave it until the sugar is dissolved.
  2. Stir to prevent the sugar from crystalizing on the bottom. It should take about a minute or so depending on your microwave.

Notes

  1. I added some tomato sauce , red chilli sauce and thai sweet sauce to the filling . But this filling did have a change in colour on the wontons once fried only where the filling was . So better to keep the filling simple and white in colour .
  2. The authentic filling is usually made with raw meat ground and then mixed with garlic , spring onion and soya sauce , I was not confident if the raw meat might cook so I used cooked meat .
  3. Vegetarians can substitute with thinly sliced mixed vegetables for the filling .
  4. Be very careful while deep frying making sure you do not brown the wontons too much .
  5. In case I have ready made wonton wrappers in stock I do use them instead which is really handy and easy but nothing comes close to home made wanton wrappers .
  6. Be careful about microwaving sugary mixtures too long because the sugar gets extremely hot and can crack a bowl due to thermal expansion of the area where the sugar is.

Momo’s

Share Button

image(30)

Preparation Time : 35 minutes

Cooking Time : 10-12 minutes

Serving : 4-6 members

Description

Momo’s . A steamed nibble very own to Tibet . I got to know about this delicacy only a few years back . My first try with this dish was a big disaster . After that I just didn’t want to try it at home , instead preferred eating out . The best momo’s I have had are at ooty in a small stall just out side modern department stores . My friends Sindhu , her four girls and sulu along with her school friends sai vidya naveen and Thelma just gobbled up the entire stock in the tiny stall . The following month I happened to go with my cousins to the same place but it didn’t taste as good as when with friends . Guess the girl power worked then . These momo’s were done under the watch full eyes of a Tibetian  girl anandhitha who helped me out with her mothers recipe . It worked perfect except that I was very slow in folding the petals . ( Practice … practice  .. practice  and only practice  can perfect any task ) Anandhitha was so fast looked as if she had magic in her hands . So the perfect looking momo’s were done by anandhitha and the not so perfect ones were of course done by me the great :-)) Another not deep fried nibble apt to be had while breaking your fast . All the best folks in advance for the petal folding part .

Ingredients for dough

Ingredients
Quantity
Flour / maida4 cups
Oil 1 tablespoon
Waterenough to knead to get a dough
Salta pinch

Method for dough

  1. Mix all the above mentioned ingredients together to get a smooth dough .
  2. Set aside covered for half an hour .

Filling ingredients

ingredients
Quantity
Ground raw boneless chicken1/4 kg ( grind with out water )
Carrot1 shredded
Beans 4 chopped thinly
Cabbage1/4 cup shredded
Spring onion 1 stalk chopped
Ginger1 teaspoon grated
Garlic 4 flakes minced
Green chillies to taste minced
Pepper powder to taste
Salt to taste

Method for filling

  1. Mix all the ingredients mentioned above for the filling together .
  2. Add seasoning to taste and combine well .
  3. Set aside covered in the refrigerator for one hour letting all the flavours infuse together .

Method to assemble

  1. Knead the prepared dough once again . Roll  one inch balls out of the dough .Take one ball and roll between your palms to a spherical shape . Dust work counter/board with flour .
  2. Flatten a ball on the dusted flour place to a 2 inch circle with the help of your palms . Do the same with all the dough balls and set aside covered with a bowl so that they don’t dry out .
  3. Use a rolling pin and roll out each of the flattened circles to get wrappers of three inch diameter in circular shape .
  4. Make sure the middle of the wrappers are slightly thicker than the edges so that you get well executed wrappers that seal the filling well .
  5. Do the same with all the flattened dough and keep covered making sure they do not dry out .
  6. Hold rolled wrapper on one palm , place one tablespoon filling mixture in the middle and with the other hand bring all the edges together to the Center , making petals . Pinch and twist the petals to ensure the filling is packed inside perfectly .
  7. Heat a greased bamboo steamer ( or use your iddli steamer that is greased properly . ) with water and  3 ripe tomatoes  in the bottom vessel . Arrange the momo’s in the greased bamboo / iddli steamer .
  8. Close with a lid and steam for about 10 minutes or until cooked through . Serve hot immediately with hot momo sauce .

Ingredients Hot Momo sauce

Ingredients
Quantity
RipeTomatoes3 big
Garlic flakes2
Dry red chillies8
Salt to taste


Method for momo sauce

  1. Blend the tomatoes that are at the bottom of the bamboo steamer vessel along with dry red chillies ,
  2. Garlic flakes and salt to taste to get a red coloured hot momo sauce .

Notes

  1. vegetarian’s can do the same by adding more quantity of vegetables avoiding the chicken .
  2. Ground Prawn also can be added instead of ground chicken
  3. You can add lesser red dry chillies to get a blander red momo sauce .
  4. You can store the steamed momo’s in  foil paper rolled around each momo individually and then packed in a zip lock cover and kept in the refrigerator . Steam the momo’s just before you want to serve .
  5. You can also boil the momo’s in boiling salted water dropping the momo’s one at a time ( 5 momos only ) and cook for about 10 minutes until they float on top . Drain and serve immediately .
  6. You can also sauté the cooked momo’s in little butter and serve .