Daily Archives: September 26, 2014


Dulce de leche

Share Button

image(34)

image(35)

Preparation Time : nil

Cooking Time : 40 minutes

Serving : as required

Description

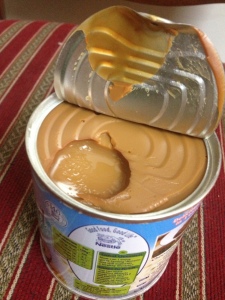
Dulce de leche . Till date I really don’t know the real pronunciation of this South American word .  Well it’s nothing but an American confection prepared by slowly heating sweetened milk to create a substance that derives its taste from the Maillard reaction, changing flavor and colour . Literally translated and it means “candy of milk” or “candy [made] of milk”, “milk candy”, or “milk jam” . I first got to know about this deadly ingredient when I came across a recipe of a brownie that used dulce de leche in them . Loving the marble effect on top of these brownies did take note of the recipe . Wanting to give it a try had to make dulce de leche . Was so nervous and scared to pressure cook a tin of condensed milk . Went ahead and it worked perfect resulting in a caramel coloured mass of sweet . As it takes a while to cook and cool down before wanting to use it as an ingredient , after my first try I always make it in a batch of two or three tins together and make sure to get the dolce de leche done a day before so it’s handy and convenient . The left over dulce  de leche can be stored in the refrigerator until needed for next time . This magical ingredient is used in cheese cakes , cakes , puddings , Banoffe pies , tarts , ice creams and so many other desserts . You just have to be more creative to use this ingredient as it tastes good as it is .so gear up peeps to add a hell lot more of calories with this fatty Devine culprit .

Ingredients

Ingredients
Quantity
Condensed milk 1 tin
Water enough to cover the tins

Method

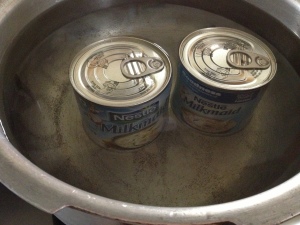
  1. Place a flat round pressure cooker with condensed milk tin in the Centre  . Pour water just up to the top of the condensed milk tin .
  2. Make sure the condensed milk tin is immersed in water well . Place over heat . Cover and pressure cook over medium heat for 40 minutes .
  3. Remove from flame and wait for the whistle heat to subside . Then open the pressure cooker lid and cool completely .
  4. Remove condensed milk tin from the cooled water . The condensed milk tin might be a bit hot still .
  5. So set aside to cool completely and then open the condensed milk tin . Your home made dulce de leche is ready to be devoured .

Notes

  1. Make sure the water is just above the condensed milk tin and the condensed milk tin is immersed in water well before pressure cooking .
  2. Cool cooked condensed milk tin well and then open .
  3. I usually made these a day ahead when required to save time .
  4. When making it’s better to make a set of two or three and store in the fridge so it’s handy to use when pressed for time .

Pistachio chicken curry

Share Button

image(33)

Preparation Time : 20 minutes

Cooking Time : 30 minutes

Serving : 5 members

Description

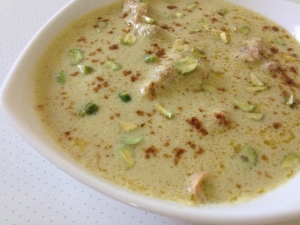
Pistachio chicken curry .pistachio being my favourite nut and it’s light pale green colour is also one among my favourite colours . What more do you need to love this curry that’s  a lightly flavoured rich curry that hits you on the right spot . Pistachios always bring me nostalgic memories of me eating these salty nuts in my boarding school as a kid . I would always eat the nuts inside first and save the shells to be had later to just suck the salt on each shell and a sour taste that follows after that . crazy little  me !!! I have such wired moments with food that always brings a board smile on my face . Coming back to the dish . This recipe was shared by my fellow home chef sherin Rizwan in a foodie group ” home chefs guild ” in face book . Her post was viral and for nearly a month we had at least two try’s by so many of us in the guild including me . Un – complicated strait forward recipe that requires less effort but with mind blowing results . A perfect cook ahead recipe to entertain guests . I served this lip snaking curry with garlic butter naan and it was devoured with no complains vanishing from the table in minutes . Make sure to have this dish once in six months or so , as it’s to rich and heavy to be had in regular basis . Umm fatty rich things are always
Yummy to the tummy but to be had with a portion control . Wonder why , why  , why ????

Ingredients

Ingredients
Quantity
Chicken1/2 kg
Onion 2 big sliced
Ginger garlic paste1/4 teaspoon each
Green chillies 8 or more
Pistachio 1/2 cup blanched and peeled + 1 tablespoon chopped to garnish
Oil 2 tablespoon
Coriander powder2 tablespoon
White pepper powder 1/2 teaspoon
Curd1/2 cup beaten
Salt to taste
Fresh Cream1/2 cup
Garam masala powder 2 pinches

Method

  1.  Cook sliced onions in little water . Cool completely and grind to a smooth paste and set aside .
  2. Grind blanched and peeled pistachio’s with green chillies to a smooth paste and set aside .
  3. Heat oil in a heavy bottomed pan . Add onion paste and sauté for a minute but not to brown .
  4. Top with ginger and garlic paste and sauté further for another minute . Add pistachio , green chilli paste , coriander powder , white pepper powder , salt and chicken . Sauté until the colour of the chicken changes .
  5. Lower the heat adding one cup of water and cook until chicken is tender .
  6. Once chicken is cooked and tender , add beaten curd . Mix well and simmer for a minute .
  7. Add fresh cream finally and keep over low heat for a minute  letting all the flavours infuse together .
  8. Garnish with chopped pistachio and a sprinkle of garam masala powder on top . Serve hot with naans , rotis or pulaos .

Oats biriyani kanji

Share Button

IMG_5858

image(32)

Preparation Time : 20 minutes

Cooking Time : 25 -30 minutes

Serving : 4-5 members

Description

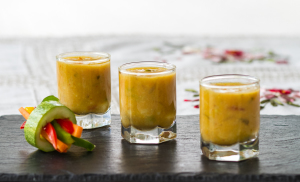
Oats is one thing that every one at home hate’s as it’s slippery texture and no taste puts us all off away from it . But it’s so very healthy and I try my best to find a cheats way to some how line our tummies for breakfast  at least once in a week . My experiments works at times and when it does not , it’s had by me ( the bin tummy at home :-)) ) one morning , there was something new on the dining table for breakfast . Not knowing what it was or who sent it over . Opened the lid to see a semi thick soupy consistency , pale yellow coloured with bits of vegetables and chicken inside that had an inviting aroma . Found out it was sent over by my mother – in – law . I tasted a spoon first to see what it was and it was a savoury soup made with oats . Served to hubby dear not letting him know it was made with oats . He finished the entire bowl and asked for a second helping . Surprised me then let him know that it’s made with oats . With raised eye brows he was like it’s the magic of my mother’s hand’s that’s done justice here . Of course,  it is her magic as she is my mentor and first teacher in my culinary journey . Made sure to get the recipe from her and it was just the usual biriyani masala mixed with cooked oats and coconut milk . What a genius way to add more taste to the boring bland oats . Well , any thing that’s cooked like biriyani is a sure fire hit  and will be talked about always . Now this dish is added to my regular menu at home and during fasting ( rozza ) time I make this once in four days to be had while we break our fast as it’s healthy and better than having the rice kanji we make usually . Happy , healthy , tasty cooking to all .

Ingredients

Ingredients
Quantity
onion2 sliced
tomato1 chopped
green chillies2slit
Carrot1 big chopped
Green peas 1/4 cup
Beans 5 chopped
Cabbage shredded1/2 cup
Minced chicken / meat1/4 cup
coriander leaves 1 tablespoon chopped
mint leaves1 tablespoon , lime juice - a squeeze
ginger garlic paste1/8 tea spoon
curd 1 teaspoon
ghee10 gm
cinnamon1 inch pieces
cloves2
cardamom1
turmeric powder turmeric powder
chilli powder 1/8 teaspoon
salt to taste
coconut milk1 /2 cup
Instant Oats1 1/4 cup

Method

  1. Heat ghee in a pressure cooker , add cinnamon , cloves and cardamom . Top with sliced onions and fry till golden brown in colour .
  2. Add ginger garlic paste and fry to crisp . Top with chopped carrot , cabbage , beans , green peas , minced chicken , tomato , green chillies , mint leaves , coriander leaves , curd , turmeric powder , chilli powder and salt to taste .
  3. Mix well and sauté for another 10 minutes till all the juices are oozed out . Add 1 cup of water , mix well . Pressure cook for one whistle or until chicken and vegetables  are cooked and tender .
  4. Add coconut  milk , lime juice  add to the cooked chicken mince , vegetable mixture and set aside removing from heat .
  5. Bring 2 1/2 cups of water to boil . Add the instant oats and keep stirring until the oats are cooked through .
  6. Add the oats to the chicken mince and vegetable gravy . Mix well . Taste and adjust seasoning .
  7. Garnish with more fresh chopped coriander leaves and serve hot .

Notes

  1.  Vegetarians can omit the chicken used for a vegetarian version .
  2. At times when I make the vegetarian version , I add two beaten egg whites finally to the kanji .
  3. Pour the beaten egg whites slowly as stirring the kanji continuously to get thin treads of cooked egg whites like in sweet corn soup .
  4. It adds more taste and it’s filled with the goodness of proteins in the morning for breakfast .

Chicken wontons

Share Button

image(31)

Preparation Time : 30 minutes

Cooking Time :3-4 minutes for each batch deep fried + 20 minutes

Serving : 4-6 members

Description

Chicken wontons . The first time I got to read this dishes name on a menu card in a Chinese restaurant in Coimbatore , was not sure about how to pronounce the word wonton . I remember it was a chicken wanton soup . Wanting a clear soup , very hesitantly pronounced the word wonton and checked if it was a clear soup , then ordered the soup . Even till date I go through this difficulty of not being sure of a million words on how to be pronounced . But I never give up and make sure to learn the exact pronunciation of the word . Every passing day there is at least one new thing to be learnt isn’t it . The deep fried wanton also was introduced to me from the same restaurant Kowloon in Coimbatore . Ever since that  first mouthful bite , this in one of my favourite dishes .   Those days of no Internet and google left me in despair to experiment for a perfect recipe of home made wontons . But every try I failed with the texture of the wonton skin and the folding part .   Days of no google left us in plain experimenting of trial and error . Thanks to World Wide google network that anything and everything is just a finger touch away . My first try .. i was so very nervous but it was the talk of the table . From then on , it’s a staple at home . Only that no one ever gets enough of them .

Wanton wrapper ingredients

ingredients
Quantity
egg 1
salt3/4teaspoon
plain flour /maida2 cups + extra as needed
water1/4cup +extra as needed


Method for wanton wrappers

  1. Lightly beat the egg with the salt. Add the water
  2. Sift the flour into a large bowl. Make a well in the middle and add the egg and water mixture and combine.
  3. Add as much of the extra water as necessary to form a dough.
  4. Form the dough into a ball and knead for approximately 5 minutes, or until it forms a smooth, workable dough.
  5. Cover and allow to rest for 30 minutes.
  6. Turn the dough out onto a lightly floured surface. Roll out until very thin and cut into 9 cm squares.
  7. Pasta machines are brilliant for rolling this out, or just use a rolling pin.

Ingredients for the filling

Ingredients
Quantity
Spring Onions 5 tablespoons chopped
Carrot 1 thinly sliced
Beans5 thinly chopped
Cabbage1/4 cup shredded
garlic1 clove crushed
pepper powder to taste
Cooked shredded chicken 1 cup , ( cook boneless chicken cubes with salt to taste and enough water ,evaporate the water to dry . then blitz in a food processor )
light soy sauce1 tablespoon


MethodFor filling

  1. Add the carrots , beans and cabbage to hot boiling salted water .
  2. Cover and switch of the flame and set aside for 5 minutes .
  3. Drain and  Mix all ingredients together,taste and adjust and set aside .

How to assemble and deep fry

  1. Cut wanton wrappers into equal shaped squares. Place a tablespoon of chicken filling in the Center of the square .
  2. Spread egg white on the two adjacent  edges of the wanton wrappers . Fold the square into a triangle so that the  egg white helps the edges of the triangle to stick together .
  3. Dot with egg white on one side of the long side of the corners . Take the two sides of the long corners and bring them together with the edged corner underneath the other corner .
  4. The edge should curl up to form a boat – like shape . Do the same with all the filling and wonton wrappers .
  5. Heat up the oil in a frying pan or wok at medium heat.  Fry the wonton until golden brown. Watch the heat carefully.
  6. Keep turning them to cook them all the way through. Will take about 30 seconds not more . Drain and serve hot along with sweet and sour sauce .

Ingredients Sweet and Sour Sauce

Ingredients
Quantity
Red chilly powder1 1/2 tablespoon
salta pinch
sugar3 tablespoons
vinegar 1 tablespoon
water2 tablespoon

Method

  1. Put all ingredients together in a small bowl and microwave it until the sugar is dissolved.
  2. Stir to prevent the sugar from crystalizing on the bottom. It should take about a minute or so depending on your microwave.

Notes

  1. I added some tomato sauce , red chilli sauce and thai sweet sauce to the filling . But this filling did have a change in colour on the wontons once fried only where the filling was . So better to keep the filling simple and white in colour .
  2. The authentic filling is usually made with raw meat ground and then mixed with garlic , spring onion and soya sauce , I was not confident if the raw meat might cook so I used cooked meat .
  3. Vegetarians can substitute with thinly sliced mixed vegetables for the filling .
  4. Be very careful while deep frying making sure you do not brown the wontons too much .
  5. In case I have ready made wonton wrappers in stock I do use them instead which is really handy and easy but nothing comes close to home made wanton wrappers .
  6. Be careful about microwaving sugary mixtures too long because the sugar gets extremely hot and can crack a bowl due to thermal expansion of the area where the sugar is.

Momo’s

Share Button

image(30)

Preparation Time : 35 minutes

Cooking Time : 10-12 minutes

Serving : 4-6 members

Description

Momo’s . A steamed nibble very own to Tibet . I got to know about this delicacy only a few years back . My first try with this dish was a big disaster . After that I just didn’t want to try it at home , instead preferred eating out . The best momo’s I have had are at ooty in a small stall just out side modern department stores . My friends Sindhu , her four girls and sulu along with her school friends sai vidya naveen and Thelma just gobbled up the entire stock in the tiny stall . The following month I happened to go with my cousins to the same place but it didn’t taste as good as when with friends . Guess the girl power worked then . These momo’s were done under the watch full eyes of a Tibetian  girl anandhitha who helped me out with her mothers recipe . It worked perfect except that I was very slow in folding the petals . ( Practice … practice  .. practice  and only practice  can perfect any task ) Anandhitha was so fast looked as if she had magic in her hands . So the perfect looking momo’s were done by anandhitha and the not so perfect ones were of course done by me the great :-)) Another not deep fried nibble apt to be had while breaking your fast . All the best folks in advance for the petal folding part .

Ingredients for dough

Ingredients
Quantity
Flour / maida4 cups
Oil 1 tablespoon
Waterenough to knead to get a dough
Salta pinch

Method for dough

  1. Mix all the above mentioned ingredients together to get a smooth dough .
  2. Set aside covered for half an hour .

Filling ingredients

ingredients
Quantity
Ground raw boneless chicken1/4 kg ( grind with out water )
Carrot1 shredded
Beans 4 chopped thinly
Cabbage1/4 cup shredded
Spring onion 1 stalk chopped
Ginger1 teaspoon grated
Garlic 4 flakes minced
Green chillies to taste minced
Pepper powder to taste
Salt to taste

Method for filling

  1. Mix all the ingredients mentioned above for the filling together .
  2. Add seasoning to taste and combine well .
  3. Set aside covered in the refrigerator for one hour letting all the flavours infuse together .

Method to assemble

  1. Knead the prepared dough once again . Roll  one inch balls out of the dough .Take one ball and roll between your palms to a spherical shape . Dust work counter/board with flour .
  2. Flatten a ball on the dusted flour place to a 2 inch circle with the help of your palms . Do the same with all the dough balls and set aside covered with a bowl so that they don’t dry out .
  3. Use a rolling pin and roll out each of the flattened circles to get wrappers of three inch diameter in circular shape .
  4. Make sure the middle of the wrappers are slightly thicker than the edges so that you get well executed wrappers that seal the filling well .
  5. Do the same with all the flattened dough and keep covered making sure they do not dry out .
  6. Hold rolled wrapper on one palm , place one tablespoon filling mixture in the middle and with the other hand bring all the edges together to the Center , making petals . Pinch and twist the petals to ensure the filling is packed inside perfectly .
  7. Heat a greased bamboo steamer ( or use your iddli steamer that is greased properly . ) with water and  3 ripe tomatoes  in the bottom vessel . Arrange the momo’s in the greased bamboo / iddli steamer .
  8. Close with a lid and steam for about 10 minutes or until cooked through . Serve hot immediately with hot momo sauce .

Ingredients Hot Momo sauce

Ingredients
Quantity
RipeTomatoes3 big
Garlic flakes2
Dry red chillies8
Salt to taste


Method for momo sauce

  1. Blend the tomatoes that are at the bottom of the bamboo steamer vessel along with dry red chillies ,
  2. Garlic flakes and salt to taste to get a red coloured hot momo sauce .

Notes

  1. vegetarian’s can do the same by adding more quantity of vegetables avoiding the chicken .
  2. Ground Prawn also can be added instead of ground chicken
  3. You can add lesser red dry chillies to get a blander red momo sauce .
  4. You can store the steamed momo’s in  foil paper rolled around each momo individually and then packed in a zip lock cover and kept in the refrigerator . Steam the momo’s just before you want to serve .
  5. You can also boil the momo’s in boiling salted water dropping the momo’s one at a time ( 5 momos only ) and cook for about 10 minutes until they float on top . Drain and serve immediately .
  6. You can also sauté the cooked momo’s in little butter and serve .