Daily Archives: March 25, 2014


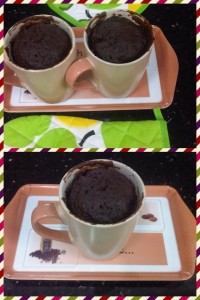
5 Minute chocolate mug cake

Share Button

photo (8)

Preparation Time : 6 minutes

Cooking Time : 5 minutes

Serving : 2 members

Description

5 minute chocolate mug cake . Recipe and picture sent to me by Hamidha Shabeer . I have not yet tried this recipe but sure will be really good. Actually the day i tried the Nutella 2 minutes mug cake , Hamidha Shabeer tried this cake at her place. As i mentioned before great people think a like. Hamidha Shabeer and myself are far relatives. Every time i get to meet her in any gathering in the family, it’s like a smile first, a hi that follows and then a bye finally. That’s all . Only through my page have i got so close with her and realized that we both are so similar . thanks to my page for that and thank you Hamidha Shabeer (pappu) for the recipe, picture and the enormous encouragement from your side.

Ingredients

Ingredients
Quantity
flour4 tablespoons
sugar (white or brown)5 tablespoons
unsweetened cocoa powder2 tablespoons
baking powder3 teaspoon
egg1
milk1 tablespoon
butter (or any neutral oil)3 tablespoons
salt (if using unsalted butter)A pinch
vanilla extract (optional)2 drops

Method

  1. Get your hands on two microwave safe coffee mugs that can hold about 250ml liquid (basically, nothing too small or the cake will spill over while cooking).
  2. Halve the quantity of flour, cocoa, baking powder, salt and sugar and add into each mug. Mix well with a fork.
  3. Then halve the quantity of milk, butter, and vanilla and add into each mug. Break egg into another small bowl, whisk with a fork and add half of it into each mug. Stir well until all the ingredients mix well. Make sure there is no flour stuck to the bottom of the mug.
  4. Add one mug at a time to the microwave and cook on medium heat for 2 mins. Every microwave acts differently and mine is a very basic one with just two knobs, one for heat level (low, medium, high) and one for time. I kept mine on medium and set each mug at 2 mins.
  5. The cake turned out perfect. If your microwave can show power levels, etc, keep it at medium and start at 2 mins. You can adjust it once you take a look at your cooked cake.

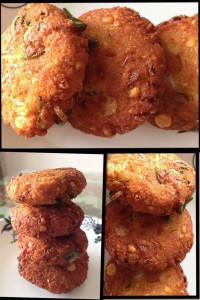
Paruppu Vadai

Share Button

photo (7)

Preparation Time : soaking time one hour + 15 minutes

Cooking Time : 2 to 3 minutes for one batch

Serving : 4 members

Description

Paruppu vadai . Also known as masala vadai every where and aamai vadai only in tirunelveli . The paruppu vadai is a street food found all over Tamilnadu. The first time i got to eat this dish as a kid , I over ate it and at midnight vomited. (crazy me only then did i realize that you should not over eat any thing beyond a limit) I learnt this dish from my mother – in – law but she uses Bengal gram dal .Once my friend Meera Aboo Thamby suggested asking me to use peas dal instead of Bengal gram dal. The paruppu vadai tasted so good. Then once my maid (fathima) made paruppu vadai adding bits of carrots and coconuts. I liked that to, so my paruppu vadai recipe has taken twists and turns from the time I got to learn it.Finally the recipe that follows is the latest version of my paruppu vadai.

Ingredients

Ingredients
Quantity
peas dal ( Pattani paruppu or vadai paruppu as known in Tamil ) 2 cups
dry red chillies4 to 5
small onions1 hand chopped finely
green chillies2 chopped
curry leavesfew chopped
snauf1 teaspoon
saltto taste
ginger1/4 inch pieces grated
carrot1 medium sized cut into small bits
coconut2 tablespoons cut into bits
oilto deep fry

Method

  1. Soak peas dal in water for one hour . Drain and reserve 2 tablespoons of whole soaked peas dal aside .
  2. Add red dry chillies and snauf to the remaining soaked peas dal and grind to a coarse paste adding very little water .
  3. Add all the other ingredients except for the oil to deep fry . Mix well . Heat oil to deep fry in a kadai .
  4. Make lime size balls with the peas dal mixture and flatten them to get small round 1/4 inch thick Pattice .
  5. Drop one by one , 4 to 5 in one batch into hot oil and fry for 2 minutes on each side to get a deep golden brown crisp paruppu vadais .
  6. Drain and serve hot with chuntny , tomato sauce ,tea ….. At home it’s had as it is without any dips or chuntny s .
  7. Even before going to the dining table 3/4 of the paruppu vadais are over in the kitchen , as every one has a taste before on the table .

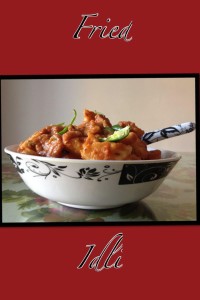
Fried Idly

Share Button

photo (6)

Preparation Time : 15 minutes

Cooking Time : 25 minutes

Serving : 6 members

Description

Fried Idli . A fusion dish (indo – chinese)that i learnt initially when i started to cook from my hubby’s aunt Bismi amma. She had invited us over for Breakfast when i was newly married. The first tought that came to my mind when i saw the dish was, it must be some chinese style chicken dish (I was like , how can you eat fried chicken for breakfast)even after they served and i tasted it also , i could not figure out what it was . Finally Bismi amma told me it was idlis. I was so surprised, that idlis could taste so good . I took note of the recipe then and there . From then on its a regular dish at home. Any left over idlis or hard idlis are surely changed into fried idlis.Who ever i have served this dish to have loved it and have never guessed that its made out of idlis.

Ingredients for Batter

Idlis – 10 , cut into 4 cubes

Ingredients
Quantity
Maida1 cup
cornflour1 cup
salt to taste
waterlittle

Ingredients for Sauce

Ingredients
Quantity
tomatoes5 big ground to a smooth paste
onions4 big fried in 1 teaspoon oil to brown in colour and ground to a smooth paste
ginger garlic paste1/2 teaspoon each
oilto deep fry + 2 tablespoons
onion1 chopped
cumin seeds 1 teaspoon
chilli powder1 1-4 teaspoon
saltto taste
ajinomotoa pinch ( optional )
tomato sauce1 cup
red food colora pinch ( optional , I didn't use in this dish on the picture )

Ingredients to Garnish

Ingredients
Quantity
green chillies2 cut into thin long strips
coriander leavesfew chopped

Method for Batter

  1. Mix all the ingredients together for the batter to get a semi loose consistency batter .
  2. Heat oil to deep fry in a wok . Dip the cubed idli pieces one at a time into the batter and drop into the hot oil .
  3. Fry to a light golden brown color and crisp . Drain and set aside .

Method for Sauce

  1. Heat 2 tablespoons of oil in a sauce pan . Add cumin seeds and chopped onion and fry to brown .
  2. Top with ginger garlic paste and fry to crisp . Add the ground tomato purée and fry till raw smell vanishes . Oil should float on top .
  3. Add the fried onion paste . Mix well and sauté for 2 minutes . Top with chilli powder , sugar , salt to taste , ajinomoto ( optional ) , red food colour ( optional ) and tomato sauce .
  4. Mix well adding 1/4 cup or more water to get a thick flowing consistency sauce .
  5. Boil the sauce for 2 to 4 minutes allowing all the flavours to infuse together in medium heat as the sauce tends to sputter all around . Taste and adjust .
  6. Mix the fried idlis just before serving with the re heated sauce . Garnish with green chillies and coriander leaves .
  7. Serve hot immediately .

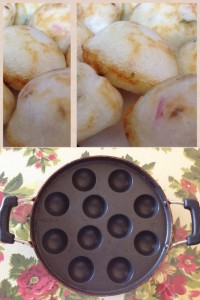
kuli paniyaram

Share Button

photo (5)

Preparation Time : 10 minutes

Cooking Time : 1 1/2 minute for each batch of kuli paniyaram

Serving : 4 members

Description

kuli paniyaram. A very easy dish made with always available ingredients at home. It’s so instant that this dish is the best option when you have unexpected guests at home any time of the day. I Learnt this dish from my mother – in – law. My kids and son-in-law Riyaz love this dish but my hubby does not fancy this dish at all . So I make this dish only when kids are at home. My gal makes this dish at her home very regularly (atleast 30 to 40 for a meal) This dish is best served with any chutney that is really hot and spicy.

Ingredients

Ingredients
Quantity
idli batter2 cups
small onions1/2 hand chopped
green chillies1 chopped finely
ginger1/4 inch piece grated
curry leavesfew chopped
coriander leaves few chopped
soda - bi - carbonate a pinch
cumin seeds1/4 teaspoon
saltto taste
waterlittle
oil4 tablespoons

Method

  1. Mix all the above ingredients together except for oil , to get a semi loose consistency batter . Set aside for 10 minutes .
  2. Heat a non – stick kuli pariyaram griddle with 1/4 teaspoon oil in each dent on the griddle .
  3. When oil is hot , pour 1 1/2 tablespoons full of batter mixture into each dent and cook for 30 seconds .
  4. You will find bubbles on top of the batter in each dent , then turn the kuli pariyarams over with a help of a spoon or a kuli pariyaram stick .
  5. Cook again for a minute on medium heat till cooked through .
  6. Remove and serve hot with any spicy chuntny of your choice . Best served for breakfast , dinner or a snak for tea in the evening .

Lychee pudding

Share Button

photo (4)

Preparation Time : 10 minutes

Cooking Time : 10 minutes + 1 hour in the freezer to set

Serving : 6 members

Description

Lychee pudding . This dessert just came to my mind instantly when my daughter wanted to prepare a dessert that would go well with a Chinese menu .She did as I mentioned and it was really nice but it was a bit bland as the sugar constant was less. We had to pour lychee syrup on top of each serving to make it taste good. So i have made some changes from what i told her that will work out well.

Ingredients

Ingredients
Quantity
condensed milk1 tin
milk1 tin to the measurement of the condensed milk tin
lychee tinned1 tin
china grass15 grams
lychee juice1 tin to the measurement of the condensed milk tin
sugarto taste

Method

  1. Open the tinned lychee tin and strain the lychees , reserving the syrup from the tin .
  2. Soak china grass in the reserved syrup and set aside for 10 minutes .
  3. Boil milk , add the soaked china grass and cook till the china grass has dissolved completely for about 10 minutes in medium heat .
  4. Add lychee juice and condensed milk and mix well . Taste and add sugar if needed. Strain the mixture into a dessert tray or individual bowls . Let it cool down to room temperature .
  5. Top with the strained lychees . Keep in the freezer for an hour to set . Remove and keep in the refrigerator till needed to be served .
  6. Serve chill .

Batter fried prawns

Share Button

photo (3)


Preparation Time : 20 minutes + 2 hours marination time

Cooking Time : 6 to 8 minutes for each batch of prawns deep fried .

Serving :2 members

Description

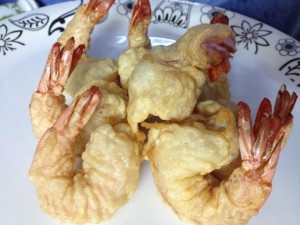
Batter fried prawns. Every one at home loves this dish. (except my vegetarian gal of course) I usually serve this as a starter with soup. My son-in-law Riyaz goes head over heels when ever i make this for him. Last night , had my husband’s neice and her family here for dinner at my daughter’s place. It was a grand feast. This batter fried prawns also was made then well my gal and myself divided the menu into 2 portions and prepared the dishes. Mine was fish , prawn and crab and hers was chinese .Her aunt and her kids went bonkers over the chinese food served .In fact they did compliment her saying that she has cooked even better than me . Both of us were so happy about it. Mohammed , my hubby’s neices son was like fried rice and noodles is supppppeeeerrrrrr. My daughter now has an added qualification as a good cook.

Ingredients

Ingredients
Quantity
prawns cleaned with the tail1/4 kg
saltto taste
white pepperto taste
ajinomotoa pinch ( optional )
flourone hand
cornflourone hand
egg whites2
oilto deep fry

Method

  1. Marinate cleaned prawns with salt , white pepper to taste and ajinomoto for 2 hours .
  2. Mix flour , corn flour , salt to taste , 2 egg whites and little water to get a loose semi thick batter .
  3. Heat oil in a wok . Dip the marinated prawns in the batter by holding the tail and drop into hot oil , 6 to 7 prawns in one batch .
  4. Lower the flame to medium and fry to a light golden colour and crisp . ( be care full about the colour ) drain and serve hot with sweet chilli sauce .

Murungga poo poriyal

Share Button

photo (2)


Preparation Time : 20 minutes

Cooking Time : 15 minutes

Serving : 4 members

Description

Murungga poo poriyal . Drumstick flower poriyal. Can’t remember from where or whose recipe this is because haven’t had this dish in my moms place or my hubby’s place. But my instincts tell me it’s from Coimbatore. My hubby loves this dish but the problem is we get to prepare this dish only when the flowers bloom in a particular season when the season is on there is always a white carpet of drumstick flowers on the ground all around the tree. It’s a treat to the eyes.Very easy to prepare dish with very few ingredients.

Ingredients

Ingredients
Quantity
drumstick flowers4 cups
small onions1 hand full chopped
garlic1/2 hand chopped
green chillies2 to 3 chopped
saltto taste
eggs2 (seasoned with salt and pepper) beaten lightly
coconut oil2 tablespoons

Method

  1. Soak the drumstick flowers in salted water for 5 minutes . This helps small spider like white insects creep out of the flowers .
  2. Rinse the flowers in water three times , changing water every time . Drain and put it into a non stick pan .
  3. Top with chopped small onions , garlic , green chillies , salt to taste and little water .
  4. Cook till the flowers are cooked and the water has evaporated . ( I do till this part of the recipe in advance , and the rest that follows latter just before serving as you get to serve the dish hot ) make a well in between the cooked flowers .
  5. Pour the coconut oil in and heat the oil . Add the beaten eggs and scramble along with the flowers till the eggs coat the flowers well and the eggs are cooked .
  6. Serve hot for lunch along with rice as a side dish .