Daily Archives: November 18, 2013


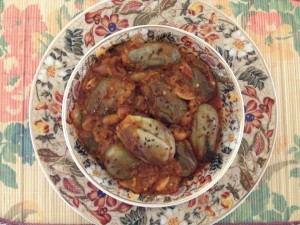
Katharikai katta

Share Button

katharikkai

Preparation Time : 5 minutes

Cooking Time : 25 to 30 members

Serving : 6 to 8 members

Description

A tasty , tangy , hot and sweet dish served as a side dish for biriyani in the ravuthar community of Tamil Nadu . Deepa Almaz requested me to post the recipe but my hubby’s place they serve a similar dish called ennai katharikai . I know to prepare the ennai katharikai dish not the katharikai katta . I very vaguely remembered going through the recipe of katharikai katta from my friend fathimas mother – in – laws from salem (meher amma ) hand written recipe book ( which I had taken a xerox of the entire book ) . I tried it out and it was tasteing exactelly as served at the weddings . One of the best treasures I own to date is the hand written xerox of Mehar ammas recipe book . It is filled with all authentic dishes which are fading away .

Ingredients

Ingredients
Quantity
To dry roast and grind to a smooth paste – mustard seeds 3/4 teaspoon
cumin seed3/4 teaspoon
fenugreek seeds1/4 teaspoon
pepper corns 3/4 teaspoon
sesame seeds 3/4 teaspoon

Ingredients for Main Dish

Ingredients
Quantity
Small onion15 crushed
ginger1 /2 inch piece crushed
garlic5 flakes crushed
brinjals12 whole slit at the into 4
gingily oil1/2 cup
coriander powder1 tablespoon
chilli powder2 teaspoons
turmeric powder 1/4 teaspoon
saltto taste
tamarind pulp1/2 cup
jaggery1 teaspoon

Method 

  1. Heat a non stick pan with oil in it . Add 1/2 of the crushed small onions , ginger and garlic .
  2. Top with half of the ground masala and add the brinjals . Fry till the colour of the brinjal changed and becomes a bit soft for about 10 minutes .
  3. Add the other 1/2 of crushed things and the ground masala . Stir well , top with coriander powder , chilli powder , turmeric powder and salt to taste .
  4. Sauté for 2 minutes adding the tamarind pulp and very little water just enough to cook the brinjal and to get a thick flowing gravy .
  5. Simmer and cook till oil floats on top and brinjals are soft and cooked through . Add the jaggery finally , mix well . Taste and adjust .
  6. Serve hot with biriyani .


Oven Fried Deviled Chicken

Share Button

ovenchicken

Preparation Time : 20 minutes + 2 hours for marination

Cooking Time : 30 to 35 minutes

Serving : 6 members

Description

A healthy dish which I took note from the magazine prevention . My gym buddy jaya Bharathi passed it over to me . I have made some changes as the original recipe seemed to be very bland . yummy dish , been into a lot of experimenting recently for tasty healthy dishes . This is one among them . Give it a try flocks . Recipe and picture courtacy prevention magazine .

Ingredients

Ingredients
Quantity
Chicken pieces8
chilli powder1 teaspoon
ginger garlic paste1 teaspoon
saltto taste
vinegar1/2 teaspoon
wheat bread crumbs2 cups
pepper powderto taste
chilli flakes1/2 teaspoon
cumin powder1 teaspoon
chopped coriander leaves1 tablespoon
olive oil spray

Method

  1. Marinate chicken pieces in chilli powder , ginger garlic paste , vinegar and salt to taste for 2 hours or more .
  2. Preheat oven to 230 degree Celsius . Mix wheat bread crumbs , pepper powder , chilli flakes , salt to taste , cumin powder and coriander leaves together and set aside .
  3. Dredge chicken in bread crumbs mixture , patting to coat all around . Line a shallow baking pan with foil paper and coat with olive oil .
  4. Arrange the chicken pieces in single layer over the greased foil . Coat the top of the chicken with olive oil spray .( just sprinkle a few drops of olive oil over in case you don’t have a oil spray ) bake for 20 minutes .
  5. Increase the heat to 400 degree Celsius and bake until golden brown and cooked through for another 10 to 15 minutes longer .
  6. Serve hot with salad , tomato ketchup .

Ginger Chicken

Share Button

ginger

Preparation Time : 30 minutes

Cooking Time : 12 to 15 minutes

Serving : 4 members

Description

A yummy not so spicy , light to the tummy Chinese style ginger chicken . Here in my hubby’s place in tirunelveli , we had very few Restaurants in the beginning when I was newly married . All the restaurants were not worth going and eating there as the ambiance was such . So when ever we want restaurant food it was ordered as take away and had at home . My hubby used to bring butter chicken and ginger chicken mostly for dinner as a surprise from a restaurant called chettinad . The ginger chicken was my favourite . It used to taste so yum . I tried it out at home as to my taste buds and wolla it was just like the one from chettinad restaurant . So no more ginger chicken from chettinad restaurant instead it’s made at home .foolish me should have had the restaurant ginger chicken itself , now it’s an added responsibility in my kitchen .

Ingredients

Ingredients
Quantity
Boneless chicken1/4 kg
egg whites2
Flour ( maida )4 tablespoons
cornflour4 table spoons + 1 teaspoon diluted in 1/4 cup water
white pepper powder1/4 teaspoon
saltto taste
ajinomoto2 pinches
green chillies2 crushed
garlic flake1 crushed
onion2 big cut into stripes
capsicum2 cut into stripes
oil4 tablespoons + to deep fry
ginger25 grams ground and strained to get 1/4 cup juice( do not add more than mentioned as the chicken might Taste to gingery )
green chilli sauce2 table spoons
vinegar1/4 teaspoon

Method

  1. Marinate cleaned chicken pieces in egg whites , maida , 4 tablespoons cornflour , white pepper powder , salt to taste and a pinch of ajinomoto along with little water if needed . Keep aside for one hour .
  2. Deep fry the chicken pieces in hot oil over medium heat to a light golden brown colour and crisp . Drain and set aside .
  3. Heat a wok with 4 tablespoons of oil . Add crushed garlic and green chillies , top with onions and capsicum .
  4. Saute for 4 minutes . Pour the ginger juice , green chilli sauce , vinegar , salt to taste and a pinch of ajinomoto . Mix well .
  5. Add one cup of water and bring to boil . Taste and adjust , add the fried chicken pieces and simmer for 2 minutes for all the flavours to infuse together .
  6. Pour the diluted corn flour over and bring to boil stirring constantly .to get a semi thick saucy running gravy coated over the chicken pieces . Add more water if wanted .
  7. Serve hot for lunch or dinner.

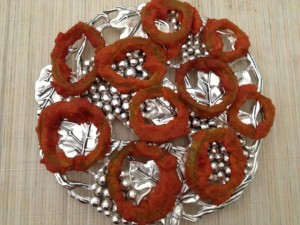
Snake gourd (Podalangkai ) Fry

Share Button

snake

Description

As a kid at home we were always fed a lot with Indian vegetables like brinjal , all types of potatoes , all types of gourds , Pumpkins etc . English vegetables like carrots , capsicum , green peas ect were rarely served as my dad didn’t like them much . But at boarding school most of our vegetables like carrots , beet roots , potatoes , green peas , cabbage were grown in school itself and we were fed a lot with the grown English vegetables . So my liking towards vegetables got balanced between Indian vegetables and English vegetables . This recipe of snake gourd  my mother – in – law and myself took note of from a regional satellite channel when the satellite channels were newly launched in India . Since the first try of this recipe it’s a regular dish at home.

Ingredients
Ingredients
Quantity
Snake gourd1 long one cleaned and cut into rings
tomato1 medium size (ground)
small onions3 (ground)
Ginger garlic paste1/4 teaspoon
rice flour3 tablespoons
chick pea flour1/2 cup
Maida 1 tablespoon
chilli powder1 teaspoon
thymol seeds ( ajwaan in Hindhi , omam in Tamil )1/4 teaspoon
saltto taste
red food coloura pinch
oilto deep fry
Method
  1. Mix ground tomato , ground small onions , ginger garlic paste , rice flour , chick pea flour , maida , chilli powder , salt , thymol seeds and red food colouring together .
  2. Mix well to get a smooth paste consistency by adding a little water . Taste and adjust .
  3. Add the round cut snake guard to the mixed paste and gently toss well so that the paste gets coated around the cut snake gourds.
  4. Set aside to marinate for 1 hour or more . Heat oil to deep fry in a kadai .
  5. Drop one round of snake guard at a time into the hot oil so that they dont stick together.
  6. Fry to crisp , drain and serve hot as a side dish for lunch or as a starter at parties for vegetarians .

Nutella Mug Cake

Share Button

nutella

Preparation Time : 5 minutes

Cooking Time : 2 1/2 to 3 minutes

Serving : 4 members

Description

I always strongly feel I lag behind when it comes to cakes .my confidence level when compared to other dishes I prepare is nil when it comes to cakes . So I just keep posponding experimenting with cakes . The guit of this cake issue does  haunt me very often . So finally for the past 2 days have been surfing a lot to get hold of an easy yummy cake to prepare . Came across  this recipe which is made in 2-3 minutes in the microwave . Gave a try and was so good that even  before I could take a picture my hubby gobbled it of . So I ended up taking a picture of the left over batter mug finally . Another interesting matter is last night Hamidha Shabeer sent me a message with the recipe and pictures saying she tried a chocolate mug cake asking me to post the recipe . What a coincidence , well great people think a like .

Ingredients

Ingredients
Quantity
Nutella

3 tablespoons
sugar3 tablespoons
oil3 tablespoons
maida  3 tablespoons
cocoa powder3 tablespoons ( I used 1 1/4 tablespoon as my cocoa powder was really rich ) 
egg1
Vanilla essencefew drops
baking powder 1/2 teaspoons
luck warm water 3-5 tablespoons optional ( I used 3 tablespoons as the consistency was to thick once mixed together . )
milk3 tablespoons

Method

  1. Beat egg , oil , vanilla essence  and milk together in a large bowl .
  2. Add the dry ingredients maida , sugar , cocoa powder and baking powder to the wet mixture .
  3. Whisk well till well combined . Make sure there are no lumps in the batter . Add Nutella and mix well till well combined .
  4. Add Luke  warm water one tablespoon at a time if the batter is too thick to get the right consistency .
  5. Pour the batter into microwave safe mugs and microwave for 2-3 minutes till done ( my cakes were ready in 2 minutes ) garnish with chocolate shavings or whipped cream .
  6. Serve right away . Best eaten when warm with vanilla flavoured ice cream .

Notes

Each microwave differs so better to check every one minute once if your cake is done . ( mine was done in 2 minutes )

Vegetarians can substitute egg with 3 tablespoons of think curd .


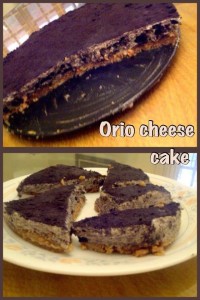
Oreo Cheese Cake

Share Button

oreo

Preparation Time : 30 minutes

Cooking Time : 40 to 50 minutes

Serving : 8 to 10 minutes

Description

A high calorie content dessert which can be had once in a blue moon .wonder why all the best tasteing foods are not good for health . Anything and every thing that is yummy to the tummy is so sin ful .i realised one thing that as growing older your resisting power toward food gets really bad . As a kid I used to hate desserts , sweets , eggs ( my nick name in school was egg , not sure why till date ) so on and so forth . But now there is nothing as I don’t like at all . Why , why why ? Gosh terrible time with my tongue to tummy . Guess its the same with most of us around . one , your taste buds must die or you should not know how to cook or be the worst fussiest person about food . i am none of what i mentioned so will have to deal with fact of being a great foodie .Recipe and picture courtesy Rehima Zenofer.

Ingredients

Ingredients
Quantity
Oreo biscuits20 +10 crushed in a blender to a smooth powder separately( 20 for base and 10 for the top )
melted butter 1/4 cup
cream cheese (8 ounce)3 packets softened
condensed milk1 tin
eggs3
lime juice1 tablespoon
vanilla essence2 teaspoons
Oreo biscuits8 broken to small bits

Method

  1. Preheat oven to 300 degree Fahrenheit ( 180 degree Celsius ) . Mix powdered 20 Oreo biscuits with the melted butter to get a crumbly coarse powder .
  2. Press it down firmly on a spring foam pan or a baking pan . Beat cream cheese , condensed milk , lime juice , vanilla essence , eggs dropped one at a time to get a smooth batter with the help of an electric egg beater .
  3. Fold in the broken Oreo biscuit bits . Pour the batter over the pressed Oreo biscuit base . Level the top .
  4. Bake for 40 to 50 minutes till done . Make sure the top does not crake . Cool to room temperature and chill in the refrigerator over night .
  5. Top the cheese cake with 10 powdered Oreo biscuits . Remove from spring foam . Cut into wedges and serve .

Shezwan chicken

Share Button

shezwan

Preparation Time : 20 minutes + 2 hours for marination

Cooking Time : 15 minutes

Serving : 6 members

Description

My brother and myself love Chinese food . We had a Chinese restaurent near our home in Coimbatore called Kowloon . Any opportunity we get to eat out we will make sure we end up there . What we order would be standard always . the shezwan chicken used to taste awesome . Once we had a get together at home with many guests coming over for dinner . We wanted to prepare a Chinese menu . My mom ( an over smart sofesticated lady by nature , my bro and myself don’t have that in us ) bribed the cook from the Kowloon restaurent and got him to cook the menu at home . I did take note of every thing the cook prepared and till date do follow it religiously . This recipe is also from the chef of Kowloon restaurent . I have another interesting story related to Kowloon restaurent . My brother in law nawaz is the same age as me . He did his collage in Coimbatore . My brother and my brother – in – law used to hang around a lot back then . Once they went to Kowloon restaurent restaurent for dinner . Finished dinner and paid the bill . As they were coming out of the restaurent , the waiter ran towards them and gave my brother – in – law a one rupee coin in hand . My brother not knowing what was happening stood blinking . My bother – in – law had kept a one rupee coin as a tip for the waiter .we have a great laugh over this incident till date .

Ingredients

Ingredients
Quantity
Boneless chicken cubed1/4 kg
cornflour1/4 cup
flour ( maida )1/4 cup
egg whites2
white pepper1/2 teaspoon
saltto taste
ajinomoto1 pinch + 1 pinch ( optional )
oil4 tablespoons + to deep fry
onions2 cubed
capsicum1 big cubed
ginger1 inch piece crushed
garlic3 flakes crushed
tomato sauce4 tablespoons
sweet chilli sauce2 teaspoons
light soya sauce1/2 teaspoon
vinegar1/2 teaspoon
sugar1/4 teaspoon
chilli flakes1 tablespoon
red chilli sauce1 teaspoon

Method

  1. Marinate cleaned chicken pieces in cornflour , flour , egg whites , white pepper , salt to taste and a pinch of ajinomoto for 2 hours .
  2. Deep fry the marinated chicken pieces in hot oil to a light golden brown . Drain and set aside .
  3. Heat 4 tablespoons of oil in a large wok . Add crushed garlic and ginger , fry for 1/2 a minute .
  4. Top with cubed onions and capsicum . Sauté for a minute .
  5. Lower the flame to medium and add all the other ingredients except for the fried chicken pieces . Mix well and bring to boil . Taste and adjust .
  6. The sauce should taste sweet , sour and hot . Add the fried chicken pieces and toss well for about 4 minutes allowing all the flavours and sauce to infuse into the chicken .
  7. Remove from heat and serve hot .